Jump to content
Posted

The truck I just got is on its 3rd alternator in a couple years according to previous owner, all have had diode failures causing the TC lock/unlock condition. Assuming that a quality high amp alternator is going to last longer than a over the counter replacement unit..


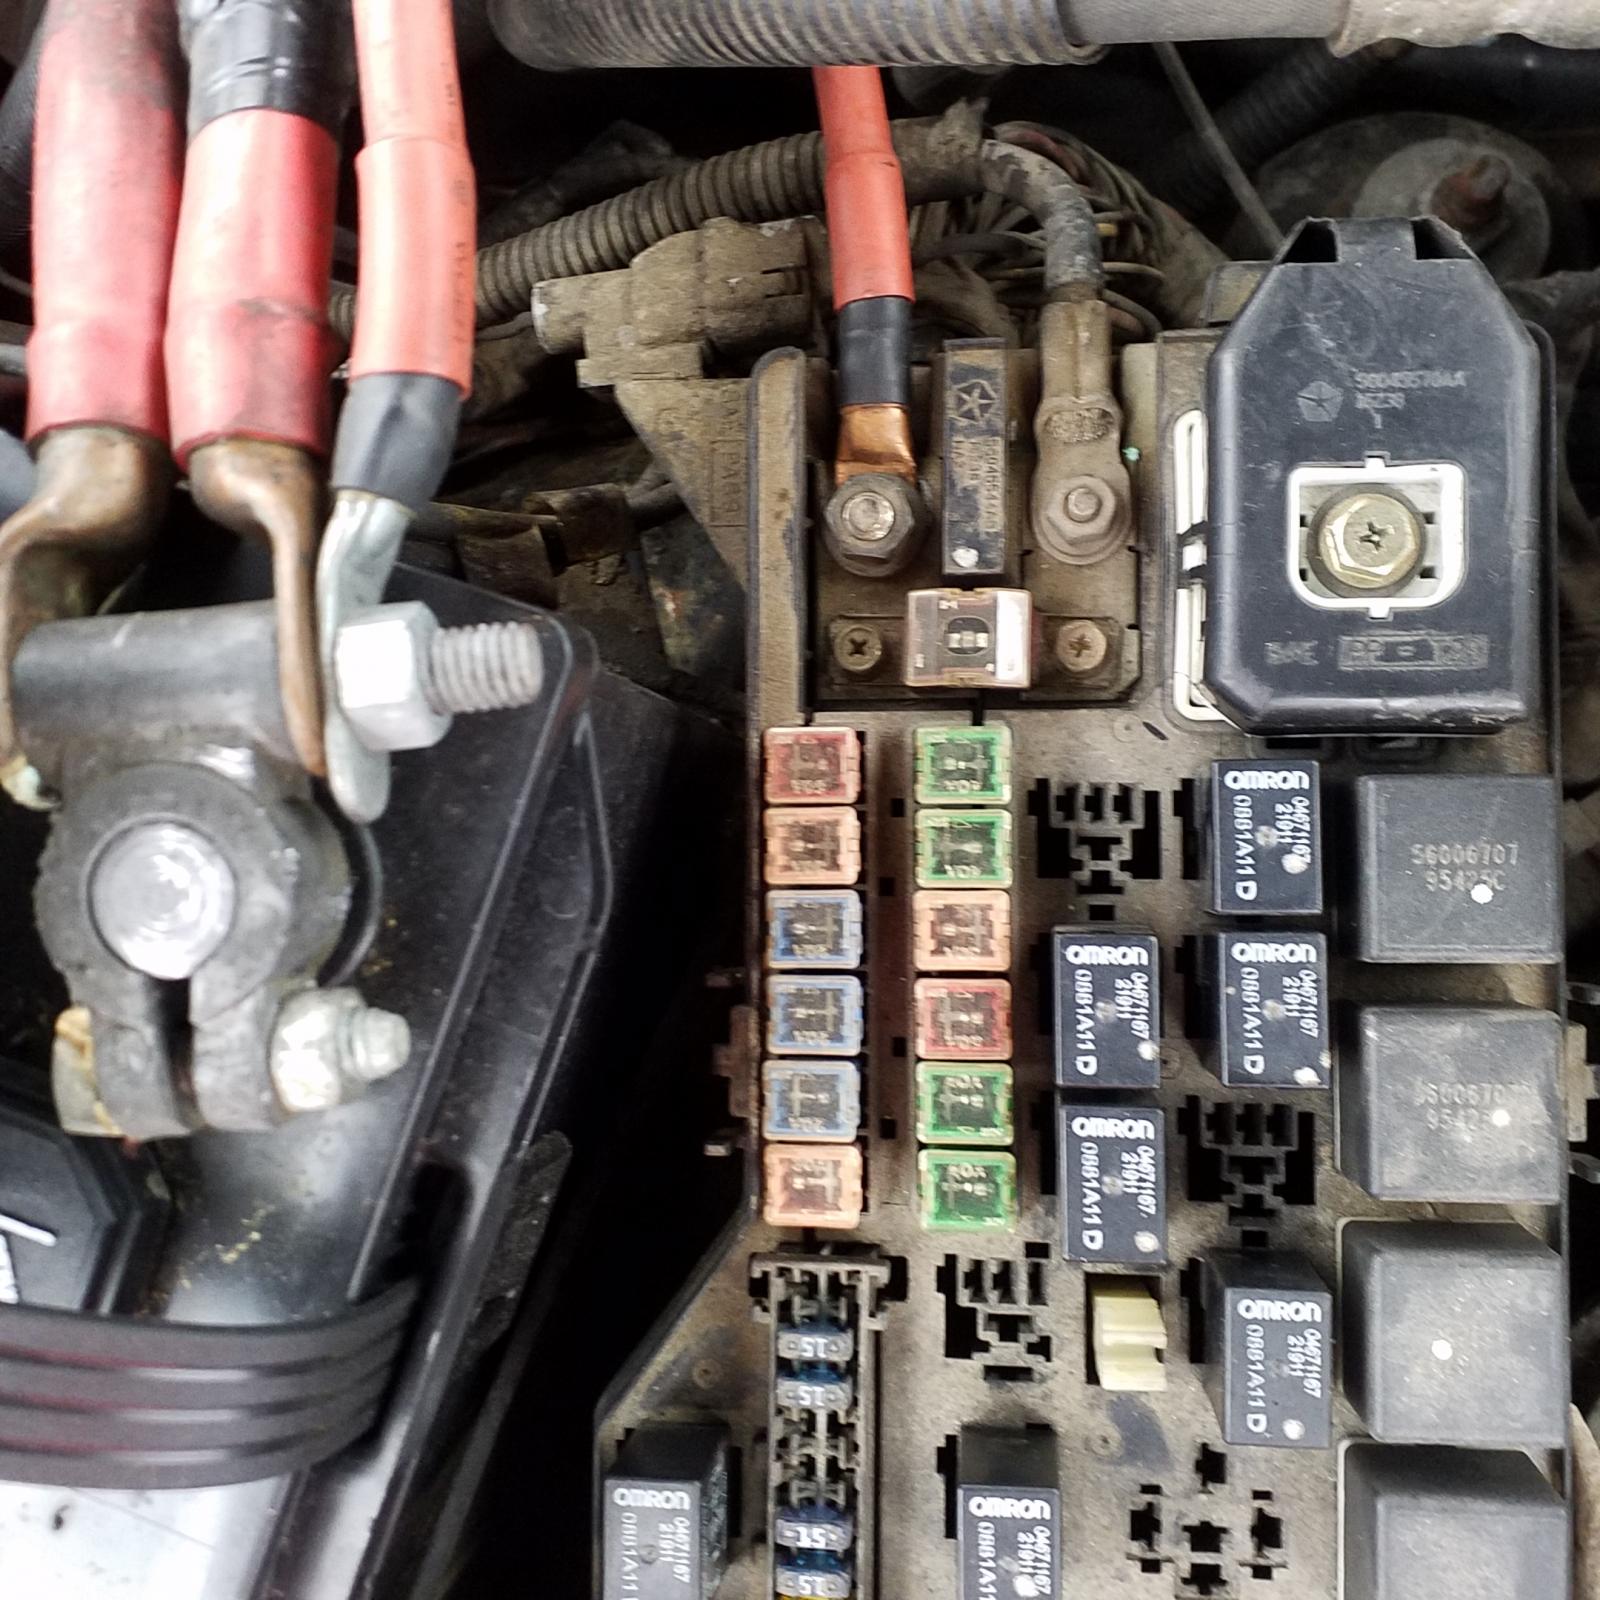
I was looking at nations alternators but the one for the 24v diesel looks to have a 2 pin plug on the back of it but mine has 2 ring terminal studs. Im new to dodge and cummins. What am I missing here? Does the 98 24v have one off parts or something??

  • Replies 217
  • Views 40.3k
  • Created
  • Last Reply

Top Posters In This Topic

Most Popular Posts

  • Mike is correct...the large current load on these 3 phase hairpin stators in conditions where all the available current is delivered does tax the design of the factory alternators. The diode's are all

  • I must admit there are many keen minds pondering this subject matter and I'm almost afraid to continue on this path but, nothing worth while is easy.   BTW...I'm still working so, when you n

  • @Dieselfuture Yes Sir, you are correct, multi pin weather-boot connectors should be dressed with Electronic Grade Silicon grease. It's a clean product and benefits small signal or low voltage contact

Posted Images

Featured Replies

Mike,


I don't think purely resistive loads "wear out".    They are either open (broken) or shorted.  They can lose their efficiency (ability for heat transfer) , but this comes more from contaminants on the outside of the elements.  (think of an electric water heater...  mineral deposits on the outside of the elements.  so a hot water heater has to run longer to bring the same amount of water to a temperature)   (it is interesting,  I will try and talk with an electrical engineer buddy, but could it begin to develop inductance over time, therefore not behaving purely resistive....)


Anyway, I think the place for "load"  to "change" in this system, would be the contacts in the grid heater relays themselves.  I can envision that the contacts become poorer and poorer over time (increasing the impedance (resistance)) causing the "grid heaters" to pull more amperage than normal.   IT is very tough to measure high DC amps easily.  (though some of the new clamp on claim to measure DC current, I have yet to play with one to see.)


I just had a grid heater relay failure, so I hope to update you guys with some pictures and better testing soon.


Hag

  • 2 weeks later...
  • Popular Post

I must admit there are many keen minds pondering this subject matter and I'm almost afraid to continue on this path but, nothing worth while is easy.


BTW...I'm still working so, when you note my absence or failure to respond, it is most likely that I'm out on the road. Yes, I have computer equipment but, it's all company issue and runs through the company servers in Minneapolis. I could dabble but, I prefer to be a low profile employee and keep my personal projects away from prying eyes in the office.


Just a short refresher regarding the test instruments we are all using: The VOM (volt/ohm meter) is a must have for any observations in the basic electronics realm. These devices vary in performance and cost to obtain as a required tool. Many inexpensive devices work quite well and if you have the budget for a Fluke product do so. We do not need the $400 dollar laboratory unit and I'm using a $39 dollar digital device that is ample for my needs. The Fluke platforms do something very well and that is the ability to read complex or dirty wave-forms and provide exceptionally accurate measurements. This is important when we take measurements on DC lines and have the ability to switch the unit to "AC" and observe small saw-tooth or ripple riding on the DC line and see the actual value or level. Not all of us have or need oscilloscopes but, this was a standard for determining "exact" levels of AC wave-forms "peak to peak" prior to these solid-state handheld multi-meters. Mike Nelson and JAG1 have Fluke 77's and I'm envious:clap:....but, I'll get by for now.


The reason I'm bringing this up is because for years Mike Nelson and Mike ONLY, was the first person I saw speaking of this subject matter on other web sites prior to the development of MoparMan1973.com and there are people out there today who recognize this issue and most "do know" it was MoparMan1973 who correctly identified the cause. I too was fooled for awhile and purchased "quick fix" filters and performed the "move the wires" out of the harness procedures touted by transmission rebuilding/performance facilities. No...I didn't fall into the "tin-foil" hat category but, almost...:doh:


I do recall a time when my 2001 CTD didn't have the torque converter "lock & unlock" syndrome and when it became obvious to me that something was wrong...it bugged me. So here we are today pursuing answers and I must fall back on my basic electronic foundation and share what I know.


Give me a moment...don't roll your eyes just yet...the subject of "ground" has been thrown around a great deal and I'm sure many are becoming tired of hearing about it but, let us look a little closer.


Our "VOM's" can only see down to .2 Ohms at best. Some VOM's may show absolute "zero" when you touch both test leads together but, I highly doubt these modest (but good) test meters can actually measure "zero" Ohms. Further more, when you touch both leads together and observe your digital display as 000.2 what you are seeing is true. The VOM's ability to "read it's own inherent DC resistance".... in diesel garage terms... the VOM is sniffing it's own butt.

This concept of understanding "your tool" is very important when we are searching for small level gremlins (DC resistance) that should not be present! The ability of a test instrument to measure extremely small levels of "pure DC resistance" has limits. Please note the term "pure resistance" is what we are talking about. The complex term "impedance" applies to complex AC wave-form angles and should not be used in this topic. Our trucks and DC power supplies are just straight DC resistance subjects and it's an easy path. I'll annoy all of you later and loose 90% of my readers if I were to go down the "impedance" path at this time.


So...is there a way to read extremely small resistance values? Yes...with a Wheatstone Bridge you could measure less than a hundredth of 1 Ohm or less. Hold on...NO, we do not need to measure anything at this level. Now...let me present another way of viewing this basic electronic aspect that we call "resistance". Resistance is measured in Ohms and when it comes to "DC ground" the least amount of resistance is highly desirable ! Resistance is "resistance to current" flow...it is an undesirable aspect in "ground". The opposite (or reciprocal) of the term " Ohm " is the " Mho" (like Moe of the Three Stooges) this term, is to describe the " quality " of "conductance or acceptance " in the DC circuit or...in our case a better or enhanced DC ground. Earlier in this thread I believe we covered "electron" flow and this IS the conductive path we wish to correct.


The factory alternator has been removed for this part of the presentation.


The mount for the alternator is a magnificent piece of shaped steel ! This is the typical 2nd Gen structure and certainly has physical prowess. It also has a  beautiful hardened black implement enamel paint job, from factory production.        

IMG_0202.JPG.c43370861fff6b2d6b512f5e3abe08b5.JPG

The Cummins staff certainly know how to mount a peripheral component with no physical compromise.

Removing the high grade quality bolts began to show a possible electrical continuity issue....

I noted the minor rust signature deposited on the heavy black paint of this mounting plate. (poor conductive surface)


I was alarmed when I extracted this "pivot through" bolt and observed pronounced electrolysis evidence at the threads. Note, the painted rust contaminated surface where this bolt terminated. Very large Ohms and very few Mhos :(  

IMG_0206.JPG.87768106647853610c022cfefc0db160.JPG

The entire BODY of the alternator is Negative and MUST BE AT SOLID GROUND !

Upon removal of the mounting bracket...I became fully aware of the complete lack of DC continuity to ground.

IMG_0207.JPG.b90082e595054456762535a9e73b48f7.JPGThis view exposes the flat pivot-plate attached to the "hoist" head plate.

IMG_0208.JPG.2a99ed51afbe2e2286e5832935ffdaa5.JPGNote the skirted bolts mounting this plate...the skirts are kissing paint !


With the bolts removed you can observe the unbroken paint divots where the bolt skirts kissed the surface. 

 IMG_0209.JPG.a4d4923a8e2c700e2ca7a7aa501dd1e9.JPGThis view allows a clean view of "immaculate" bolt holes ! Wow someone knew electrical integrity was required here !

IMG_0210.JPG.6cfc9f52bf8a7a84a838d0d95027317f.JPGThis clean bolt-hole appearance and the embossed "feet" of the cast pivot-mount, mating to this "hoist-plate" with "paint in tact" tells me the Daimler/Chrysler assembly line and pre-production crew lacked critical detailed information as to the reasoning of these cast and machined components in regard to electrical continuity.


This next photo in hand is the pivot-plate...let me set it on the bench for a "rear-shot" photo of the protruding "feet".IMG_0211.JPG.0962d9837d83193bd7970c5c2fc9a3c0.JPGAgain...beautiful protective paint application on this cast piece. :wink:


Now...for the rear shot to observe the "protruding" feet that are precision "milled" to flat mount against the "hoist" plate.IMG_0215.JPG.45349a6c54174c90f576254892a64d5d.JPGNote, the "milled" surface of these protruding feet snugly kiss the painted ( non surface prepared) "hoist" plate when mounted in place.

This photo is the "two" structures that carry the full current (130+ Amps) at the "integrity" of Ground Reference !!!IMG_0214.JPG.d4b5f0eca024b5ed6d4b9a0879a206a1.JPGThis is so disappointing to observe the "overlooked" aspects of electrical integrity...is it built well?... Oh Heck Yeah ! But, it doesn't have electrical properties...it has tremendous resistance ! The "body" of the alternator is "floating" above true ground !!!

In any power supply, where the primary AC energy wave form is to be rectified (converted to DC) in a full wave bridge, the cathodes of the diodes MUST be at full chassis reference ground. Lifting a single diode's cathode or the entire bridge above true ground reference will induce large "ripple" currents. This disassembly procedure and individual examination at each contact point reveals extreme galvanic action created by the alternators ability to generate 130 plus Amps at 13.8 volts and more. 


Let's do the math on this...basic Ohms Law for Power is: P=E*I or Power equals voltage times current.


14 volts x 135 amps = 1,890 Watts .... impressive power generation and again the "bolts" and "mounting plates" are passing this electron flow when the alternator is spinning and there is a demand for this amount of current. When does this happen? Every time you start your engine and in the winter time, let's bring "grid" cycling into this equation. This poor little alternator is screaming it's guts out quite often. I neglected to mention heater/blower, heated seats ( I love mine :cool:) windshield wipers, stereo sound system, headlights, running/fog lights....I left wench out because you should have your butt out of the vehicle if your using that device. 


Oh...hold on...this is going to get worse ! :sick:


This next photo is a "review" of previous information regarding the VOM. Please note at the bottom of the photo you can see the two test-probes touching. 

IMG_0220.JPG.c4bd6ea40476ecf2bc1c0ececebd1b72.JPG

  This modest VOM floats between 000.2 and 000.1 Ohms in the "test" with both leads contacting one another.


Again this Dodge was produced with some excellent components and physical integrity is not to be questioned. Even the selection of Grade 8 bolts and WOW !!! The brute force hooligans elected to provide black anodized coating to prevent rust and contribute to extreme longevity! Now that is so very cool ! NOT!!!


Oh...hold on...anodized surfaces in the industrial world are great for rust resistance however; it now renders the treated component Non Conductive. I would like to know who the Einstein was who made this decision :doh:

Check my probes out !  (I did not load this photo sideways) 

 IMG_0219.JPG.4b24e219e2e53ed10c6da269e008ad8f.JPG

    Note, the surface of the bolt was wiped clean and the test-probes are just sitting on the anodized surface. As you can see the display shows OL over-limit and this bolt is acting like a non conductive piece of dry wood. Nice !


Surface preparation is required on all assembly components and bracket surfaces. This was never done at the assembly plant and the "almost, kind of conductive paths" that "kind of sort of maybe worked a little bit" to get this Iron sold and off the car lot inventories and into the buyers hands....was just enough electrical integrity to do so. Afterwards the conductive aspects began to deteriorate....some were in the shop right away...some took years. 


Lets do the right thing...after all "we are building" our power supplies!


Please see the next photo and NOTE, all surface preparation is done with BRASS wheels and Brass brushes. Never use steel wire wheels on dedicated conductive surfaces or assembly hardware. Using Brass is "magic" and during the procedure the molecular aspects of Brass will transfer to the steel surface and enhance electrical pathway properties. Steel is not a great conductor...yes it works but, we can't get physical strength from pure copper, silver is even better but, that's way expensive and Gold would be ludicrous...hey...check out my Gold alternator bracket... ain't I cool :whistle:

Use what ever it takes to remove paint but, once down to bare metal...treat it sweetly...a smooth clean, shinny, surface conducts best especially if you massage the steel with Brass.

Look how my bolt passes current now !

IMG_0221.JPG.438967b41a3cb4bd2253f1c2f35b5a9a.JPGNote, the contacting surfaces of this bolt including the "backside" of the skirt will make contact with the flat prepared surface of the alternator mounting bracket. The meter is floating between .3 and .4 Ohms but, pressing down on the probes with only slight physical force the meter will drop to .2 Ohms, simulating the "tighten'" into place during the alternator mounting procedure. 


Golly...this whole procedure is getting pretty sexy...and it's being done just to attract "electron flow"....or enhance electron flow that was never there to begin with...I think we had best start thinking about personal lubrication :hug:


From here forward on heavy duty contact points and assemblies that carry "high current" electron flow... this will be the lube!

IMG_0216.JPG.17076989a1816db064f1f3d43854bd06.JPGI keep this in the night stand on my side of the bed.

The small tube is my traveling companion...you never know when you'll have a wild connection that needs taming 

IMG_0217.JPG.f8a15581dff5b470f3890e841b79528e.JPGThis lube is tenacious and stays put....it penetrates and promotes strong current paths....and maintains a cool connection. You do know my truck's name is Betty...Betty Boop,,,, and she just loves this. :cheerleader:


Surface preparation on the alternator bracket is featured here.IMG_0222.JPG.f9ee3621169109f5d1353e620b0fe142.JPG  This was slow careful work as I wish to maintain the factory appearance and avoid running a separate ground cable...that would suffice for a ground but, Betty wouldn't allow that.:umno:  

This photo depicts the method of removing non-conductive paint from "bolt holes" and YES...I'm using one of my brushes from the gun-cleaning kit. It is "Brass" and does a nice job of preparing the threaded hole.

IMG_0226.JPG.972d231486b714d1719113516058f704.JPGThis was quick work with the drill driver.

IMG_0227.JPG.ffa22d93cda5a899d12930885ecda65b.JPGThis was also performed on the "clean bolt holes" at the "hoist plate" location. 

I tried to get the light and contrast to reveal how well this brass brush prepared the threaded bolt holes.IMG_0228.JPG.fed64c87ffcbf022e685f6e33ffa458b.JPGThis alternator mounting bracket and the related bolts for assembly will certainly have corrected continuity for the new war-head installation. ( DC Power Engineering XP270 will be produce 200 Amps at idle when needed)


Each bolt and flat-mating surface during the assembly will be dressed with OX-Guard. The product is common and available at any hardware store. It is the ONLY thing to use in this regard. Electronic Grade Silicon Grease is for highly sensitive electronics and weather-pack connectors where additional moisture incursion prevention is required. In high current situations such as this alternator subject, OX-Guard is superior. I use Q-Tips to apply this mascara in precision methods and avoid messes...once done...nobody knows she's all lubed up.:whistle: 


There is so much more to address...please allow me some time and I'll complete this project. I know there will be questions...and I haven't really done anything yet. Well yeah...let's correct some errors and perhaps save some money and avoid another alternator...a real ground eliminates ripple.


I'm going to get some sleep...Cheers


IMG_0205.JPG

Another awesome article, thank you.

I did notice some galvanic corrosion on my bracket last time I had alternator removed. I cleaned everything and used dielectric grease which is probably not the best choice when you trying to make connection better not worse. That brings another question, this ox-gard used for electrical connections, is it conductive or non-conductive, because if it's conductive you would only want to use it on a single connection not a multi plug. My intention with dielectric grease is to tip corrosion away, and if the surface is clean it will still make a great contact. Just thinking out loud here.

  • Popular Post

@Dieselfuture Yes Sir, you are correct, multi pin weather-boot connectors should be dressed with Electronic Grade Silicon grease. It's a clean product and benefits small signal or low voltage contact points and your thoughts along corrosion prevention is spot on. The OX-Guard product commonly used in construction and house wiring especially where dissimilar wire/contact occurs. Examining OX-Guard in bright sunlight reveals a glistening shimmer in the grease structure. I would assume there is a conductive compound embedded in the "grease vehicle" and in a "connection" scenario of tightening a wire-nut, this would aid in promoting a conductive pathway. This is especially important in a "high current" path way where a poor connection would actually become "hot" due to undesired resistance. OX-Guard is only one compound that would serve well and I know there are other commercial products available, No-Lox comes to mind.


Your observation of galvanic action at a contact point is direct evidence of a "hot spot" and your actions show excellent disciplines. These "power supplies" in our CTD's are very serious in nature...when we swing 14 Volts at 130 Amps, this is nearly a 2 Kilowatt arc welder in action. It is to be taken seriously with great respect.         

  • Staff

i'm pointing at a great sticky article up there:thumb1: Thank you W-T.


In talking with W-T on the phone last Thursday, I think there is a whole other aspect that is related to our Lift Pumps from Raptor/ Air Dog. Just have to wait till he gets some rest for the next chapter.


:popcorn:

Edited by JAG1

On ‎1‎/‎20‎/‎2018 at 5:25 AM, Mopar1973Man said:

But I still have a hard time thinking back why did my truck run fine for over 10 years and never replace an alternator in 10 years? Something has changed... That's the problem I can't prove the load issue on the grid heater right at this moment nor the diode overheat issue.


I have also wondered why I have not experienced some of the electrical problems that many others have.  I bought my truck new and right away I put the grid heaters on a manual control switch.  I very rarely use the heaters.  And, like you, my alternator (a Bosch) has never given me trouble.  I replaced brushes and bearings (only for maintenance, the alternator was working fine) three years ago at 216,000 miles.  I am currently at 285,000 miles and the alternator passes your AC voltage test.  I never tested for AC output until I came across your website and I will be keeping a close eye from now on.


- John

  • Staff

Mopar Man mentioned this in a phone conversation saying that deterioration of the relays or grids, when our trucks get a bit older, causing excessive amperage draw are two possible reasons the alternator diodes start getting hot and burning. Now we know about a further combined effect from poor grounding of the alternator.


Another concern I have is the 4 sensor ground wires connected by only heat shrink tubing with the wires just laying on a main ground wire inside the harness right in front of the injection pump. There are no crimped connectors other than the 4 wires being squeezed by shrink tubing.


See pics on Turbo Diesel Register forum under Second Gen Engine and Transmission. Thread topic is,'' 1999 3500 w/ TC Lock Unlock Problem''. Look at posts 11-15. Mopar Man says no big deal but it did solve this guys transmission hunting even after 25,000 miles.


Sorry, I tried to do  a link but didn't work.

Edited by JAG1

@JAG1 Good catch on additional information. After speaking with you on the phone today I believe we both started looking at this. Yes...Turbo Diesel Register member AKGriz has a 1999 3500 and his info is valid however; The production changed and my photo shows a little different evidence.IMG_0231.JPG.804f913513a7e705e4ab20abd4071b81.JPGThis is my "2001" CTD and it appears after two years, the assembly procedure depicts full shrink-tubing and note.... the sealed ends.


I'm not giving this a pass and I'm going to surgically open this up and inspect the wire to wire splice. Done correctly all four wires should be soldered to the #8 black/tan stripe that comes out of this large harness way over on the passenger side. 


Guys...I'm so sorry to become side tracked with additional issues and observations but, WHY in the world would an Engineer run nearly 38 inches of wire across the front of the engine, terminate this single #8 into a connector on the battery box, pick up this connection with a mated-connector that is another "splice" at the negative terminal of the passenger side battery and the "spliced" connector is then mated to an additional run of #10 that is a dedicated ground at the PCU ???  I'm astonished to see this. :doh:


The four black wires...3 are #18 Gage... 1 is #14 Gage all are black with a lite Tan or off white stripe.IMG_0232.JPG.130497130586f13261906ed62766e4ce.JPGSorry...fuzzy...I'm using a small wrench to display the single #14 wire...the other three are #18 Gage.

Here is the #8 Gage with the first set of connectors at the battery tray.IMG_0233.JPG.6d6d67000225e5feb68de502a7adb9c0.JPGNice connectors but, this IS an additional maintenance point in the ground system.


Here is the two #8 Gage wires "spliced" to a single "negative terminal" battery connector.IMG_0234.JPG.8a6cba5a5e04a944c7edcc610b9679e7.JPGNice factory job...and this IS connected directly to the negative post connector/battery.


Then...here is the #8 Gage connector engaging the final run of of #10 Gage to the PCU. IMG_0235.JPG.dd03e7c76b8f39a99cdc4a7e7089f94b.JPGThree connectors all dedicated as The PCU Master Ground and the final run of 20 inches is dropped to #10 at the mating connector. I guess is was budget :doh:


Here is how I am going to do it.


1) I am removing the #6 Gage alternator B+ line from the large harness entirely.


2) The four grounds on the drivers side of the engine will terminate at the negative terminal of the drivers side battery directly. 


3) One, and ONLY one #4 will be run from the negative terminal of the drivers side over the radiator and terminated directly at the negative terminal of the passenger side battery.


4) I will use the clean #8 Gage scrap and run directly from the PCU to the negative terminal on the passenger side.


My method has superior integrity, additional "Mho's by using #4 to directly tie both negative terminals of the batteries. Directly bring the integrity of the PCU's ground without the use of connectors and cleanup the appearance of the entire spaghetti-mess of a very poorly thought out grounding system. (who did this?)


5) The new alternator (XP-270 DC Power Engineering, of Riverside Ca) will have the B+ delivered directly to the passenger side positive terminal via #4 Gage silver welding cable with a total length of approximately 23 inches. The factory #0 Gage from the passenger to the drivers side has excellent "current squared/resistance loss" characteristics and will allow this DC presentation to be a true lossless  "parallel" system.


6) The B+ DC to the PDC will remain with the factory #6 Gage and allow the factory 140 Amp fuse to remain as a "master fuse" for the fed system.


This new "Large Frame 270 Amp alternator, 6 Phase" device could NOT be bolted in place for service with the factory B+ configuration.


Also, with the factory B+ line and the "PCU Ground" lines having been removed from the large flexible conduit at the front of the engine...this is now reduced in size considerably and will now be just "sensor feeds" in a much smaller flex-conduit configuration.


I do believe I will have alleviated the TQ converter "lock and unlock" syndrom and I can remove my tin-foil hat.


The 270 XP key points: 6 Phase, Large CNC machined housing, Square-wire wound stator with no overlap, 200 amps at true idle. IMG_0236.JPG.6d95f112b29229ec59b5bfd08e9a8d9f.JPGThe finish work is excellentIMG_0237.JPG.ea6a3985a9536f7320c198de66438411.JPGHair pins are epoxy dippedIMG_0238.JPG.b90c643b476f8f10906e99d25384cf1b.JPGclose up viewIMG_0239.JPG.636f91ec627de1b37346730f4b3e4104.JPG12 diodes 6 Phase and high performance alloyed heat sink.


When the installation is complete I'll provide engine bay photos.       


Edited by W-T
spelling

How much fab work is needed to mount that alternator? The thing looks impressive, but then I saw the price tag! :spend:


Also, how the F did you get and keep

your engine bay so clean?!?

  • Owner

Something that might be interesting. 


2002-Dodge-Wiring-Pg3.jpg


You can clearly see the ECM and VP44 ground in this diagram but take notice where the grid heater solenoid ground and PDC grounds come together. Now I know @W-T knows that when a solenoid is de-energized there a surge that comes from the solenoids. This is most likely feedback on the grounds that feed the ECM and VP44 being it's the same G115 ground. Again the G115 ground feeding the PCM as well.


2002-Dodge-Wiring-Pg1.jpg

@W-T after reading what is the difference between the company 270 from DC compared to the XP 250 from Nations?  Besides the obvious 20 amp output difference.

Oh you didn't like the 3 grounds on the passenger side that when I did my upgrade I streamlined it a bit.

I opted out of removing the positive from the alternator because I gathered that to also be the PCM voltage regulator signal wire am I wrong how will the DC power be regulated?

I added extra charge wire with new fuse to handle extra output

Also I forgot to mention check your engine grounds the block is painted and the bolted the ground and lug to the painted surface of my block, I cleaned to bare metal installed star washer bolt and grease on top, same for chassis ground on frame rail the bolt in there is likely to be completely coated in rust....  

Good point on alternator bracket that explains why my added ground on the bracket is getting some corrosion

Edited by WiscoRedkneck

7 hours ago, notlimah said:

How much fab work is needed to mount that alternator? The thing looks impressive, but then I saw the price tag! :spend:


Also, how the F did you get and keep

your engine bay so clean?!?

@notlimah...The 270 XP is large Frame to accept the robust Stator and companion 6 Phase rotor within the embodiment however; the CNC design engineer compiled the dimensions required and produced the platform to bolt directly into place with ZERO changes to the factory geometry for mounting.


It's amazing what these 3D prototype printers are able to do today in creating a mock-up of a structure and be able to "expand" the dimensions within a target zone. Once done they feed the data into a CNC data logger and "mill-out" a solid metallic body from a billet piece. My company also produces assembly chassis's for our widgets and to observer the process is amazing.


Clean...well I'm really anal and I do "doodle" under the hood with little rags and a squirt of oil. I approach maintenance clean-up the same way I clean weapons. I purchased this CTD new in 2001. The day I took delivery in Billings Montana at Billings Dodge I was out in the lot with the hood up. It was a blasted thunderstorm as the sales staff stood inside and watched the idiot (me) in the rain place fine mesh screen in front of the radiator/condenser-cooling structures to prevent bugs from plugging holes in the cooling units. I drove home and immediately removed that stupid puke bottle from the front of the engine and ran a "road-draft" tube straight down. There has never been an "oily shower mist" encapsulating the entire engine-bay compartment. That "blow-by" fog-syndrome poops all over everything including the cowl-seal where the hood meets the upper mantel of the firewall. This exit precisely deposits "oily film" on the front windshield and creates a never ending battle during rain events. It's also a constant visual detraction as I pilot this 7000 Lb device down the road...I really dislike a murky view through the front windshield. Most people who view this machine are astounded to find that it IS 17 years old with 154,000 miles on it. Yes...I'm a real A-hole  :cool: ... at the local car shows...they let me in for free just because this thing is full-on-goon stupid ! I put mirrors under it at the shows to expose the extreme efforts to detail.


BTW...Thank You. 

2 hours ago, Mopar1973Man said:

Something that might be interesting. 


2002-Dodge-Wiring-Pg3.jpg


You can clearly see the ECM and VP44 ground in this diagram but take notice where the grid heater solenoid ground and PDC grounds come together. Now I know @W-T knows that when a solenoid is de-energized there a surge that comes from the solenoids. This is most likely feedback on the grounds that feed the ECM and VP44 being it's the same G115 ground. Again the G115 ground feeding the PCM as well.


Again, Mike Nelson has a keen eye and has been pouring over this schematic for years...YOU are very right and it appears there is NO "back pulse EMF" protection on the Grid Heater relays. Boy...where is @IBMobileat this time ? He has documented several times on the procedure and merit of such disciplines...it is standard protocol in all electronic design to prevent transients from collapsing field-coil inductive currents.CoilDiode.png.d9dfc008292c797a58ba2a47a81b61b7.pngThis is a generic example of what is at hand.

Any time a DC current passes through a coil of wire there is an expansion of electromagnetic energy surround the coil.

Diodenotconduct.jpg.6e00489cada50e395945c562ce36232d.jpgThis is a normal property of a coil.

Now...the problem ocures when the current is turned off. The electromagnetic field collapses back into the coil itself and creates a strong "back-pulse" of "opposite" polarity ! 


Remember, the exciting current is most likely 12 volts in potential however; depending on the "size" of the coil ( how many turns) or how many microhenries , this will determine how strong the potential of the collapsing electromagnet force. In simple terms...if you excite a coil at 12 volts, the collapsing force (back-EMF) will be MUCH larger in reverse polarity. The 12 volts input to the coil now becomes a 50 volt back-fart into your control device. This rouge reverse current will damage sensitive solid state devices and perhaps make your speedometer bounce wildly for just a moment as the field collapse dissipates.  


To prove this to your self, go find a relay...apply 9 volts from a transistor radio battery to the coil. You will hear the relay close (or operate) NOW...wet your finger and place it across the contacts where your 9 volt transistor battery is hooked up. Now disconnect the 9 volts while keeping your wet finger on the coil contacts....:wink: Yeah Baby...can you hear me now!


Ok...so this is another electronics 101... @Mopar1973Man has again located and identified an additional "danger" aspect in our CTD's...good eyes Mike ! With this small presentation...let's go fix this and prevent back-EMF damage.

1 hour ago, WiscoRedkneck said:

@W-T after reading what is the difference between the company 270 from DC compared to the XP 250 from Nations?  Besides the obvious 20 amp output difference.

Oh you didn't like the 3 grounds on the passenger side that when I did my upgrade I streamlined it a bit.

I opted out of removing the positive from the alternator because I gathered that to also be the PCM voltage regulator signal wire am I wrong how will the DC power be regulated?

The DC Power Engineering company out of Riverside California produces their own products from scratch. Many other companies produce higher current devices all within the same frame of an original platform. Custom  stator  and  rotor combinations will produce additional heat during operation and with the lack of "mass" and better internal cooling fans there could be a longevity issue.


Also...note "square-wire" symmetry wound stators with no overlap on the field coils are superior transformer coils. The sinusoidal electromagnet fields cut the stator wires and induce currents at a much enhanced efficiency. 


Also....Note the "true Idle" spec's on these units...if the supplier tells you a new serpentine belt of a slightly longer length is required...spinning a small shaft at a much higher speed reveals a design difference.


The DC Power Engineering design allows you to drop the alternator into place. The 270 XP does 305 Amps at redline...it's speck'ed at 270 normal run and reduced to 250 at above normal temperatures. It will produce 200 at idle with our 5.9's...gosh the Grid Heaters on a twenty degree morning...you won't see the headlights dim anymore. These beasts are bad to the bone ! You had best be sure your DC integrity is top notch...this thing will melt your truck ! :thumbup2:

Good to know I redid all my cables recently and thought I was doing a good thing by putting a bigger alternator in there now I am thinking I wasted my money at least I bought the cheap one...  I'm sure after 340k miles the alternator was toasted anyways. BTW great information thanks 

2 hours ago, WiscoRedkneck said:

added extra charge wire with new fuse to handle extra output

Also I forgot to mention check your engine grounds the block is painted and the bolted the ground and lug to the painted surface of my block, I cleaned to bare metal installed star washer bolt and grease on top, same for chassis ground on frame rail the bolt in there is likely to be completely coated in rust....  

Good point on alternator bracket that explains why my added ground on the bracket is getting some corrosion

The extra B+ charge line is very good. As a parallel lead this will help lower the resistance of the factory #6 in the system. Now as for the 140 Amp fuse in the PDC...that fuse is for the entire system and there is no accumulation of more than a 140 amp demand. The engineer that selected this also knew they were providing an alternator that can only provide 130 Amps so,the method they chose is fine. Now if you upgrade current supply and you feed that factory input at the PDC as designed you will defeat the design of the new power supply generating device. Hence, when you have the Grid Heater trigger demand the grunt of the new power supply (big honkin alternator) will blow your 140 Amp fuse because it is in series with the drivers side battery. The drivers side battery directly feed the Grid Heater relays...these relays are controlled but, the raw DC current at the relay contacts are directly from the battery. This system only replenishes the battery after the head-charge has been ripped off by the starter action and the continued demand of the Grid Heaters are now taxing the original design. With an upgraded "monster device" generating current your batteries are no longer being swamped and the alternator has less work to do in a shorter period of time.


Better grounds by every method is BETTER ! :wink:

  • Owner

The reason why the 140 Amp fuse was installed is for the stupid people that would manage to hook up a set of jumper cables reversed polarity and attempt to cook the diodes out of the alternator. Which the would be a dead short and the fuse would blow out automatically. 

Oh Gosh...your right...I forgot about the "Bafoonery" factor !:doh:

  • Staff

I copied down the wire mods your doing So I have a reference while under the hood.  Going to make a run down to the marine supply for wire. 


Do you know of any butt connectors that don't have the plastic sleeve over the top and are perforated to accept solder after crimping. Suppose I could crimp a short piece of copper to hold while soldering.

Also my soldering gun is only 125 watts... acts like it will only heat hair size wire as I tried holding on there and did not do anything.


Man I love that alternator... like a real piece of honest equipment. From my reading I knew not to fall for a lot of them with all the claims.


One final question... would it help at all by running a wire from the Lift pump housing to ground?

Edited by JAG1

6 minutes ago, JAG1 said:

I copied down the wire mods your doing So I have a reference while under the hood.  Going to make a run down to the marine supply for wire. 


Do you know of any butt connectors that don't have the plastic sleeve over the top and are perforated to accept solder after crimping. Suppose I could crimp a short piece of copper to hold while soldering.

Also my soldering gun is only 125 watts... acts like it will only heat hair size wire as I tried holding on there and did not do anything.


Man I love that alternator... like a real piece of honest equipment. From my reading I knew not to fall for a lot of them with all the claims.


One final question... would it help at all by running a wire from the Lift pump housing to ground?

Good Morning @JAG1hey brother don't bother with connectors...if you can work directly at the point of connection just solder them and shrink wrap each connection. A large piece of shrink to encapsulate your surgery when complete will suffice nicely. Boy...you started this and a good deed never goes unpunished ! I'm glad you found all of this and YES...it snowballed but, finding all of this will return good measure. With @Mopar1973Manlooking into the discreet components at the control level perhaps the full circle will prevent these catastrophic failures we have all seen over the years. There is back-EMF in several key locations and in time this can prove to be harmful. Now if @IBMobile would chime in and bless our findings and procedures perhaps I could view the Super Bowl in good graces.


Oh...your soldering gun...break the little nuts loose that hold the "hair-pin" element to the posts and re-tighten ...you have debris at the connection and it's preventing current flow.


Cheers...I'm going back out to the lab and continue the saga 

  • Staff

Thanks w-t. and thank you too. IBM mobile as you say, is one smart guy... just don't ever sass him back at camp or you'll find out just how smart. You'll reget it the rest of your vacation. he he.


Its just I have a difficult time holding two wires together while waiting for enough heat to flow with the solder. 


On Edit; I could tie the two together using some ss grizzly hair size wire I found on a job.:thumb1:


I hate making a beautiful connection and realize I forgot the dang shrink tube :doh:

Edited by JAG1