Tractorman
Yearly Subscription
-
Joined
-
Last visited
Everything posted by Tractorman
-
I am currently approaching 294,000 miles on the original clutch and transmission with lots of towing over its life. The last 45,000 miles have been with a Smarty programmer set on Software 5. I don't have coolers on the transmission (someday I will), but I overfill by one quart. If you make an effort to match road speed to engine rpm during shifts (up and down), you can make a transmission and a clutch last for a very long time. Enjoy the truck! - John
-
For awhile I thought you were going to have to change your slogan to "Truckless for the first time FOR a decade". - John
-
When I quit calling my truck a dog, it started behaving much better. First, can you confirm that it is the brake light (not the taillight) that is staying on? The two circuits share the same bulb (but different filaments) in the rear of the truck. Also, is the problem light illuminated at full brightness when this occurs? The turn signal switch (mulit-function switch) and the emergency flashers are also a source of power to the brake lights and the both circuits share the same filament in the dual filament bulb. You might try removing the emergency flasher fuse to see if that changes the symptoms. The brake fuse and emergency flasher fuse are supplied with unswitched power, and the turn signal circuit fuse is supplied with switched power. - John
-
If the clutch engagement is reliably at about half pedal during all driving conditions, this would indicate that the clutch is operating as it should. If the pilot bearing is dragging and forcing the transmission input shaft to rotate when the clutch pedal is depressed, it will be hard to select a gear from neutral with the engine running and the vehicle stopped. Here is a way to test for a dragging pilot bearing. After driving the truck for a few minutes and when your hard-shifting symptoms are showing, drive the tuck to a safe parking place. Set the park brake, shift the transmission to neutral and leave the engine running. Do the following sequence several times: 1. Depress the clutch pedal and wait for about 3 seconds (this will give time for the mass of the transmission input shaft and countershaft to come to a stop). 2. Leaving the transmission in neutral, release the clutch pedal fairly quickly ( you should hear the engine slightly load when the clutch engages the transmission input shaft) Note approximate pedal position when you hear the engine slightly load. If you do detect the engine loading during this process, then the pilot bearing is doing its job by allowing the transmission input shaft to stop rotating. If you do NOT detect the engine loading during this process, then friction from pilot bearing is latching onto the transmission input shaft and not allowing the input shaft to stop rotating. Some other things that can contribute to hard shifting while driving. * wrong type of oil in transmission * not matching road speed to engine rpm during shifting * low oil level in transmission - John
-
I agree. It was partly for this reason, and also to gain the option of having two wheel drive in low range, that I disconnected the vacuum controls at the transfer case and installed a manual vacuum control valve in the cab to engage the CAD. When roads are expected to be snowpacked, I will engage the CAD before I move the truck so that I can go in and out of 4wd on the fly as needed without harming the syncrho in the transfer case or harming the CAD unit. The vacuum control valve is a heater control valve from a Pontiac in a salvage yard. The cost was $2.00 and with a slight modification it has been in use for over 200,000 miles. The truck has 292,000 miles currently with no CAD problems yet. - John
-
Just wanted to share a dead pedal experience. One March 19, 2018, during a return trip from Crescent City pulling my travel trailer, I exerienced the dead pedal syndrome about fifteen times in the last 35 miles to home. Each event lasted about 20 seconds (sometimes longer). It was a slow 35 miles, but the truck made it home. At this time the truck had logged a total of 289,000 miles with 202,000 miles on the VP44. The check engine light came on and stayed on and code P0121 ( Accelerator Position Sensor Signal Voltage Too Low) was set. I was hoping that I could replace the APPS and the problem would be resolved. I went on-line to Blue Chip Diesel for help. I was immediately disillusioned when I read the following: “The symptom of Dead Pedal is rarely caused by the APPS (Accelerator Pedal Position aka Throttle Position Sensor) and 90% of the time it is caused by a faulty computer on the top of VP44 Injection Pump. These numbers are NOT an exaggeration.” My old analog voltmeter doesn’t work anymore, so no testing of the APPS. I decided to replace the APPS with a Timbo since the original had logged 289,000 miiles. The good news is that I have driven over 3,000 miles (mostly towing) and the dead pedal condition has never returned and no codes have been set. The engine runs strong. Only time will tell if replacing the APPS was the correct solution. I will post again if I the dead pedal condition returns. - John
-
Check tightness of fuel injector line clamps for knocking sound at idle or just off idle. A friend of mine has an 07 truck that the engine knocked at low rpms and I was looking into re-clocking the CP3 pump when he noticed #4 injector line clamp vibrating. I tightened the very loose clamp and the knocking sound immediately disappeared.. Check for broken or loose boost clamps between the turbo outlet and intercooler, and between intercooler and engine. Also, check exhaust manifold for cracks or leaks. Either situation could lead to significant loss of boost or drive pressure, and a squealing sound could occur as air or exhaust gases escape under pressure. - John
-
I should have stayed with my OEM pump. - John
-
Interesting. At 215,000 miles on my truck I replaced the original power steering pump even though it was still working. I replaced it with the Boregeson pump. The Borgeson pump had started making a very minor noise under certain conditions a few months ago and it failed suddenly and completely at just under 75,000 miles later. I now have a Napa remanufactured pump on the truck. It will be interesting to see how long it will last. I was disappointed in the short life of the Borgeson pump. How many miles did you get out of your Napa pump? - John
-
I understand - good luck with your search. - John
-
One year ago I purchased a Denso compressor (same as OEM ) from Amazon for $203.00 with free shipping. The original compressor was still working fine at 270,000 miles, but the shaft seal was leaking refrigerant, so I was having to recharge frequently. Since the first compressor, a Denso, was so reliable, I went with another new one. - John
-
Isn't "D" for, "It will ready in December? - D1 for, "Ready for sure by December 1st?" I'm sure this is what it means. - John
-
I’ve had the roof and hood painted since my earlier posting of a photo. The rest of the body has just has a few paint chips, but the clear coat is still good. As usual, no good deed goes unpunished. While the truck was in the shop, I received a phone call saying, “Hey, we went to move your truck this morning and there is no power steering or power brakes”. Well, that was great news. So, after the truck was painted I picked it up with my flatbed trailer. At least it was towed by another Dodge Cummins. I replaced the power steering pump the next day and now the truck is back to work again - John


.JPG.8f7c6fb01b683d85044d17b8a41d6ac9.JPG)
-
I ran my original compressor for 240,000 miles. I was adding refrigerant more frequently and decided to take a gamble and replace the compressor with another new Denso one year ago last month. The following November (and 13,000 miles later) I replaced the heater core. When I recovered the refrigerant, I took out the same amount I put in when I replaced the compressor. Since I had no refrigerant leaks, I decided not to replace the evaporator core when I had the dash apart. Time will tell whether or not it was a good decision. - John
-
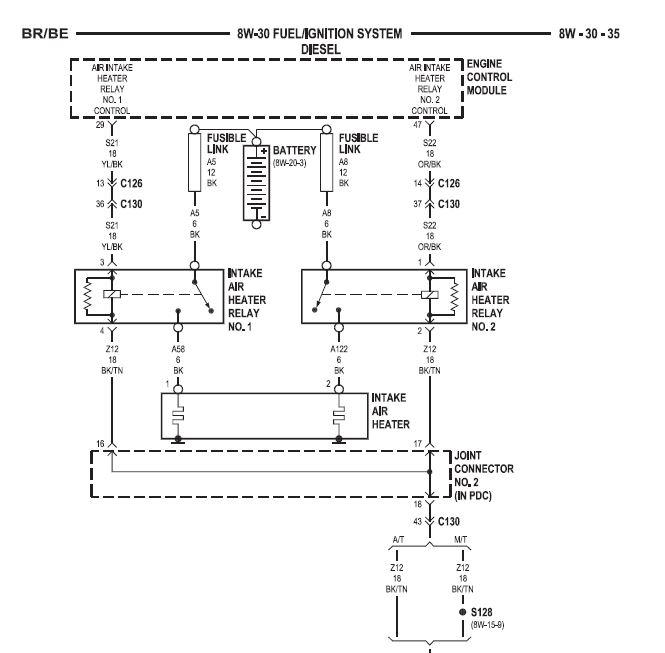
You are getting closer. You do not need a heavy wire. Each relay consists of an internal coil and a switch. When the coil is energized it operates the switch. The coil only draws about one-sixth of an amp or about 150 milliamps, so light gauge wire is fine. The internal switch handles the load - about 100 amps for each grid heater. You are not tapping into the switch part, so no need for heavy wire. Note the wire sizes in the wiring diagram for the relay coils (18 gauge). Note the wire sizes for the relay switches (6 gauge). Also, the wires that leave the bottom of the page go to ground - not enough room to show it. Please let me know if I can make this more confusing. - John
-
The question has been answered. Whether you toggle the positive side or the negative side of the relays, you do not have to splice into any existing wires. In your case, disconnect the wire on the negative post of each relay and protect the wires from the elements as they will no longer be used. Then make a new wire (18 gauge is fine) that connects to both relay negative posts and run the new wire into the cab to your switch and then to a ground. If you use a maintained switch, when it is switched off (open), the grid heaters will never operate and two codes will be set. When it is switched on (closed), the grid heaters will operate normally. I chose to toggle the positive side of the relays with a momentary switch because I wanted to be the boss. I can choose when and how long to run the grid heaters. I think there is something in the Constitution about this freedom. I can also load test each battery independently by turning on the grid heaters for 15 seconds at a time and monitoring battery voltage during the test. Nothing like a built-in tool. - John
-
Here's an idea. If you want to fool the computer (like Mopar1973man likes to do - you know, the IAT fooler), you could measure the resistance of each intake manifold heater coil and then wire in a resistor of that value from each trigger wire to ground. That might stop a code from being set. For me, I don't mind the set codes. - John
-
I'm with Dripley here. Truck is running, battery voltage is at 14.2 volts (normal) - that means the voltage at the alternator output terminal has to be slightly higher to bring the batteries to 14.2 volts. It is possible that you are getting a poor connection with your test meter at the alternator output terminal. Something doesn't make sense here. - John
-
I think everyone knows that a responsible "push starter" would do it twice, the second time in the opposite direction. - John
-
My 02 also came with both. I pull three different trailers with trailer brakes using the 7 prong terminal. Been doing it for almost 290,000 miles and I have never had a problem with the trailer wiring circuit. Unreal Summit, if you are not the original owner of the truck and you noted that the 40 amp fuse for the trailer circuit was blown, then it is likely that a previous owner did something, (I am sure unintentionally), to this circuit. 01cummins4eve is steering you in the right direction. - John
-
The P0577 code ( Cruise Control Switch Voltage High) may be just coincidental. If the tilt wheel is used a lot, the wires that feed the cruise control switch flex over time and break internally. It is easy to check and repair - just remove the plastic panel under the upper steering column to gain access. The wire insulation may be intact, but the wire strands will be broken if this is the issue. This has happened to my truck twice, now. - John
-
I installed a new Borgeson steering gear box on my truck a few years ago. You may not be getting what you think you are getting, but I think you will like the steering gear box either way. Borgeson sold two different steering gear boxes under the same part number - one is a quick ratio, and the other is a variable ratio. I got the variable ratio. The following information is copied from a post I did for the TDR about three years ago. You may be interested in the read. "Borgeson Steering Gear Box 800120 - Things You Should Know..." Last winter I did some steering and suspension maintenance to give my 2002 truck (then at 215,000 miles) a second life. I upgraded to a Borgeson steering box and a Borgeson steering shaft. At the time Borgeson advertised that model 800120 steering box would reduce steering wheel turns from stop to stop to about 3 1/2 turns. My original steering box that I removed from my truck took 4 1/4 turns from stop to stop, so I was looking forward to a significant improvement. After installing the pitman arm on the new Borgeson steering box I noticed that it took exactly four turns from stop to stop. I thought that was rather odd, so I contacted my supplier who confirmed that only one model was made by Borgeson to fit '94-'02 Dodge trucks. So, I installed it on the truck and gave it a test drive thinking that it would feel much the same as my other one. Actually, it steered much better straight ahead and definitely had a faster ratio when turning sharp which didn't make sense to me because the ratio was only slightly faster than the one I replaced. I contacted Borgeson and explained that although I was happy with the overall results, I was really expecting significantly less turns of the steering wheel - as was advertised. The representative said that the 800120 is the only steering box available for '94-'02 Dodge trucks. I asked if there was someone I could talk to who could explain why the steering box that I purchased takes four full turns from stop to stop. I was transferred to an engineer and during our discussion the engineer noticed that there were two slightly different steering boxes that were being packaged and sold under the same part number (800120). She said that one was a 14:1 ratio (3 1/2 turns from stop to stop) and the other was a variable ratio with a higher ratio in the centered position. Now things began to make sense to me as to why the steering box installed on my truck felt so responsive, but did not meet my expected 3 1/2 turns from stop to stop. The engineer also said that the customer could not choose which one to purchase; either one could be shipped. I thanked her for the information she provided and I offered a recommendation that Borgeson might consider re-wording how the steering box is marketed (specifically the 3 1/2 turns statement). Even though my initial expectation was for a faster ratio steering box, I am still very satisfied with what I received. I just wanted to let other Dodge truck owners who are considering upgrading to a Borgeson 800120 steering box that I believe it is a very good upgrade, but one may receive a steering box different from their expectations. - John
-
I just realized that I gave the incorrect information in the above post. As of 7:25 pm I have corrected that post. I should have said that I installed a switch that supplies 12 volts to the control relays for the air intake manifold heater solenoids (I erroneously said that the switch grounds the air intake manifold heater solenoids). Below, you will see the text I copied from a post that I did several months back. I did not have to splice any wiring.. "Find the two relays that control the intake heaters. They are located just below the driver's side battery and power distribution center. You will see the two relays side by side, each with two small gauge wires and push-on connectors. One wire on each relay comes from the ECM (12 volts when commanded) and the other wire on each relay goes to ground. Remove the two wires from the ECM side of the relay and protect them from the elements (the wires will no longer be needed). The wire colors (according to the diagram) are orange with a black tracer and yellow with a black tracer. Sometimes colors differ slightly. From an un-switched 12 volt source add a fuse, a momentary switch (your choice of location), and enough light gauge wiring to complete the job. The wiring and the switch will only need to handle less than 150 milliamps of current. Coming from your switch, connect to each exposed terminal of each intake heater relay The terminal posts are threaded, so you will need to provide a nut with the proper thread pitch for a secure connection." Good luck with the project, - John
-
The only benefit to this method is that no codes will be set, but as you see, you don't get to use the grids when you want them or need them. I chose to wire in a momentary switch and mount it on the steering column. The switch supplies 12 volts to the air intake manifold heater control solenoids so that I get to choose when to use the grid heaters. Yes, codes P0380 and P0382 Intake Air Heater Relay #1 & #2 Control Circuit are set, but the check engine light stays off. To me the benefit of being able to have control over the grid heaters far outweighs having two codes permanently set. The momentary switch has been operational since the truck was new. - John
-
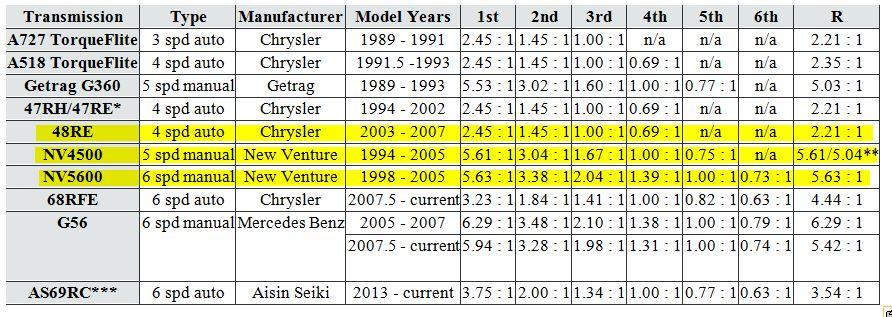
You should have a 48RE transmission. You can compare gear ratios in the chart below. Even if the torque converter could be locked in every gear (simulating a manual transmission), you still would not get the braking that a manual transmission would give. However, if you can modify your transmission to lock in all gears, then 1st gear with an exhaust brake would help you in the 10-20 mph range. Study the gear ratios. Note that 1st gear in the 48RE is in between 2nd and 3rd gears on the manual 5 spd and 6 spd.transmissions. Hope this helps, - John