

Leaderboard
-
Dieselfuture
Yearly Subscription5Points5,783Posts -
dripley
Retired Staff4Points11,788Posts

Popular Content
Showing content with the highest reputation on 02/23/2020 in all areas
-
Hey Guys, as you know I'm one of a few guys running a modified truck around here with larger injectors popped to 322BAR. So far the truck is running 100HP injectors a Dynamic Valve Body, and a Smarty. Current Smarty Settings are SW#7 TM3, T3,D4. The truck runs fairly well, and there is no smoke unless you really try. Even so its a light haze when passing. Ive played with the Timing and TM settings, and can say both have caused stalling issues at varying temperatures. However the stalling is alleviated significantly when you put the truck into Reverse for 30 seconds, then drop it into gear. I have over 2,000 miles now under my belt with these injectors, and have determined that depending on what settings you have on the smarrty it also effects when the truck won't start due to cold temperatures. On the current settings the truck will not start at about 22F without grid heaters. It will crank over and miss like its got air in the fuel. However 30 seconds with the grids and it fires right up.1 point
-
If you own a 94-97 Ram 2500/3500 4x4 then your probably aware of the steering related issues these trucks can have, most notably the dreaded “death wobble” and steering wander. You may have replaced all the ball joints, tie rod ends, track bar, and even the control arm bushings on your truck but still have wandering or death wobble issues. Before you set your truck on fire and/or pull your hair out, you may want to consider upgrading from the factory Y style steering to the later T style. How will converting from an inverted Y setup to a T setup improve the steering you may ask? It's simple really. Notice that the tie rod on the light duty inverted Y steering (94-97) does not directly connect both wheels together. Instead it connects to the drag link which is then connected to the knuckle. This setup allows the tie rod to pivot as the axle moves up and down during normal suspension travel, which is exaggerated even more when traveling down very bumpy roads. The problem is that as the tie rod pivots it also changes the toe-in/toe-out of the alignment, which in turn causes the front end to “walk around” or “wander”. This design can also cause death wobble, even when all new parts are installed. The heavy duty T style steering eliminates the pivot point by utilizing a one-piece tie rod which is unaffected by suspension movement. If you do a Google search on the subject you're likely to come across numerous discussions of using the T style steering from a 4th Gen Ram for the conversion. The problem here is that the tapered holes in the knuckles will have to be enlarged in order for the 4th Gen parts to fit. As a note you can't simply drill out the tapered holes, they require a larger diameter TAPERED hole and NOT a straight diameter hole. So, besides dropping big money on a custom steering setup what other options do you have? Why converting to the 98-99 HD steering of course! 98-99 Ram 2500/3500 trucks came with either the light duty inverted Y steering or the optional heavy duty T steering. The drawing below shows the 94-97 light duty inverted Y steering and the 98-99 heavy duty T steering. The HD steering option was only available for the 98-99 model trucks. One of the best parts of this conversion is that it is a direct bolt-on for the 94-97 trucks. However, there is one catch, in order to retain the steering dampener you will need a universal style bolt-on mount. I currently do not have a dampener installed and to be honest I really don't feel the need to use one with this steering. Here are the parts you will need for the conversion. All part numbers are AC Delco Professional. These AC Delco Pro parts are actually re-branded Raybestos Pro parts. AC Delco Pro parts are easier to locate than Raybestos, which is I why I used them. To complicate things a bit more, these same parts are offered by NAPA under their own name for about 60% more than AC Delco Pro from RockAuto. CarQuest offers these parts under Raybestos Pro and are also about 60% higher than RockAuto. They are also available in Moog. PN: 45A3074 Inner TieRod Rockauto Link PN: 45A6011 Small Collar RockAuto Link PN: 45A0811 TieRod End RockAuto Link PN: 45A3073 Passenger Side Tierod RockAuto Link PN: 45A6058 Large Collar amazon Link PN: 45A0871 Drivers Side TieRod RockAuto link You can do this conversion with the truck on the ground, in fact it makes keeping the alignment correct easier. Start off by making sure you're parked on level ground, wheels pointed straight ahead and the steering wheel straight. It would also be a good idea to chock the wheels as an added safety precaution. NOTE: I had the passenger side knuckle apart because I was replacing the ball joints when this picture was taken. This is NOT required for the steering conversion so please disregard. First step is to remove the steering dampener bolts located at the arrows along with the dampener. The frame side bolt head is 15mm and the nut 18mm. The drag link side nut is 18mm. Using needle nose pliers; remove the cotter pins from the driver, passenger, and pitman arm rod ends. Once the cotter pins are out, remove the nuts. Passenger and pitman arm nuts are 21mm, driver side is 22mm. This image shows a pitman arm puller installed. It's a straight forward tool to use, just tighten down on the bolt head until the rod end pops out. I was unable to use this puller as it was damaged while removing a stubborn pitman arm. This image shows a pickle fork being used. You wedge it flat side down in between the knuckle and rod end, then drive it in with a large hammer. The process is the same for the pitman arm rod end as well. A pickle fork works great for removing rod ends that will not be reused. You do NOT want to use them on rod ends that WILL be reused as they tend to destroy the rubber grease boots. With all three rod ends popped free, remove the old steering assembly from the truck. Below is a comparison shot of the old inverted Y steering to the 98-99 HD T steering. The old tie rod measures out to 1.000” while the new one is 1.250”. Both drag links measure out the same at 1.125”. Assembling the new steering is pretty self explanatory by looking at the above picture. One thing worth noting is that when assembling the new steering, make sure that there is an equal amount of thread showing between the rod ends as shown below. There is an alignment bar (red arrow) attached to the old drag link that needs to be removed and installed on the new piece. Loosen the 15mm alignment bar nut and slide it forward out of the way of the adjuster sleeve. Loosen the first adjuster sleeve screw, leaving the other tight. Unscrew the adjuster sleeve and short rod end together and remove them. Tap the alignment bar off of the old drag link and install it on the new one as shown below. Screw the new adjuster sleeve and rod end on and you're almost ready to install everything. This would be a good time to install the grease zerks. The tie rod end zerks are 8mm and the drag link ends are 7mm. Now you're going to adjust the tie rod adjuster sleeve until the tie rod fits into the knuckles WITHOUT moving the tires. Moving the tires will throw your alignment off which is what you're trying to avoid. Once the tie rod is bolted on, install the new supplied cotter pins. Next you're going to loosely mount the drag link to the pitman arm being careful not to move it. Then adjust the drag link adjuster sleeve until the drag link reaches the mounting hole in the tie rod, again being careful not to move anything. You do NOT want your tires OR pitman arm to move. If either move, it will throw off your steering wheel alignment. Once the drag link is tightened up at both the pitman arm AND tie rod mounting points, install the new supplied cotter pins. Here's everything all bolted up. I'm not running a steering dampener but they are easy enough to install if you so desire. All that is needed is a universal mounting kit and a new dampener. You can also weld on some mounting tabs as well. A couple notes: Even though you were careful to not move anything during the install you will still more than likely need to fine tune your alignment and steering wheel center. My alignment was darn close but my steering wheel was about a ¼ turn off. I wasn't done centering my steering wheel yet when the picture was taken so the alignment bar was still slid down out of the way of the adjuster sleeve.1 point
-
1 pointI have just been wondering about it for a while. I put mine in on a Sunday on the side I40 when the old one blew. It could of had 1 or 20 cores l didn't much care as long as it worked. It's held up just fine though. Surprisingly easy to do too.1 point
-
1 pointI use 1-800-Radiator & AC here in the San Diego area. They are a franchise wholesale parts outlet. There's one in Kansas City, Mo at 310 89th Terrace. 861-361-5960 Give them a call and see what they can do for you.1 point
-
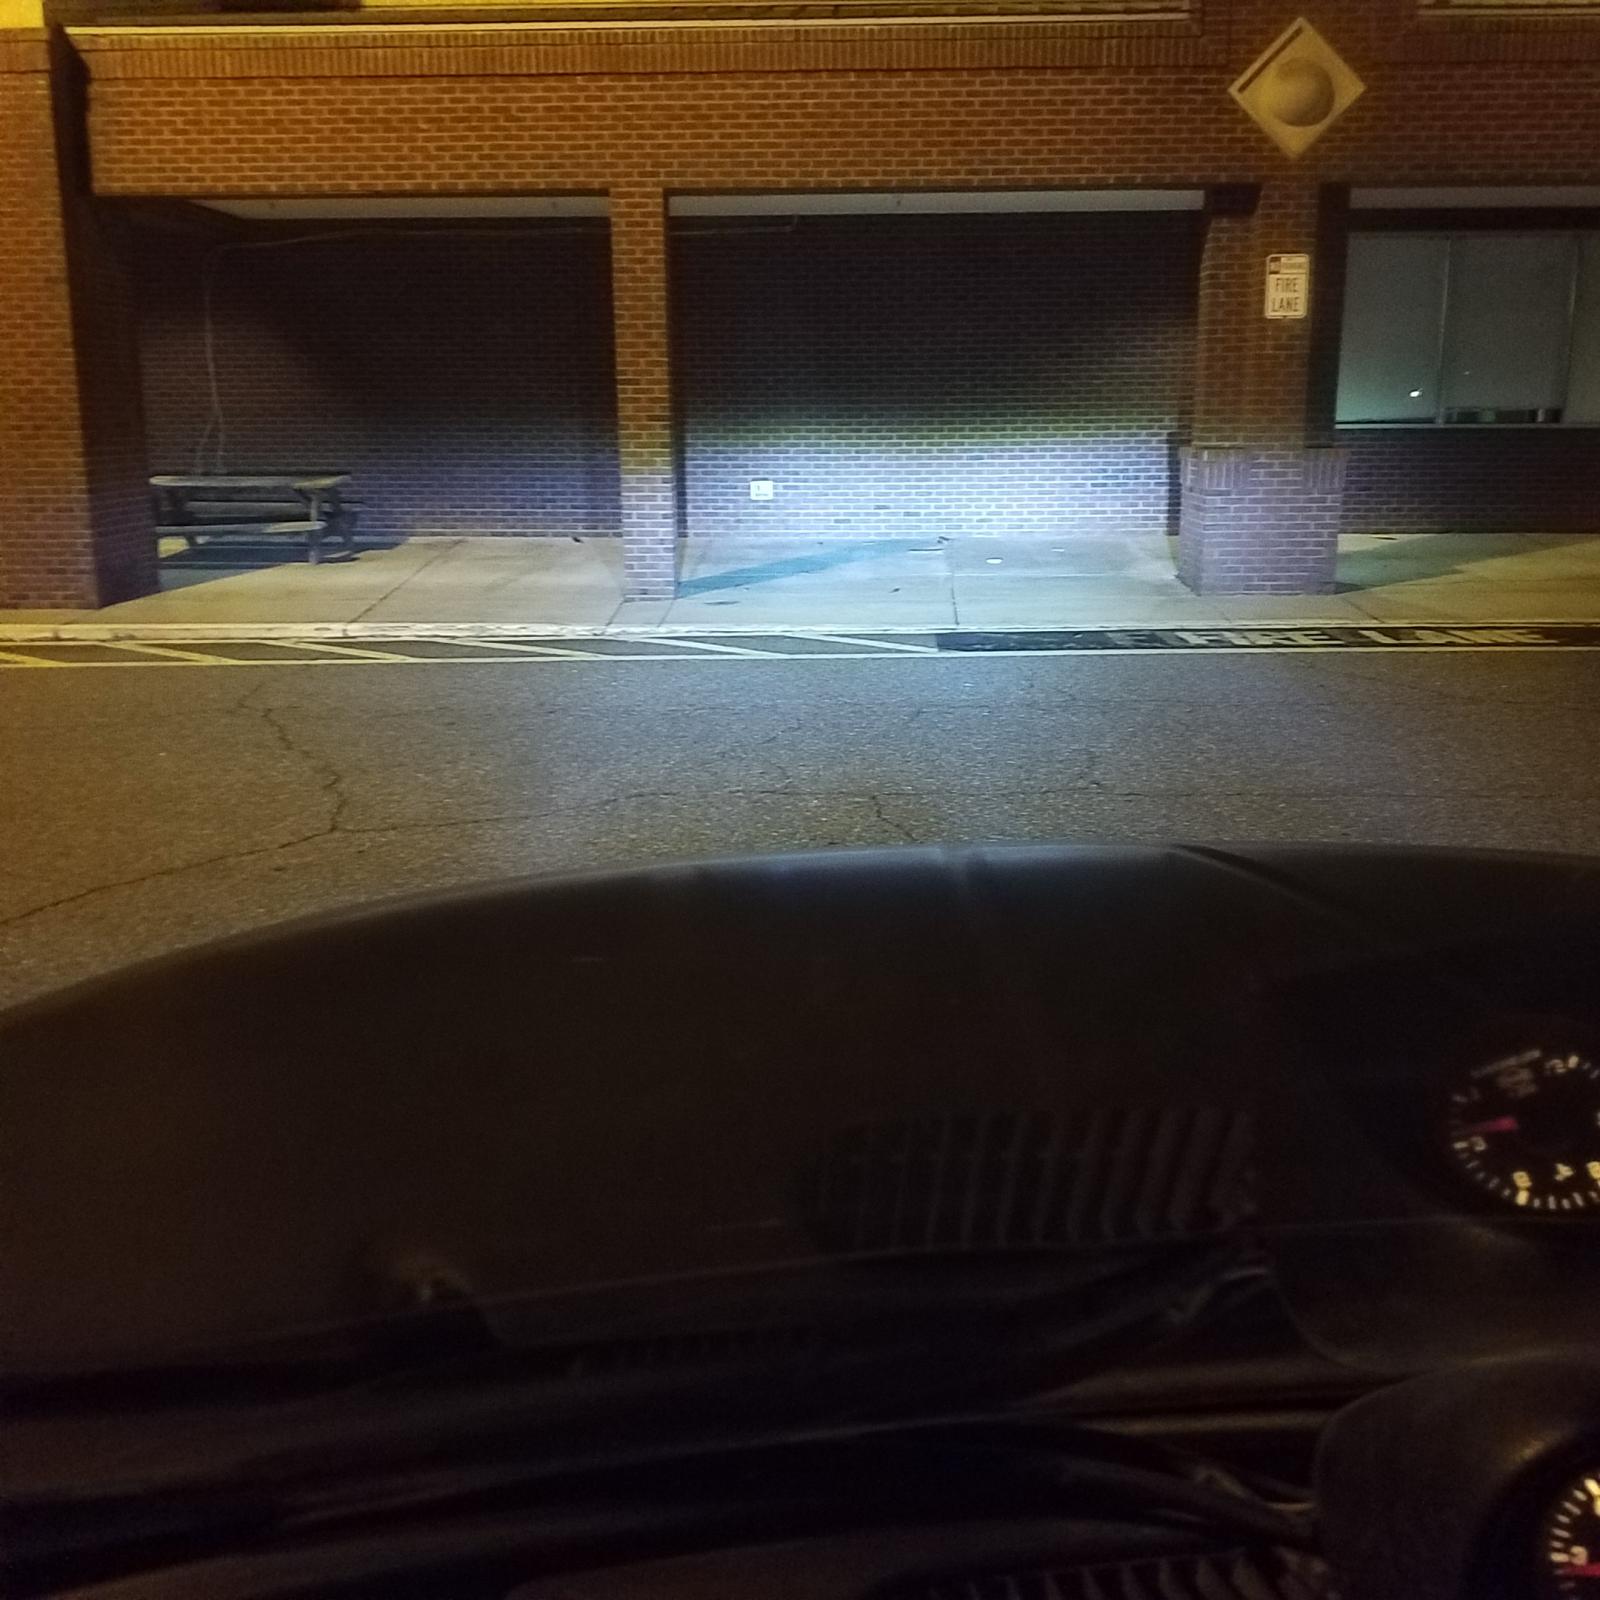
1 pointThose may draw more attention to bulbs being the problem. Here is mine. Cheap ones off of amazon. But the beam is much more focused than yours. This at 40'
 1 point
 -
1 pointMe too. I had no idea the head lights were any part of the engine wiring harness1 point
-
1 pointI had same thing happen between manifold and head on last cylinder, that was when I discovered my exhaust valve seals blew off the guides and got smashed by retainers. I know it also means my gasket is not sealed. It been fine since I put new seals on. At that time I was blowing smoke on start ups too1 point
-
1 pointNot that I can tell with butt dyno, I'll follow up later if I notice anything big 301 point
-
1 pointDoes it do it after sitting over night or just that one time after 60 days of none use?1 point
-
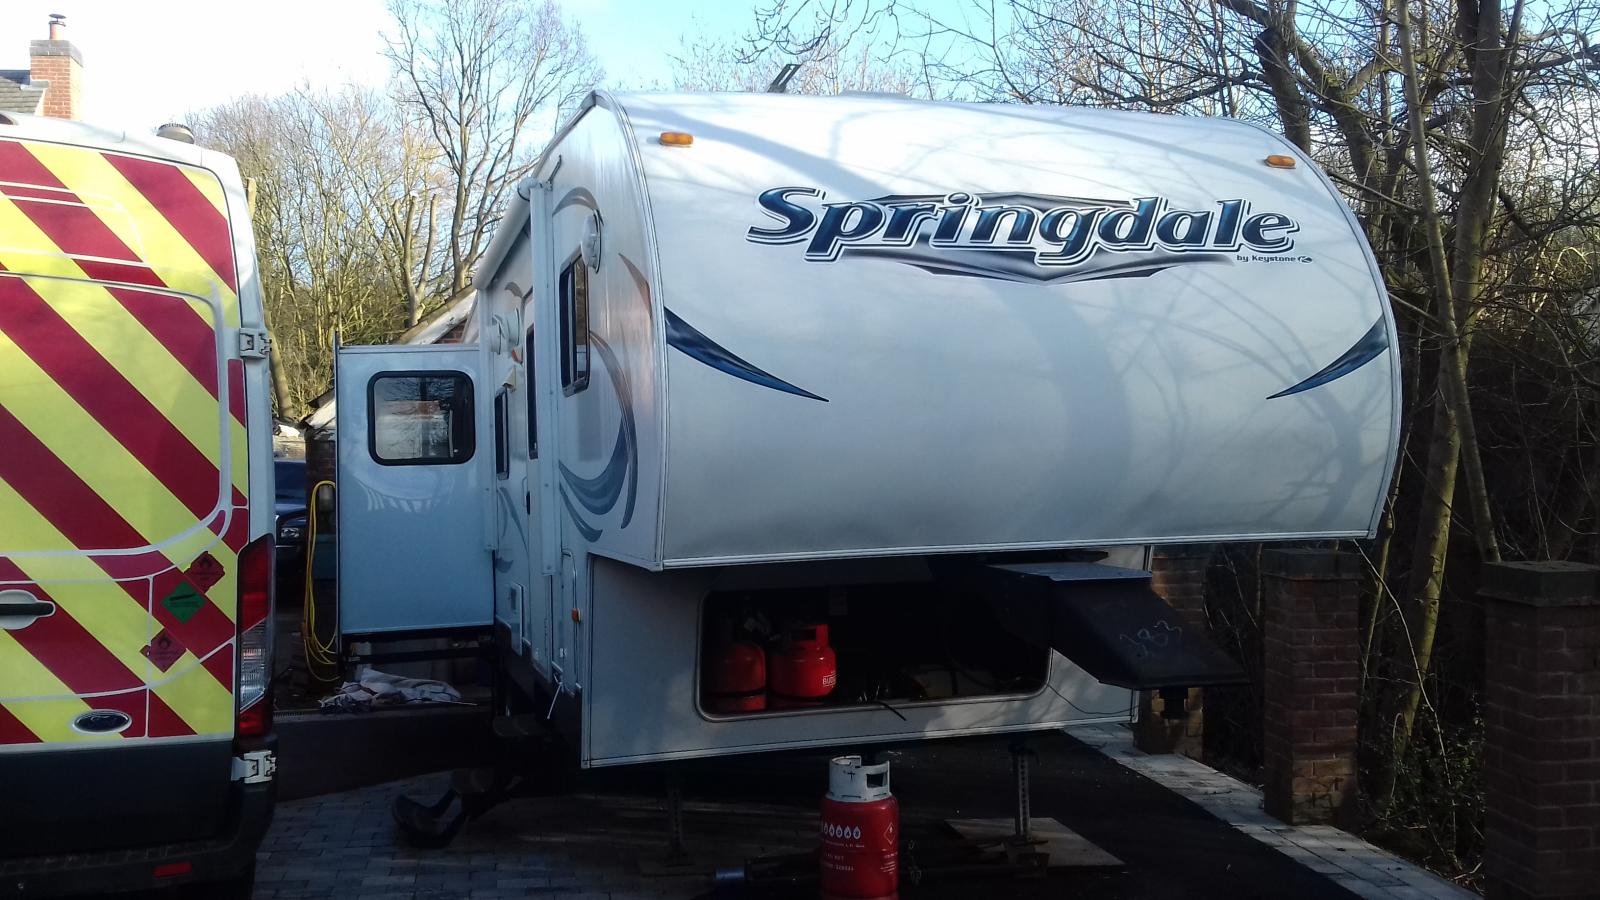
1 pointgot delivered yesterday, decent weather for a change yesterday and today, back to terrible for tomorrow though, we spent yesterday and today checking everything over, all working good and as it should be, going away in it on the 5th March for 5 days so going to get water to it and check that all works ok but I've no reason to think it won't be all good. Been a while since we bought it and we'd forgotten how clean it was. 2 slides in the lounge area one each side makes for a large open space

 1 point
 -
1 pointI've seen that in older Volvos at the flange between the exhaust manifold and tubo when first started; there was no head gasket or oil sealing problems. Condensation being blown out.1 point
-
1 pointLooks like wet stacking, older tractors sometimes do it when they idle alot. They usually clean up after they have been worked hard.1 point
-
1 pointHow are figuring your miles driven? Is your odo adjusted for the tires? You are gerring 30% better milage than anyone I have seen on here with 35" tires + 9000 lb gross weight.1 point
-
1 pointNeed to get your final ratio to the ground between 3.55 and 3.73. So for example my truck came with 265's and 3.55 gears. Now switching to 245/75 R16 that drop 1 inch on tires and final ratio to the ground is 3.69:1. This makes for optimal high speed travel. I've done plenty of 2,500 RPM runs at 80 to 85 MPH and netted 20 to 21 MPG. On the scales I'm barely 7,300 to 7,500 pounds on average. Need to shed lots of weight. That like towing my empty trailer behind your truck. My BigTex 70TV is exactly 1,800 pounds empty. I learn long ago not to carry any tools in the bed or truck. Does absolutely nothing. 5th gear disappeared. Nothing a toolbox could do, no way to fix. Lift pump failed, nothing a toolbox can fix without parts. Broke the mainshaft in the transmission nothing a toolbox will fix. I stopped carrying tools. 409k miles later and toolbox could fix ZERO of any failures I've had! Edge Comp, RV275 injectors, road speed limited to 55 MPH and MPG fooler was being used to retard timing. (Not advance). Now knowing these tricks from the past I've been able to keep 500 HP and still keep 19 to 21 MPG most of the time. Matter of fact Edge Comp broke the mainshaft in my transmission. My angle is remove as much drag and rotational mas and the power natural comes out. Currently 3rd, 4th and 5th gear are known to spin the tires.1 point
-
1 pointRight now Priorities is getting some rest this weekend some how. Then heading to Lewiston, ID for shopping. I don't need to run to Ontario to get hit with all the memories. Eileen has a busy week taking care of her medical appointments. Once they are done we are free to travel south. Beyond that I want to have what most have a 9 to 5 job and a paycheck. Get a few months of normal life and then get rolling in to the fun stuff possibly. Summer is coming. I know there is 2 members talking camping trip. Gives me a goal of getting my transmission fixed and Cummins / Jayco RV ready to haul towards a camping trip.There is a few other people I want to travel and see too.1 point
-
1 pointIm sorry this happened to you and glad I read about Rock Auto's bad customer service on another forum to be able to share too. Sometimes a small amount of information will help a lot of others. I suggest you change from just using the letters 'RA' to their full name Rock Auto so others doing a search can get the story too.1 point
-
1 point
-
1 pointI can say I've had my cry quite a few times yesterday. Still sad about it. In the other hand I'm free from tending to mom. I've got my own plans of making a new family. I've got 4 wonderful daughter that enjoy talking with me. Then a son that needs a bit guidance. I've got now a mother to go visit in Susanville and another grandmother to meet too. I might of lost my mom but gained another family. I won't be alone. Hardest thing for me is to reprogram myself to my own life.1 point
-
1 pointI originally was going to order the sac injectors but ended up going with VCO's for max fuel mileage. Everything I've researched has seemed to have said that VCO's will get slightly better mileage over sac's. My buddies tell me that I'm a hypermiling bas****1 point
-
1 pointIf you guys could have ever met her... she is really a loss to all those who knew her. I know that she is in a place that can give her an unlimited happiness that this ol' world cannot ever do. Now healed from all worldly weight, pains and sickness, he has graduated to God's house. It's more beautiful than words can say. I know this because I have prayed with her when visiting there. I know she prayed for all of us regularly too. She is and always will be the sweetest MoparMom with a cowgirl hat in my heart.1 point
-
1 point
-
1 pointI just ordered the injectors the other day and asked if they were able to set them to 320. Hopefully they can. I ordered the 7x.010 VCO aftermarket body injectors. Looks like they had them on sale. If for some reason my mpg goes down, I'm gonna flip haha 1 point
-
1 pointMy best guess is valve seals, but you're saying you're losing coolant too, so not sure.1 point
-
1 pointSo was it sitting for a while and it got wet, or it got wet progressively driving it1 point
-
1 pointMy condolences. Having lost a parent, I can tell you that it doesn't get better but it does get easier. Hang in there and remember the good times. That's what will get you through. Also, don't forget you are not alone and don't forget to ask for help or someone to talk to. Don't hold it in. It took me a while to figure that out. My thoughts and prayers are with you and your family.1 point
-
1 point
-
1 pointokay. some forums have strict rules, but I like the fact it's okay with you guys. In this crazy world it good to have a place you can have some freedom.1 point
-
If you going to replace cables make sure to do as a pair. That way you'll have a even pull. NAPA does normally stock these cables.1 point
-
1 pointMike, Dan just shared with me about Rosalie. Although we knew this day would come, it is still so very sad; a terrible loss of an incredibly wonderful, God-fearing woman, Mom, and friend. I loved her from the first "Hello" back in August 2017! Her positive energy, joy, zest for life and her love for Jesus made an imprint on my heart!! She so loved her home and property there in New Meadows; a place God directed her to so many years ago. Well, once again God is directing Rosalie to a new home He has prepared for her where she will live eternally without pain, in a new body and in the glorious presence of our Lord Jesus Christ. I pray that Rosalie's passing with be peaceful; and, that even tonight she is seeing glimpses of Jesus and the glory of heaven. I pray God will comfort Rosalie with His peace assuring her that you, Mike, are in the palm of His hand as His plans for your life will prevail. Mike, I pray God's peace flood through you as you trust the promptings of the Holy Spirit as you make these difficult decisions on behalf of your Mom. May God's grace fill you with the perfect words as you spend your last hours together; do not rush. Rest in God. "Be still and know that I am God." The Hebrew root of 'be still' doesn't mean 'be quiet', it means "let go." Let go of what you cannot control - and rest in the knowledge that God is in control. I am grateful that God has brought Eileen into your life this past year for such a time as this; I am glad Eileen has had the pleasure of getting to know your Mom and will be with you during these next days and months of transition. The grief in the loss of your Mom's presence with you will be deep; but, I trust the years of loving memories together will fill that void in and warm your heart. Please know that Dan and I are here for you anytime during this transition season. With all our heartfelt thoughts and prayers …………… Jennifer and Dan1 point
-
0 pointsPrayers to you and your family. Sorry for your loss. I lost a loved one Friday as well. I hold peace in the fact that her suffering is over and in God's hands now.0 points


This leaderboard is set to Boise/GMT-06:00