Mopar1973Man
Owner
-
Joined
-
Last visited
Everything posted by Mopar1973Man
-
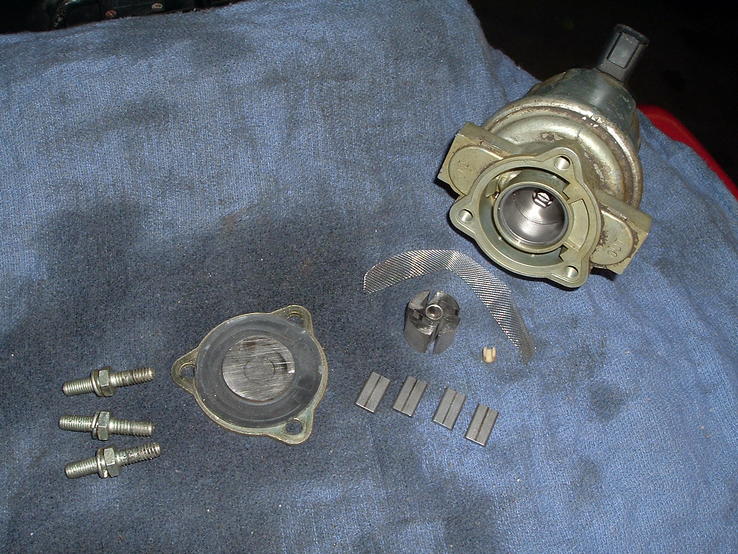
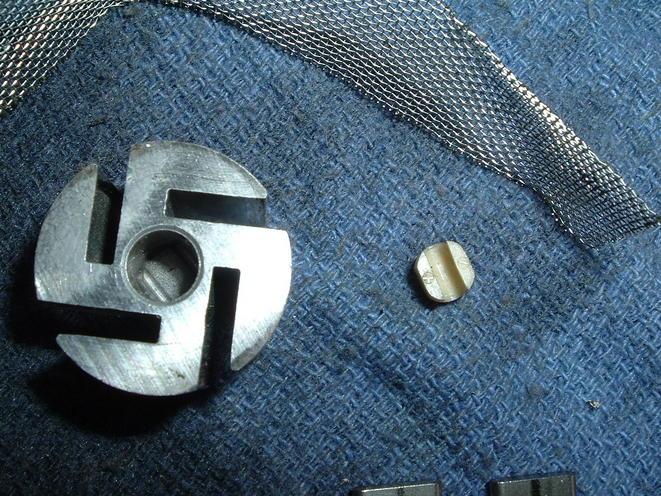
Is it a electric sender gauge? If so does the electric sender have a needle valve or snubber before it? If not the replace the sender. _____________________________________ If the gauge is mechanical the I would be cvhecking the lift pump soon... _____________________________________ Now stock lift pump have been known to slip the plastic hub inside the rotor head...

-
Got any APPS error codes? Battery cables and grounds good? Remember the ECM & APPS ground is behind the starter. To inspect it you must remove the starter... Alternator noise from a bad diode?
-
Actually I heard a rumor that some states might outlaw audio car alrams and might switch over to silent alarms only (Low Jack and simular)... Out here in Idaho nobody locks ther cars/truck... The key are always in the ignition... Vehicle thief is extremely rare... Because the fact is there is only 1 road north and south so if you steal a vehicle you not going to out run Mr. Motorola... As for all the fools that come from Boise, ID and set the car alarms we sit here and laugh or arses off because the kids around here love to set them off... As for my my alarm... It well rather silent... But rather deadly... You get in my truck you got to deal with 80 pounds of Dobbie coming at you...
-
If its like my AirDog 150 then the stock pump is dead and your hearing the Raptor pulse at key on. Mine will bump the gauge to 15 PSI and fall. This pulse is normal and typical of any fuel pump controlled by the ECM. Basically the stock pump on the block should be disconnected and no longer used but you can remove the pump and plumbing from the old system but you need to leave the mounting plate there. That mounting plate covers the hole in the block form the old school 12V pump.
-
If its got hose clamps then its low pressure... If its got screw in fittings (flare) then its high pressure...
-
Well I got back from Boise, ID and got my replacement drive... WeeHaw... 1.5 TB worth of hard drive... Now back to loading it back up with stuff... I'll take the old drive down to the shop and see if I can get if fired up ot back it up...
-
A lot of people are asking how to pull the fuse from this black clip... (So they can keep it). If you don't want to mess with the clip you can toss it out and push a normal fuse in the hole...
-
I'm going to be right behind you for testing too... I know I need to buy trans fluid and chnge mine but I'm going to hunt for a good price & product...
-
You own a Cummins they don't use Ford parts! (Duct Tape and bailing wire)... Yea... That would do it... To thicken up JB weld just mix it up outside in the cold and the epoxy will remain thick... But it might take some time to cure being cold... (Remember) you door light will be on during this time it might be a good idea to pull the batteries wihile it cures... Don't forget to reset your APPS afterwards...
-
Like myself I would be doing it for the MPg's reasons. Like my Mom's 96 Dodge Gasser is constantly jumping around gear out here with every roll of the highway. It would be nice to lock it up like a manual and let cruise pull it over the hills in top gear instead of dropping lock up, then dropping from 4th to 3rd spinning a bunch more RPM's and then climb the hill (1/10th of a mile) then shift back to 4th and lock up again... Now I know why I bought a 5 speed... But I would like to hold the lock up on the 96... Like climbing dirt roads that trans keeps jumping from 2nd to 3rd remaining unlocked. But funny I can pull the hill in 3rd in my Cummins and not think twice... The other bonus if done right and you watch your trans temps it should reduce them... There should be less thrashing of the fluid from the TQ conv because the lock up.
-
I'm not sure... But there has been talk in the past that the VP44 has a small vane pump in it but how much pressure, suction, volume it capable of producing is totally unknown to me. But from what I've learned so far is if the truck is coasting then the injectors shutdown (VP44 doesn't produce line pressure). So this means that the overflow valve must be venting... But theat hard to measure return volume while cruising down the road... So maybe in your case the overflow valve is a bit weak opening at 13 PSI and venting back to the tank... Or that little vane pump is giving it that extra 1 PSI to open the overflow valve... (speculation)
-
I got to admit that $20+ a quart is hard to deal with... I know the last 2 quarts I bought are from the dealer at $23 a quart... That hurts the pocket knowing its 1 gallon needed for a change. I know I'm due for a change of fluid too...So if your willing to be a test subject... Go for it... I'm about ready to try something else too... I just don't think I can swallow $23 to $25 buck a quart...
-
Being my BHAF filter has most of its life in dirt road and never had a Outwears till someone gave it to me... I've got a filter minder plugged in the head of the filter and its not moving but I do test the filter minder for function. 6 years and 112K miles and only owned a Outwears for 1 year... Even at that rate I paided $40 bucks for the filter so thats $6.66 per year for the filter. Not bad and I got a new one sitting on the shelf waiting for that other filter to finally fail and plug up... I got Taz hooked up with a BHAF on his 92 and we found out because of it pure huge size it not able to hold dust on the media for long. It tends to shake off the excess dust on a bumpy road like head up to the Ranch on a 6 mile climb on a 1 lane dirt forestry road... His now is 2 years old and still looking good...
-
That a quick easy fix... Another thing you could do is mix a thick batch of JB weld and put a thin pile right there... I doubt that will wear away as quick as the duct tape but still soft enough not to wear the switch tip...
-
Been there done that...
-
I never thought about that... But yeah its true they are always dry...
-
Thanks I feel the love... Yeah your about right... No error codes... Just a hung screen (dead pedal) and then Bam! - DEAD HARD DRIVE (VP44)... All BIOS report is the hard drive is BAD and need replacment (CHECK ENGINE LIGHT)... Seagate must be getting hints from Bosch...
-
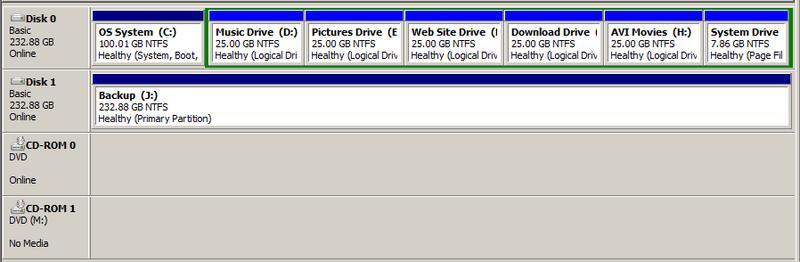
Ahhh... I'm covered there... My main drives are twin 250 GBs... The first 250 GB is split to smaller partitions and the second drive is a mirror image of the first drive... So my main stuff is fine...
-
Actually I did lose much for data but it was my big work drive that I toss everything into to work on then store on the the smaller partitions... So actually I didn't loose much just lost a nice large work area... As for life span it just past it warranty and died... Typical huh...
-
I think I mis understood the last post... I was assuming coasting/deceleration conditions with <14 PSI of fuel pressure... (re-posted to clarify). If you coasting down hill or decelerating... There is no fuel pumped to the injectors if there was you would be accelerating or maintaining road speed. The injection pump is literally turned off. So there would be zero return from the line at the back of the head. The only time fuel returns from the rail is when the injectors are fired (bleed off pressure) is drained to the return rail. This small bit fuel is the remain of fired injectors and bleeds off the line pressure and drain into the return line. So since coasting/deceleration tends to shutdown the VP44 from firing the injectors that means that return rail will be dry and if the fuel pressure is below 14 PSI so is the overflow return line. (except what will ooze out of the 0.16" inch bleed hole...)
-
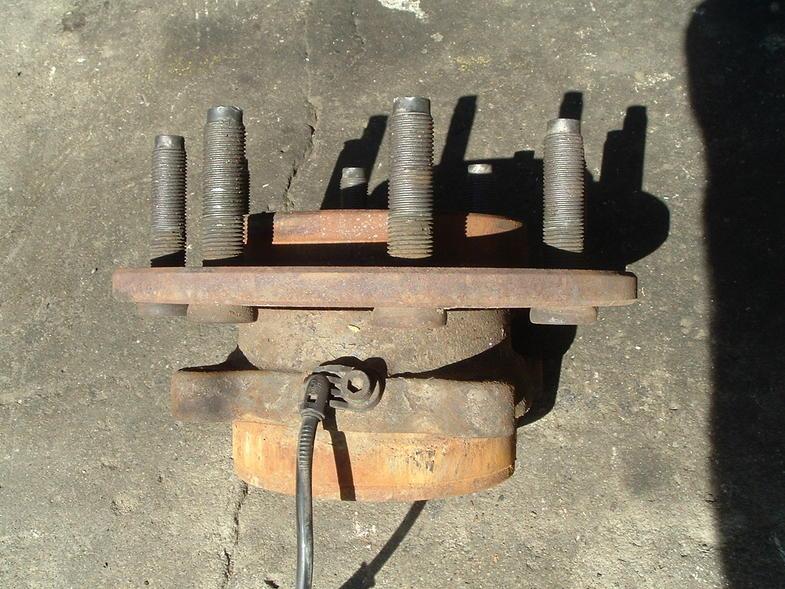
First thing is first... There is no way to reset the computers by disconnecting the batteries. Now that you have disconnected the batteriews you lost the APPS calibaration that the ONLY thing that resets with the batteries disconnected. Now for the ABS/BRAKE light problem. The is 3 speed sensors in the ABS system... Now if the rear sensor is damaged the speedometer doesn't work. If the speedometer is working then its one of the front 2 sensors mounted behind the rotors on the wheel bearings (4WD) To reset the ABS computer repair the problem and go drive the truck... If the problem is corrected the lights will go off with road speed.
-
Nothing... There would be technically no flow... The injectors are not firing so there is no return... And the Overflow valve is closed... So the only fuel that would be moving is what little fuel there is bleeding past the 0.016 size hole in the overflow valve. Maybe that why I opt for the 15-17 range of pressure most of the time... At least then I know the overlfow valve is open...
-
At that rate I consider myself lucky to only see 1-2 PSI drop from idle to WOT... But running a AD 150 with 1/2" lines... (Arrgh!) So many thoughts running through my head about this but no way to test this out... :banghead:
-
If you had a electric fuel pressure gauge and 2 senders you could hook up a sender in both port (with needle valves to protect the senders). But then wire the senders to a toggle switch in the pod (or anywhere you wanted) then be able to toggle between the 2 sender and see how plugged up your filter was. If the fuel pressure drop was more than 5 PSI then its time for a filter. But remembering the minimum pressure... Just a crazy dumb idea... But goes along with AH64ID...
-
Yeah the question is though how much pressure drop between idle and WOT say at 300,400,500,or 600 HP... Then compare to 1/2" line... That would be the way to show it... But that would take a bunch of truck all rig with the very same fuel system and different mods... Bit tough to pull off...:banghead: