


Mopar1973Man
Owner
-
Joined
-
Last visited
Everything posted by Mopar1973Man
-
I just realized that I'm already for a tappet cover gasket install. I'll have the VP44 out and just got to pull the ECM and filter and install. I've already got the gasket laying on the workbench in the shop. I guess I better have my camera ready as well and refresh a VP44 install article and tappet gasket install.
-
If you installed a ISSPro EV2 you already have LED lighting that is USB programmable.
-
No. So did I. No biggy. Just need the pump. I've changed enough VP44's to do it now in about 1.5 hours. Easy peasy job.
-
There in DAP core pile by now and been rebuilt and living a new life in someone else's truck.
-
Idle. So if it not rolling it's idle. If it's rolling it 0% fuel because RPM is above idle fueling so fueling is cut. @Tslaney So I'm wondering what the OP has for feedback...
-
The Quadzilla is not doing anything differently that any other brand of tuner. Just better control over the existing timing and fueling. There are 4 ways to kill a VP44... 1. Low fuel lubricity (>450 HFRR) 2. High AC noise levels (>0.1 AC volts) 3. Poor filtration 4. Low fuel pressure (<14 PSI) Even Jacob was saying that wire tapping the VP44 will reduce the life of the pump. Like I pointed out to him I've been wire tapped for just about 240k miles and no issues till now. So I tend to call BS on the wire tap putting stress on the pump. Being that Jacob says the average life of a VP44 is about 70k to 120k miles. When I told him 243k miles on mine when it gave up he was shocked. Also everything he said would shorten the life of the pump I've ben doing. (Wire tapped and running 2 cycle oil)
-
That's a hydraulic issue. The only thing the ECM/PCM can do is cut fueling. It can't shift gears that all in the valve body. The most I can think off is that if it cut to idle state that it feels like its in neutral because its just free rolling. (Educated guess).
-
Basically, in a nutshell, AC noise from the alternator will muddy the signals within the ECM. So anytime the ECM sees a signal out of range it drops to idle state disregarding the commanded throttle. My buddy 2006 Dodge we changed the APPS sensor and still had a dead pedal issue. Once his alternator gave up and was replaced the problem went away. No longer having dead pedal.
-
Might be true but the MPG number will not be as good with that big of an injector. Again im not in it for the power but the MPG. PRIORTY - Economy / MPG
-
No need to run back to the headlight switch in the cab just use the head light plug right there for A, B and C contacts. (refer back to my wiring diagram - https://mopar1973man.com/topic/12500-bright-headlights-quit/?do=findComment&comment=154457) B is fused +12V power A is lo beam (ground) C is hi beam (ground) Lo beam relay "A" to 85 and "B" to 86 Hi beam relay "C" to 85 and "B" to 86 This will reduce the amount of wire distance and need to run into the cab.
-
Well, it gives a good report for 2 cycle oil being it got me to nearly 250k miles. Even though Midwest told Jacob that 2 cycle oil will cause issues with varnish build up. I want to call BS too if I've exceeded the life span by double. Also brought up the conversation about wire tapping. Again it was mention that wiring tapping will reduce the lifespan of the pump. Again I want to call BS to being I covered double the average life span of VP44. Again I'm not whine about the failure being I've covered this amount of distance and time. I'll plan on wire tapping and running 2 cycle oil again once again. I'm not exactly fond of Midwest Injection and some of the thing said about reasons of failures.
-
Called DAP (Jacob) and talked to him. He told me average life span is about 100-120k miles for VP44. When I told him I cleared 243k miles he was rather shocked. I'm looking at my options on pumps. Bad part is no matter what I'm going to lose my warranty on the pump because of the wire tap.
-
No. Completely clean exhaust neither black or blue smoke. Just heavy timing rattle and no power.
-
No connection. Trust me. P0216 code and the behavior of the pump have no connection at all. There is a malfunction in the timing circuit of the VP44 causing the pump to run full advanced on timing. That was my first thought to watch timing displayed but it had no connection to what I was hearing. After checking the error codes and hearing the timing return and then fail again. I knew what I was seeing is commanded timing on the Quadzilla not actual timing. Very True. It is not unreliable. I say it performed just fine for nearly 250k miles. Does it frighten me to know the next one might fail? No. Does it worry me that I've got to carry another VP44 in the back seat? No. If you look back at history most older 60's and 70's vehicles were doing an engine rebuild back at around100k miles because they were worn out. So now I've got a VP44 injection pump that has a timing failure P0216 code and needs replacement at 243k miles. I'm going to say this one is strictly all wear. Not a fuel pressure problem being I'm still holding 15-17 PSI. Lubricity I will admit I've been skipping on the 2 cycle oil a bit being the massive amount of miles I put down. I only consumed 687 gallons of fuel in the last 3 months. I did add 2 cycle oil to the tank when the pump started getting goofy. I think its band-aid at best and got me home.
-
The truck is all tucked away in the shop and hidden from the public. It's going to get the dark closet punishment for crapping the bed.
-
There is the ash tray light. You could easily tap that wire and pull light power from there.
-
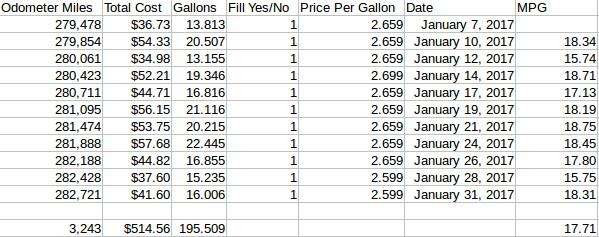
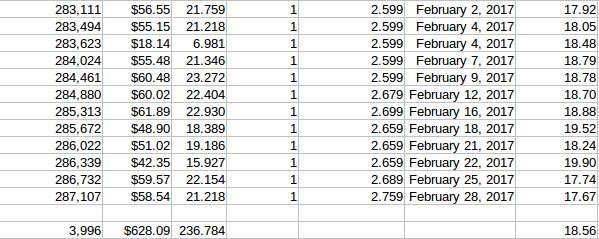
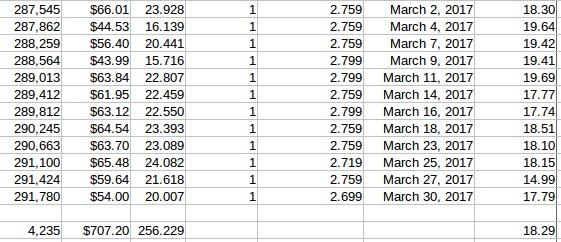
The trans failure was me towing a friends truck back to his house. I called him told him to meet me at 45th parallel because my transmission had failed. We unloaded his truck, unhitched me I drove up on the trailer (still had 1st, 2nd, 5th and reverse). Tied it down and hauled home. I could have driven it home but why make a bad problem worse. As I sat for dinner tonight and thought about the whole VP44 failure it might have been giving me clues all along with the MPG's being low and fighting the Quadzilla to gain good MPG for the last 3 months. Then the odd lopey launches might of been the VP44 having problems dealing with the larger injectors. March Feburary January
-
Like I tell most people... The "Good Lord" watches over us. So far I've always made it home. The only time the truck was towed home was the transmission when the main shaft broke. Even then I got a friend to put it on his flatbed trailer and bring it home the 20 miles. I'm glad I took the time to go visit my friend in town. If I didn't I would have had the failure tomorrow when I head to Council, ID for personal business. At least the 1996 Dodge is ready for the fall back rig. Not walking yet. I've always got a fallback plan. As I was backing the truck in the shop. I was listening to how it's running. It got a weird loading of drag pulling the RPM down just about 20 RPMs and then pop back up with a surge of throttle seen on the Quadzilla it more or less fighting to even run at idle. Still got a tinny injection rattle which is the timing being full advanced. Still puzzled by that all the trucks I've dealt with usually go to the retarded state and have low power. Still odd how the limit pedal (not dead pedal) happens it's only throttle so much then like something pops loose and power comes on. Then to here the timing flip-flop back and forth so wildly really strange. One thing on my project list is to verify the AC noise again just for safety sake before installing a new pump.
-
Odometer: 293k OEM VP44 pump: 50k (Replaced under warranty) So right around 243k miles. I'm not crying about it at all. Wore out and gave up. What I'm surprised about how quickly it failed. I was in the town of Riggins, ID with a friend stopped at the store for a soda and left there and it went from normal smooth running to hard rattle in a split second. On my way home I was taking it slow and easy. Not much choice being when it rattled like this there was no power. Max speed was about 40 MPH matted to the floor. Then randomly a few times the timing would retard and smooth right out and run good then pop instantly and go advance and fall on its face. The VP44 might have been telling me it's been failing being I've been fighting to get my MPG's up and just wasn't doing it.
-
Yeap... The old VP44 gave up. Timing is stuck in full advancement rattle very hard and very little power. P0216 code is present. I pulled the Quadzilla and still present so I know the problem it's not Quadzilla related. It hits a state of limp mode won't power more than 40 MPH. At times it will clear up and run well then the timing goes back to full advancement pull the power way down. I did make it home but very slow ride. I can say without a doubt the Quadzilla only reports commanded timing, not actual timing. Time to make some calls to DAP in the morning...
-
When you look back at my monthly fuel logs I started in January... This all kick off back in October. Last month...
-
After week of running, I did learn some more. I'm not going to reveal any of my tuning yet and I'm verifying my numbers. All I can say is when you hit optimal MPG timing the pyrometer will drop pretty good there should be nearly no injector rattle noise.
-
Well geez... Late to the party like usual... Welcome to the family!
-
Talk to @Cowboy he's created a filter design as well that seems to work. As for running two filters, I don't see a problem. Personally, I wouldn't worry about filters but add a few good strong magnets on the PTO covers. Being all the materials in the transmission are metal and would be captured by a good strong magnet. First, transmission cleared 260k or so when I broke the main shaft. When I opened the transmission up there was ZERO debris in the case and very light fine dust on the one magnet in the case. I was using nothing but the Mopar 75w-85 fluids and changing every 100k miles. Currently running 50 SAE Mobile Trans Fluid GL-4 Synthetic and still clear at nearly 40k miles and just over a year old.
-
@IBMobile That won't work. 85 pins can't have reference to ground. It has to return to the head light (B) position. This was a mistake I made in my first attempt and will cause light to be on always. Because the circuit is +12V hot already so a source to ground will trigger the relays. Stock system the headlight switch and dimmer control the ground. The rest is correct though...

