


Haggar
Unpaid Member
-
Joined
-
Last visited
Everything posted by Haggar
-
Did you have the snap on with you? I would seriously look for those funny voltages you get with the map sensor etc... I agree the 216 is disheartening.... and could something going on in the controller board for the vp be pulling the other voltages down. OMG.... which is the chicken and which is the egg and which came first? You being the chicken man, please clarify this for us!!!! Hag
-
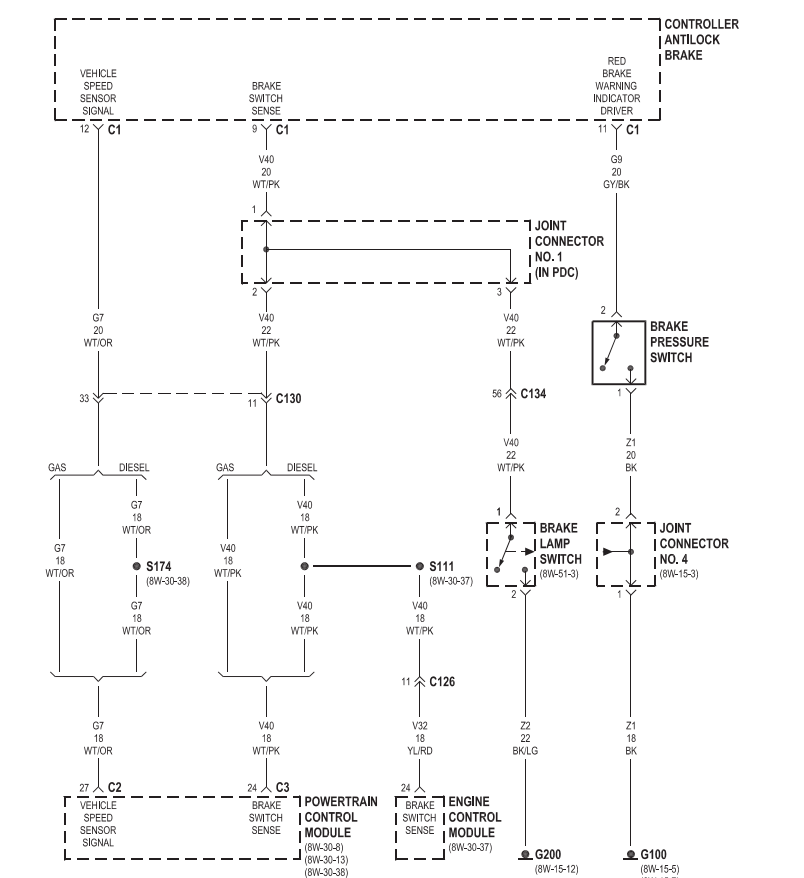
In theory the park brake indicator is illuminated from the park brake switch(yes ground confirmation). BUT it is also commanded from the ABS module and will set with a code from the ABS also. Solid illumination is from ABS and blinking illumination is from the park brake switch. so the instrument cluster gathers info and illuminates based on what it decides. Red brake warning from ABS controller Hope that helps a bit. (you can use these to find the pinouts and see if you have the neutral on the right connector from the switch.) I don't think adding a 2002 cluster will automatically give you the readouts you are looking for. I think it would be more tied to the PCM and does the information actually pass through the network. It wouldn't hurt to try and see. Maybe you can add a new piece to the puzzle! GL Hag
-
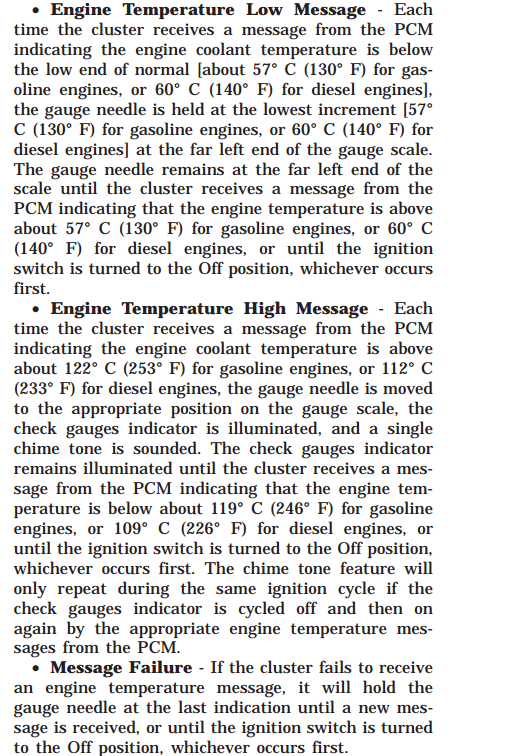
The temp gauge dropping bothers me.... Isn't timing directly connected to engine temperature? (just checked FSM. Yes it is.) Also the gauge display is buffered through the PCM and back to the actual gauge. if you are getting squirrelly temp info to the ecm, I don't know how the truck responds. Notice if there is a LOSS of information the (message failure) the needle stays where it was. It only goes to cold if there is a LOW temperature "seen". It is one of those "funny" areas. yeah 216 normally means what we don't want to mention. But with the coolant temp info swinging so fast, could the timing not respond fast enough? Hag
-
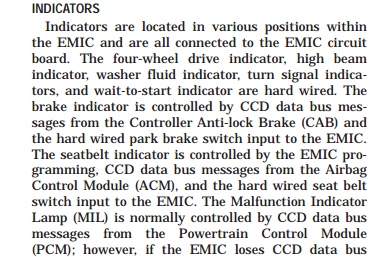
Jeremy, I don't think this is possible. The reason being, the ABS signals are not hard wired into the cluster. They are triggered through the CCD system(the communication languages between the different computer modules.) This is from a 2001 Factory Service Manual, but I expect yours to be exactly the same or similar. (EMIC is the ElectroMechanical Instrument Cluster) GL HTH Hag
-
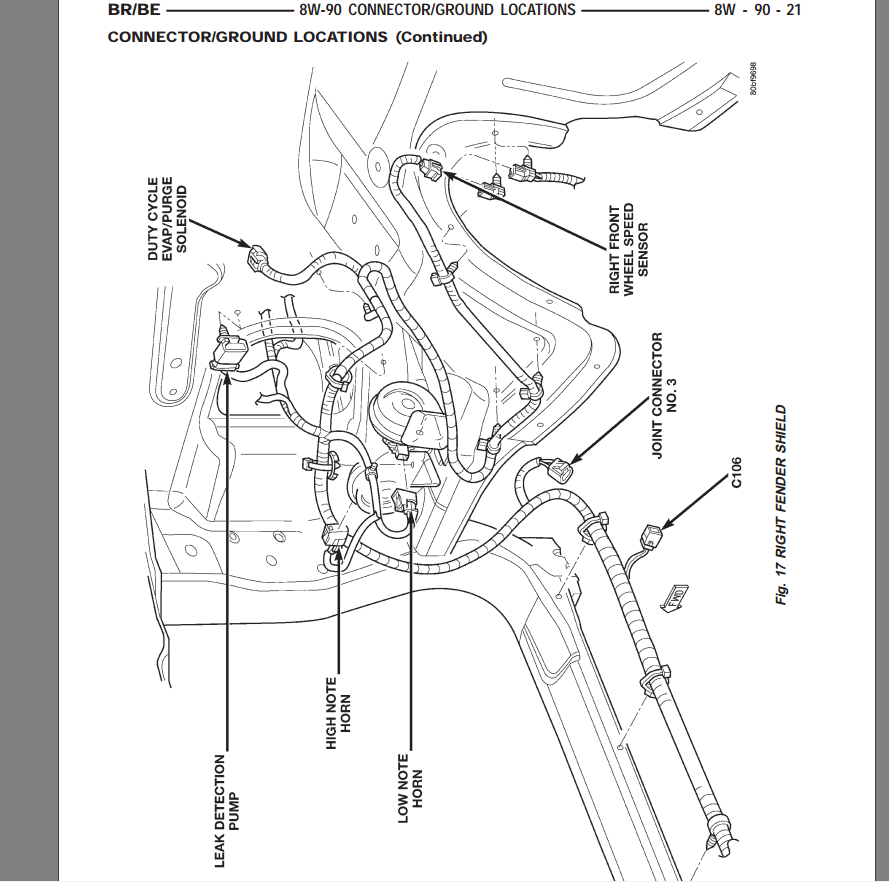
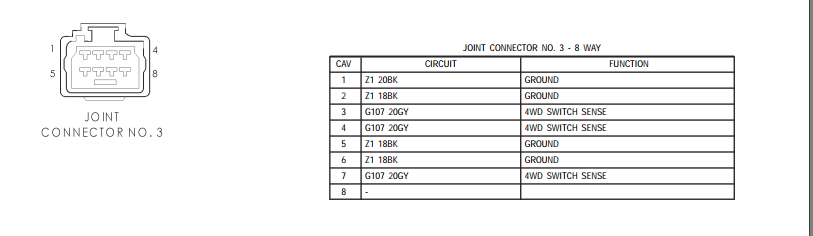
wow, Dave there is..... its low and on the front crossmember. OP note this is from a 2001 manual so wire colors could be different for yours..... So it has the horns probably headlights, rf wheel speed sensor and C106 (4x4 indicator) and Joint connector #3 (this just junctions a lot of the wires together.) Here is #3 It will take you some time to science it out. I am not sure who or where might have a really good drawing of just that portion of the harness.... The FSM is going to break it down by circuits and you have to guess what it looks like in the harness. GL HTH Hag
-
I can't picture the screw you are talking about, but one possibility can you replace it with a longer screw and use a jam nut to help hold it? another option is to "disturb" the threads a bit. Use a soft hammer to make the male threads deform just a bit. Loctite makes a purple thread locker. I use it for smaller screws (like scope mounts etc) it seems to be good to resist light vibration and it is easily disassembled. HTH Hag
-
Ask if they reflashed the computer.... it could be that they replaced the programming with an automatic tune.... You lose the stall prevention that the manuals have. They had to remove the ECM to do the tappet gasket. Its easy to bend a pin on the ECM if you are not careful. There are also hidden splices in that area. They could have easily boo booed them. If I may ask, what was the cost? or at least what was the hours that they quoted. Thanks! Hag
-
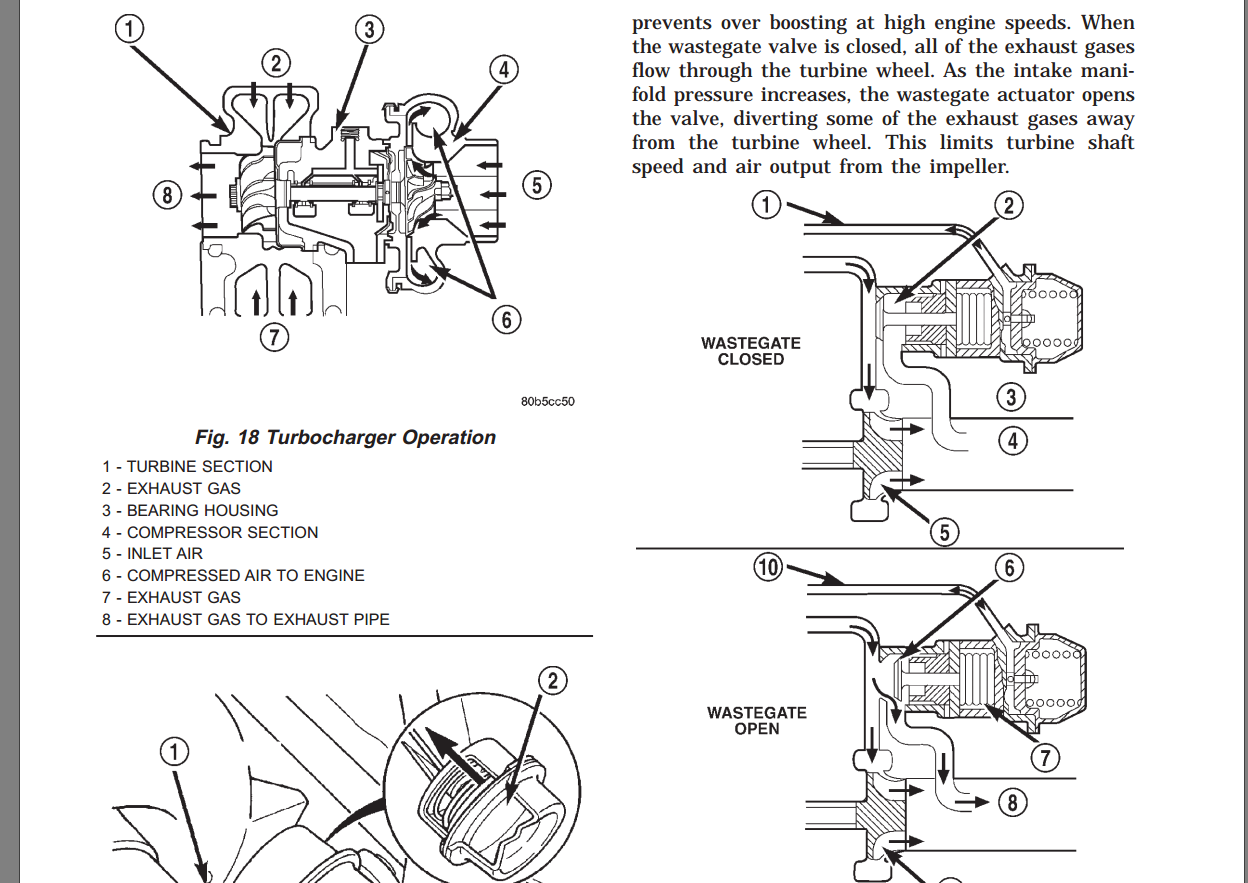
Our waste gate does NOT reduce the pressure of the intake tract. (there are systems that do, ours does not) Our waste gate diverts potential energy from the exhaust drive pressure away from the drive side of the turbine. (our waste gate basically reduces drive pressure) From 11-14 (Exhaust system) of the 2001 FSM HTH Hag
-
Greg, For the racing trailer I use a nitrogen bottle. Dude that will save your life. its easier and cheaper than sketchy cords and low voltage on a compressor, or trying to run tanks back and forth to the tire guys, or pulling out, setting up and listening to a stupid generator to run the compressor.... I can in a pinch run air tools. GL HTH Hag
-
That would be much more awesome than that shall not be named..... GL Hag
-
Manimal If you think you are in a situation where its gonna act up, (or while hot see if it starts like its cold, when it doesn't pour cold water over the vp.) You could also try just a bump with no start, that should leave the lift pump running for like 30 seconds. Then try a normal start. (this would circulate cooler fuel through the pump cooling the circuit board.) You won't like where I am heading, but it is a known failure mode of the VP. (while hot the circuit board doesn't make some specific contacts, but when cold it will....) (my brother's vp was opposite. you heated it to get it to run right. Hot air gun was very handy.) Hag
-
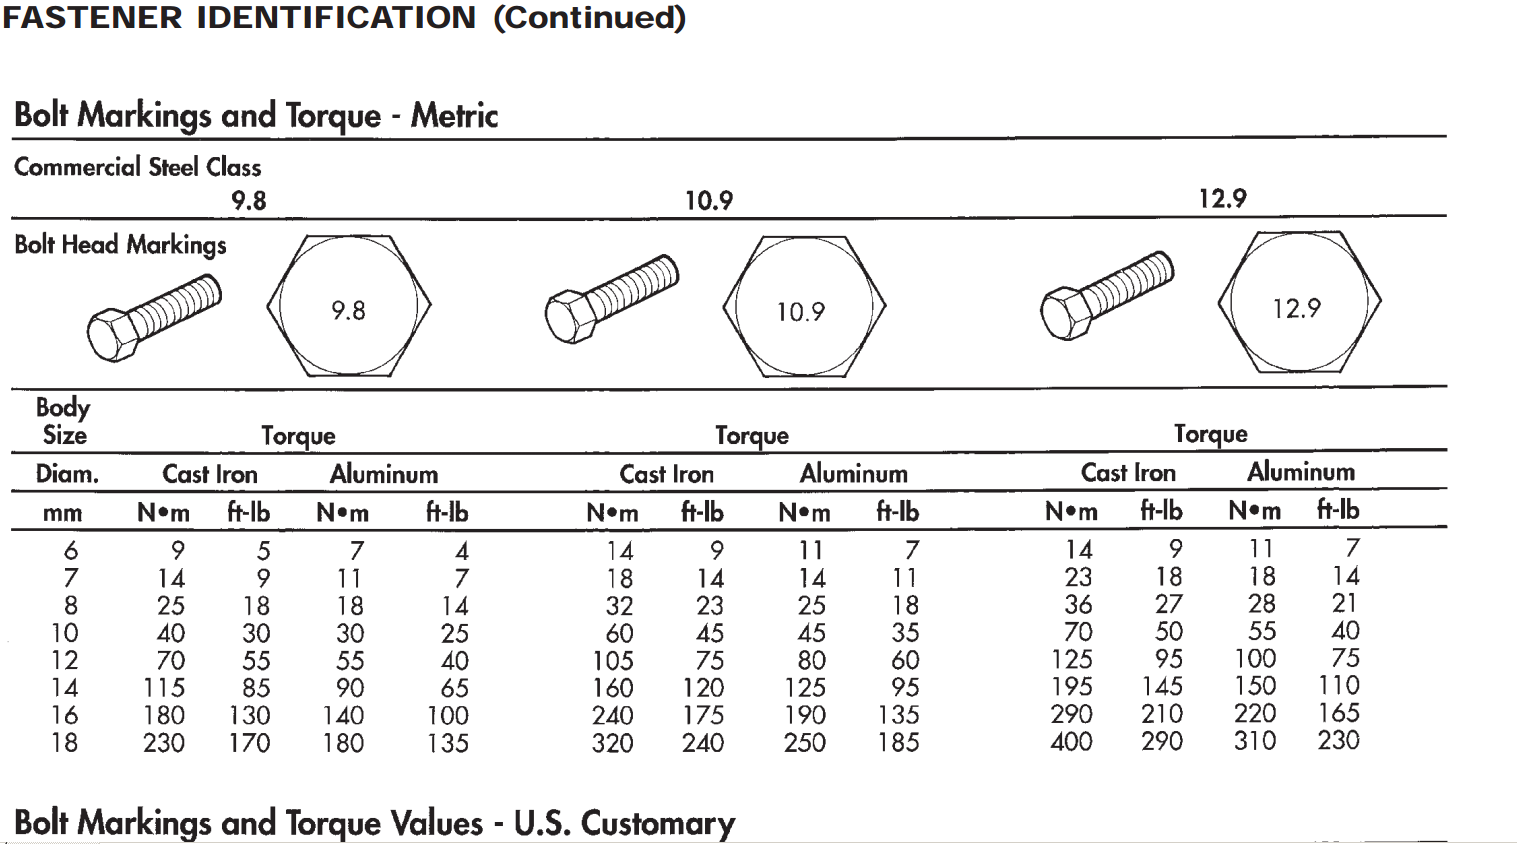
IBM, I agree I found both of the different references you found.... I think the bolts are M12. Need to know the class of bolt. (and materials to be fastened) Metric 12.9 (similar to our grade 8) maximum suggested tightening torque is 123 ft*lb. grade 10.9 is suggested max 106 ft*lb. grade 9.8 is suggested max 83 ft*lb. This chart from the manual says the m12 at 12.9 can go to 95 ft*lb in cast iron. Our crank is forged steel. (significantly stronger in tension) so I think the 101 ft*lb is fine if the fastener is 12.9 or stronger. HTH Hag
-
Newbie, Sorry you are taking it that way. I don't see anyone that responded, intended for you to take it that way. That is a huge list. Most of those things I have performed on my own truck, so someone else's truck needing it is not out of the ordinary. But trying to think through a lot of them, takes some time. We have all performed them but in smaller bites. I agree that there seems to be a lot of double charging for labor. The labor of 2700 for the waterpump tappet cover and timing/oil pan cover seems high. The oil pan is a pain. and the tappet cover requires removing the injector pump. but 2700 worth of pain? ( i would really be surprised if ALL of those gaskets are really bad. I think someone shotgunned that issue. I would clean the block up and only replace the gaskets that were bad.) The front end may need to be rebuilt, but it does not necessarily all need to be rebuilt at the same time. Some of it comes down to, is this your son's only vehicle? This seems to be a list of "I want to drive this truck daily for the next few years, what do I need done?" vs "This is my secondary vehicle that I use ocassionaly, what do I need to repair to make it safe." The suggestion that he perform the work himself is very valid. Very little of this work is rocket science. It is hard work (heavy, aggrivating, dirty) but just takes time.. Most of us could not afford to pay someone else to perform these functions. (we have more time than money....) So trying to expand our mental view into that is hard. I am also worried that there are going to be adders..... I cannot believe that the front end is this worn out, but the brakes are wonderful. The front end repair seems the most reasonable. I would probably have that done. The oil leak, I would diagnose myself. That is just cleaning the motor and watching for where the leak really is. and doing a targeted repair on that seal only. HTH Hag
-
Evan, Pull strings from your rear tires forward. (probably have to have front tires off.) This will let you "see" where the rear end angle is in relation to your front suspension. This should help you visualize if the rear is really out of alignment. Take a string attached to the truck near the differential pull it across the rear of the tire, it should be long enough to go past the front end. Start with the string only touching the rear of the tire, slowly move the string towards the truck until it touches the leading edge of the rear tire. This is a reference line of the outer edge of the rear tire. Do this also on the other side of the truck. (you can tie them to jack stands or something. now you can measure the distance between the strings close to the tires and in front of the truck. the difference is your rear toe angle. (they should be parallel or slight toe in. never toe out on rears) the center of this rear toe angle relative to the center of your front suspension is your thrust angle. It should be nearly zero. This will also show you if you have "parallel offset" or dog tracking. (you need to check the body relationship to the suspension relationship also.) You can do it without removing wheels and just measure from parallel lines on both sides of the vehicle, but you just get measurements. there is no visual of the strings following the rear wheels to the front. If something is really wrong it will show up visually really quickly. Hag
-
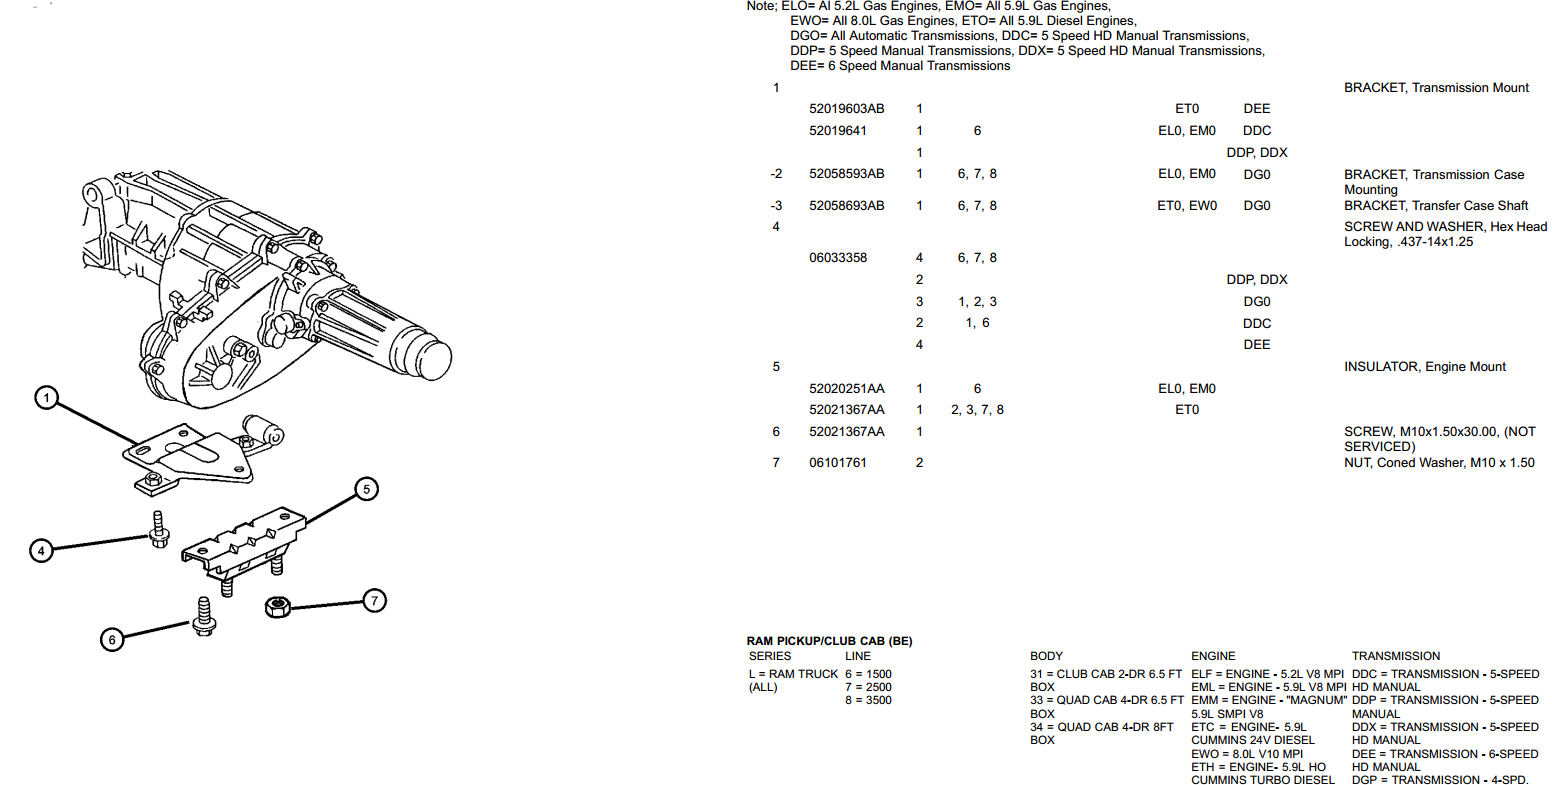
grrr, Sorry. Looking back at it. I bet item 4 is the bracket to transfer case. It is item 6 you were looking for which is m10x1.5p bolt. It is very close and would thread together. (the 3/8 bolt is smaller in diameter than the M10 by about 0.02" and 16 threads per inch is about 1.58mm pitch.) So close enough to thread together, but not a uniform tightness. When you get a chance put the correct bolt in. The looseness of the standard bolt in a metric thread will fall out eventually. (or if you can get above the welded nut, just add another 3/8" nut on top to jam against the welded nut. That would prevent it backing out.) HTH Hag
-
Irie, (starting a new thread is the best thing to do!!!) here is a picture from the 2001 parts manual. (you may want to download and look at the 1999 to make sure yours is the same the same, but it is in the chapter called "engine mounting" It looks like you need an M14x1.25P (14mm diameter 1.25mm thread pitch) bolt. I do not know the length, though It might be that the 0.437" measurement is the length. (that would be about 12mm long) GL HTH Hag
-
Behind the fuel tank seems to be a common place to lose a line due to corrosion. I have not experienced this, but have seen other posts where it happened. GL Hag
-
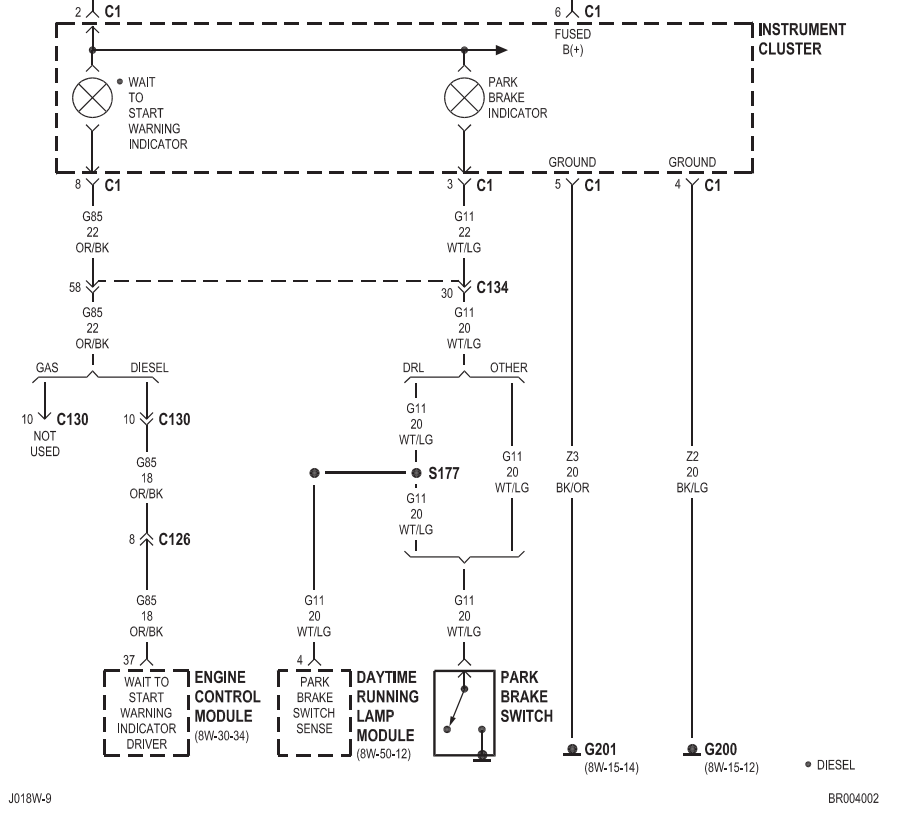
Gip, Sorry, was out of town yesterday. In the FSM page I attached you will see the OR/BK (Orange with black tracer) wire goes from pin 37 on the ECM connector to pin 8 on the C1 connector at the cluster. You can look up each of those connectors in the 8w-80 section of the manual for "connector pin-outs" and the 8w-90 section for "connector locations" (the 8w-90 section will also help you find the connectors C134, C130 and C126.) If you are trying to "check for shorts" and you are not using the FSM wiring diagrams, you may not be finding all the possible areas that a short can be and causing problems. GL HTH Hag
-
Gipper, I hope you find it. I am pretty sure they can tell too much amperage flowed through pin 37. Here is the wiring diagram for an 01. That wire goes through three junctions and goes near the steering column. so good potential for issues. It is a computer output going to a driver, so it should only see a small amount of amperage flow. Disconnect the ECM and pull the cluster and check to see if you have continuity to ground on the orange/black wire. If you do, its in the wiring. It will be harder to troubleshoot the cluster itself. hope that it is in the wiring. GL Hag 2001 FSM Ram 8w-30-34.pdf
-
When you go to push it back, and it won't move, open the bleeder. Does it suddenly move then? If yes, the problem in is in the brake lines (most probably the hose, but could be anywhere from that caliper to the master cylinder) If it won't move back easily with the bleeder open, it is a stuck/sticking caliper. Usually very easy to tell the difference. Hag
-
Just keep an eye on it. Since you hadn't driven it in a while, the rotors probably had a nice skim of rust on them. that takes a bit of time to wear off, and all that time is extra drag, making more heat. But definitely keep an eye on it. HTH Hag
-
Have you replaced the flexible hose to the caliper? Known troublesome spot. Had to do one of my buddies while in Florida this summer. It was right side hose failed, but truck pulled left on braking. My thoughts for this is right brake has gotten too hot. When you apply brakes, the left one being cool has a higher coefficient of friction (in is not in the throws of brake "fade") so the vehicle pulled left. Put new hoses on both sides right now. Keep your calipers, they are probably not bad. In fact if you want to test it, drive truck get caliper to start sticking. bleed that caliper, if the fluid shoots out, it is under pressure. (a truck sitting still should have 0psi of pressure in the caliper.) You then know "something" is retaining the pressure you put in with the brake pedal but not allowing that pressure to return to the master cylinder to become 0psi again. HTH Hag
-
Dan, OMG. That will make it a bit harder to figure out too...... Just go slow, try to make your own wiring diagram of exactly what wires you have.... It will take a while, and some long jumpers. Try and get a copy of the superbright wiring diagram. hopefully the installer sort of followed their diagram so some of what you see will start to make sense. GL Hag
-
Keep in mind!!! 12v positive is supplied directly to the light bulbs themselves!!!! (let that sink in, look at the drawing) 12v positive will never show up at the headlight switch FOR THE HEADLIGHTS. (mine being the 24v, does have 12v positive there, but it is for the instrument lights and park/turn signal, not the headlights.) The headlight switch for the headlights ONLY controls the negative side (ground). So you need to identify the direct ground wire (G201 or G208 depending on which cab) Then the wires that go to the ground terminal on the bulbs. Connect those and you have head lights. Sorry, you have a nightmare... That will take some work to figure it back out. Just why in the world would someone want to retro back to a push pull versus the rotary switch. GL Hag
-
My brother and I swapped ECMs troubleshooting his VP issue. (our trucks are very similar in year model, both '01.5, but are otherwise completely different. his is a top of the line 2wd automatic, mine is a base model 4wd manual.) Mine is a 5speed and his Auto. The only thing I noticed during the swap, the Auto ECM does not have the same stall prevention programming that my manual has. So my 5 speed ECM in his Auto truck made no difference. His Auto ECM in my 5 speed prevented me from selecting a gear and letting out the clutch and the stall prevention didn't try to maintain idle speed. HTH Hag


