

Leaderboard


Popular Content
Showing content with the highest reputation on 04/06/2018 in all areas
-
As much as I'd love to build you a transmission, if you're only 1-1/2 hrs from Firepunk, I'd just have them build you one. Lavon seems to be a standup guy, although I have no personal connection with him. His prices are a bit higher than mine when comparing apples to apples, but he has a larger shop, a crew, and more overhead than I do, so that stands to reason. After all, at the end of the day, there are only so many ways to build these things. I will tell you that the best way is not found in a box kit of any kind, so as long as whoever is doing the work knows what they are doing, you will be fine.4 points
-
2 pointsyou can always go up in size but the limitation you will find is the size of the lug for the B+ terminal. I used a #4 lug with a 1/4 screw size hole for that application and had to grind a few thousands off the sides to make it fit in the plastic isolator around the B+ terminal. I think if you go any larger you will be doing a lot more grinding and may compromise the integrity of the lug. I went to the battery shop I have an account with and bought the cable and lugs. The rest of the materials, (solder, heat shrink' cable cover, #12 -1/4 lug, bolt and washer), came out of my supplies, 2' #6 AWG $5.54 2' #4 AWG $5.54 1 #6 -1/4" lug .47 1 #6 -5/16" lug .47 1 #4 -1/4" lug .47 1 #4 -5/16 lug .47 TOTAL 12.962 points
-
2 points
-
2 pointsI did it years ago when they first came out. It made NO difference on my truck. the issues I was having was for another reason & rather than actually look to figure out what was going on, I just did it.............. Im not saying it does not work for its intended use, Im saying, changing the oil to fix a flat tire is a dumb idea. Sometimes I need to slow down & think about stuff before I do it. LOL. Bob2 points
-
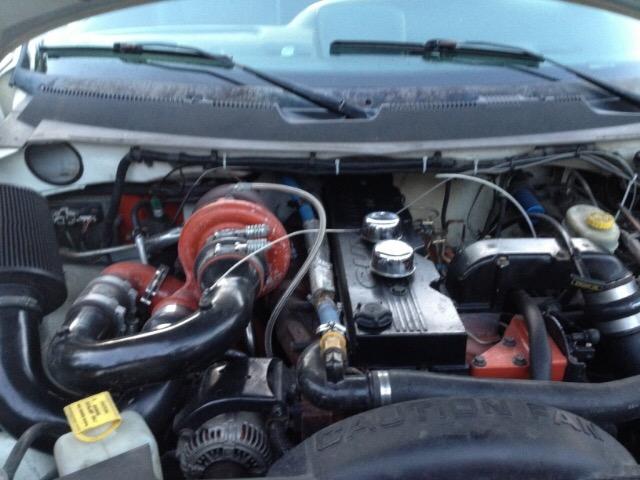
2 points@dripleygetting ready for the rain. I finished that grounding/alternator B+ modification that @W-T did the write-up on. First time took a few hours to get everything right but now I could knock that time down to a couple of hours. Cut the grounds here and throw the rest away. #4 gauge wire from alternator B+ to aux battery.2 points
-
2 pointsOk, I was thrown off because for that tire size it says circumference is 102.7. I adjusted to 98 and I’ll go by the nearest speed trap area and check it lol2 points
-
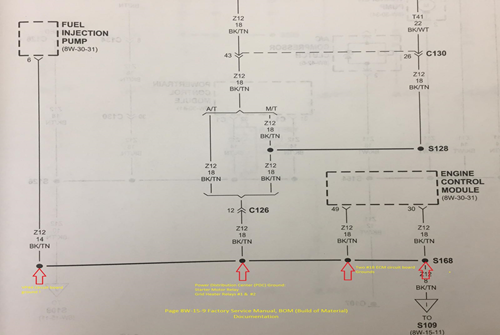
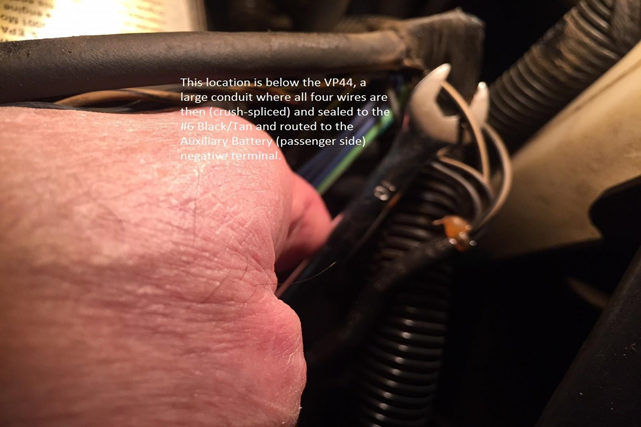
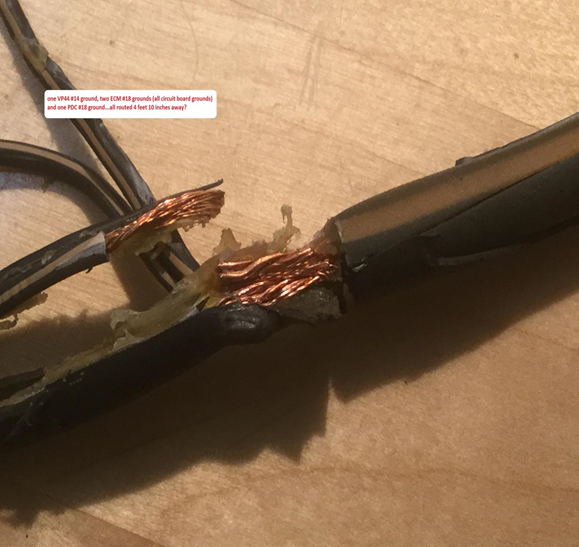
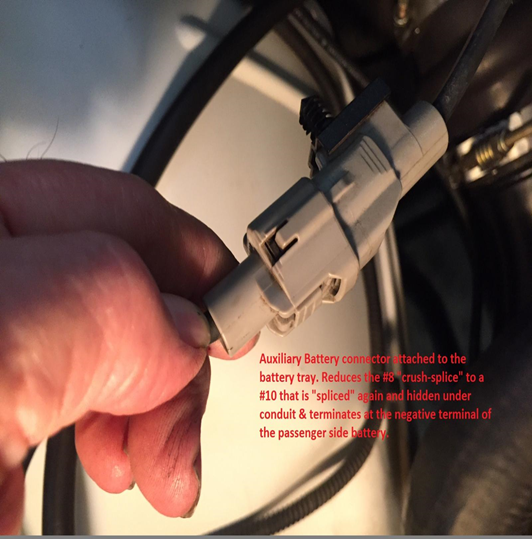
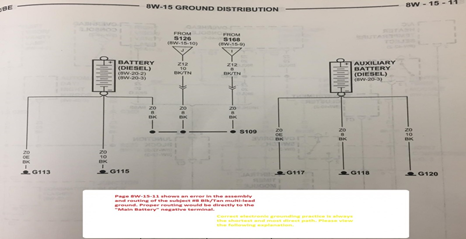
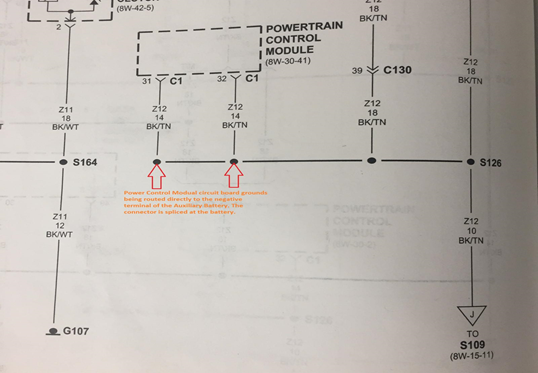
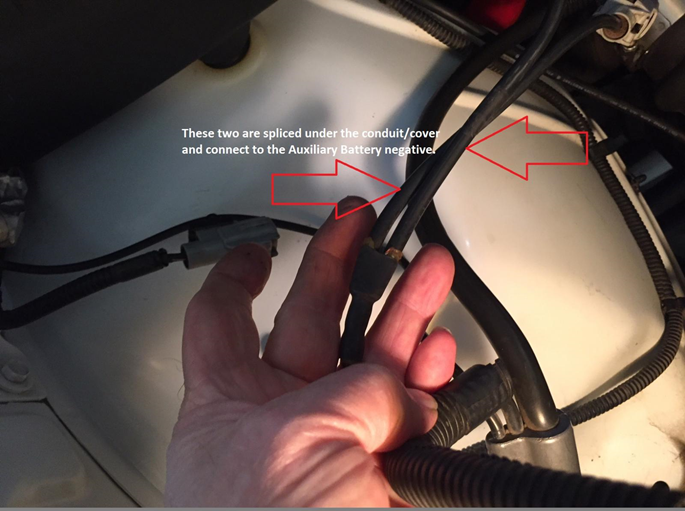
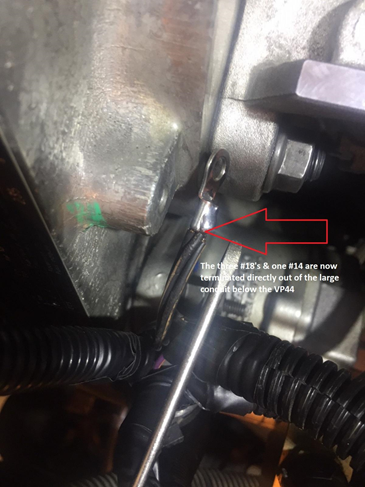
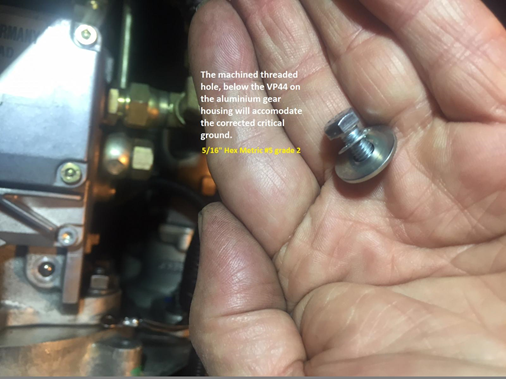
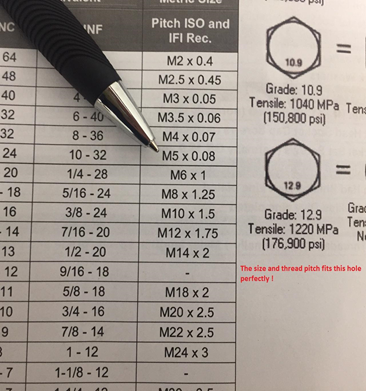
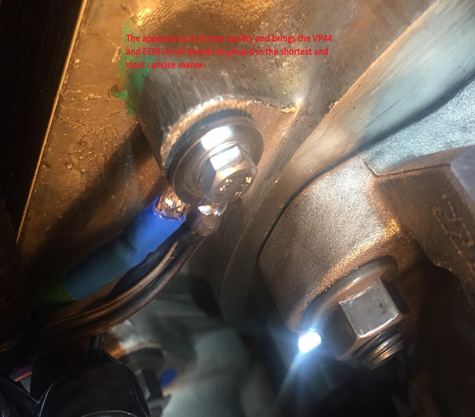
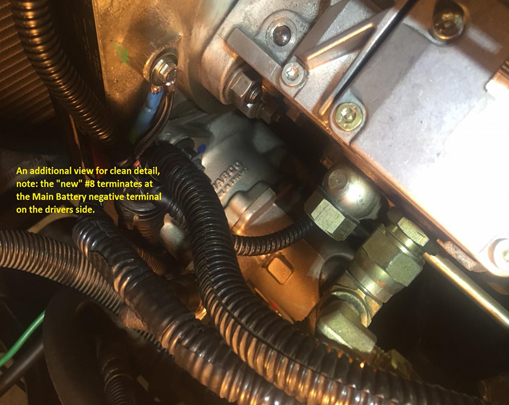
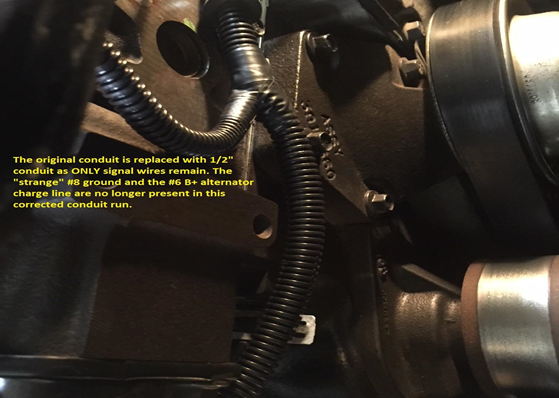
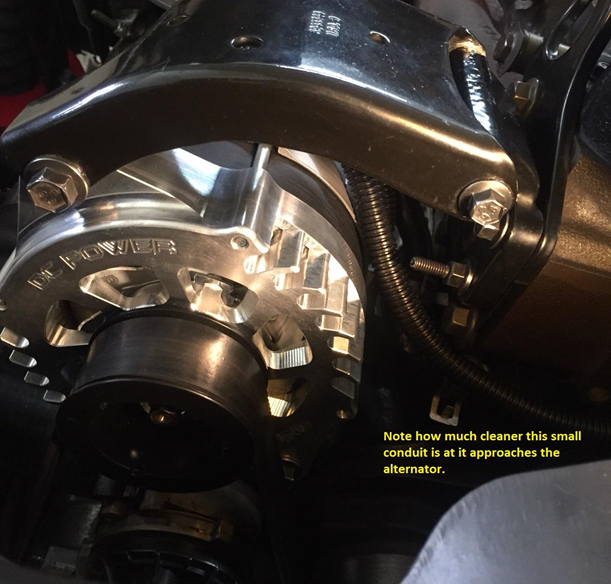
After 18 years of interesting CTD enthusiasts and transmission specialty outlets all contributing their method, or fix, to the well known TC lock unlock syndrome, I can no longer remain silent. Extensive review of many posts regarding TC lock unlock, the rerouting methodes, the add on filters for APPS and last, but not least,...the "tin-foil hat" brigade. I do realize that each individual or company that contributed to the vast amount of information on the web had good intentions and I must acknowledge that some of the procedures caused me to closely examine what these people were trying to do. I believe it is well known that even a blind mouse occasionally finds a morsel of cheese. Again, as it is well known @Mopar1973Man was the only entity who positively identified the instigating source of this key issue. My entry today is not about alternators...it is about what Daimler/Chrysler did in regard to production of these Cummins powered platforms and the complete disregard of common sense Electronic Engineering. Please note, this applies to automatic and manual transmissions as each platform is plagued in the same manor with different quirks. This Blk/Tan #8 gage wire is quite critical in the scheme of things. It is contained within a 1" plastic conduit passing along the front of the engine. It contains water temp sensor leads, air conditioning leads, alternator/PCM leads and the #6 gage alternator charge line to the PDC. This #8 gage Blk/Tan passes over the top/backend of the alternator and is "eventually" connected to the Auxiliary Battery (passenger side) negative terminal. This snapshot of the Factory Service manual documents "four critical ground leads" that are "spliced" in an unconventional method. This photo depicts the three #18 gage wires and the single #14 gage wire entering the shrink-tubing where the "crush-splice" occurs. This bundle exits the large plastic conduit below the VP44 This again is a most disturbing depiction of the Daimler/Chrysler method of splicing critical ground leads and then routing this across the top of the alternator and "eventually" bringing this to ground reference. This photo depicts where this #8 gage Blk/Tan first connects on the way to "eventual" ground...yes this is the Auxiliary Battery tray connector. Please note: it is spliced again and joins the PCM circuit board grounds...which are critical in their own nature...and "eventually" terminate at the negative post of the Auxiliary Battery's negative terminal. This photo is very interesting, it is the Factory Service manual and the assembly line documentation follows this as a road map in the matrix during production. Please NOTE the title "NAME" to each battery...I looked at this for a considerable amount of time before I realized the assembly line coordinators tried to work with the documentation from the Engineering Staff to "make it as it looks"...Could this single oversight be the reason of a four foot ten inch critical ground wire combination traveling the distance to "EVENTUALLY" terminate at ground? From a basic engineering standpoint regarding ground...you "NEVER CHOOSE THE PATH OF EVENTUAL GROUND" !!! It is to be the shortest and most concise connection in reference to ground...this is biblical in ALL ELECTRONICS...including pickup trucks. ! Here is the Factory Service manual documenting the PCM circuit board reference ground starting as a pair of #14 gage wires being spliced into a #10 gage bundle and arriving at the Auxiliary Battery through another connector that joins a #8 gage wire that is "splice-joined" under plastic conduit in a Y configuration joining the rouge #8 gage "after passing over the alternator" traversing the entire engine compartment from the driver side of the vehicle. Seriously I have been drinking excessively, most recently, due to the nature of this blatant discovery. This is the hidden Y splice at the Auxiliary Battery where the "mess" EVENTUALLY terminates for ground reference. This photo shows the correct "HOLE" of where to apply ground for the VP44, ECM and the PDC...note the logical location It took a little research to find the size and proper thread-pitch. Metric M5 with a 5/16" hex head is perfect This is where you apply a fresh "quality" #6 gage ground and terminate this at the Main Battery negative post on the drivers side for absolute ground reference for the VP44 and ECM This is a very short and concise reference to ground. This is the corrected procedure for a rather critical ground. The two largest wires originally contained within the 1 inch conduit are no longer present and located well away from the alternator. My alternator B+ "charge" line is now a #4 gage line directly connected to the Auxiliary Battery and when my new battery terminals arrive and they are secured, I'll provide photos of a completed Master Power Supply System within this engine bay. With these corrections, I would hypothesize that a poor ripple specification on a given alternator would be overcome by the immense capacitance of the parallel batteries and would become less prone to causing the dreaded TC lock/unlock for automatics and cruise-control abnormalities for the manual transmission platforms. The #8 gage Blk/Tan passing over the alternator as an "EVENTUAL" ground is gone...the PCM, ECM, VP44 and the PDC are now grounded in accordance of standard Electronic Engineering practices. Respectfully W-T


 1 point
 -
1 pointI was going to revive an old thread on my issues but it seems ther are more than one. So I will give the Readers Digest version. About 4years ago I started having engine surging problems. It would surge about 3% to 5% and was annoying and would set a couple of apps codes. But the problem got worse and would surge upwards of 14%. When it would go this far it would soon trip an apps code and would dead pedal. Always recovered, though it would take a few minutes. So I broke down and made my electrically challenged arse do some diagnostics on the apps and everything pointed to the sensor being bad. I bought a cheap one off of EBay installed and sure enough no surging. Ran that one a week or so and ordered a new Timbo. Installed it and bam right to surging again. Reinstalled the cheap no surging but now I have a p0222 code that won't go away. Cleared multiple times and it always came back immediately. And every so often I would get a MAP sensor code. I was not sure if the cheap apps was hurting anything so I put the Timbo back in Fast forward some and I decided to swap the MAP sensor with the spare I had to see if that was part of the problem. Well i broke that one and just had to stick the old one back in. I had to hit the road to go back to work and no surging and it has yet to surge since. The only I messed with was the MAP wiring harness, though I did have my hand shoved in around the ECM wiring harness at the ECM. Now on the trip back to Maryland I pick up another issue. CEL comes on with a p237 code and the engine is defuled and I can only accelerate at about 40 maybe 50%. Stayed that way for several miles then went back to normal. But it kept doing this on and off sporadically. This did morph itself into bouncing in and out of the defuel mode when ever I put much more than 40% throttle to the engine. No more codes either. I also noticed that whenever this happens the Scan Gauge is loosing the MAP signal. Fast forward to this week and I have the no start issue. I have messed with that for 3 days and after swapping the fuses around it has worked fine. One thing I did while messing with it Tuesday was grab the engine wiring harness near the ECM. I gave it good squeeze and moved back and forth what little it would move. Drove back to the motel and it ran like a scalded dog. No jumping in and out of the defuel mode and for now she is back to normal. My conclusion is that the grounds in the engine wiring harness that @W-T wrote about are most likely the cause of the multiple issues I have experienced over the past years. So i am going to take an extra day this weekend and see how many of them I can redo.1 point
-
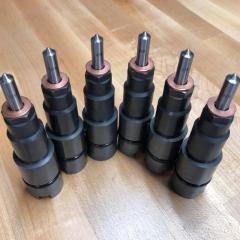
1 pointThe power bug is the worst and best thing in my life! Just finished up installing some 7x10 injectors in my truck, gunna be a long restless night thinking about it ? Got a day full of tuning for me tomorrow ?
 1 point
 -
From the driver side look up towards the back of the block and you'll be able to see the freeze plug back there. If your rotting out freeze plugs it might be a good idea to replace them all. Typically stems from people over using the coolant till its corrosive and the damage is done.1 point
-
I agree with Dave. Might try a billet bolt-in one if that's the case.1 point
-
The freeze plug on the back of the block comes mind. Might have lost it.1 point
-
1 pointHX35 rebuild kit is $60 from DAP and an hour of your time. (Once the turbo is off the truck) HE351CW swap is about $400. Less if you can fabricate your own pipes. SX-E would be drop in WITH a HX40 downpipe. Also would be laggy with just 75 HP injectors and no tuner.1 point
-
1 pointIs your EGT issue at cruise or WOT? If it's at cruise going to a larger turbo will make your cruise EGT issue worse. If its at WOT then a larger turbo will lower your EGTs, to a point. Everything I have gathered from this thread is that it's a cruise EGT issue. Your airflow is too low, but a larger turbo will make it worse based on the rpms you cruise at.1 point
-
1 pointI think I was impatient, but I knew I was going to line x it so scraping paint wasn't a big deal to me1 point
-
1 pointHeater hose will break down under oil. It'll get gummy and the ends will collapse. Best to run some oil rated hose, like turbo drain hose. Expensive stuff tho.1 point
-
I drove out and had him do it. I hung out and watched as much as I could. He tries to make it out to be pretty easy but I wasn’t willing to try haha.1 point
-
1 pointAww my day-time ghost stories aren't working???? It's only ever happened after nightfall. During the daytime I've never had an issue. And it gets kinda chilly when you roll by it.... I'm not overly superstitious, but there are a handful of things I've experienced that I can't explain.1 point
-
1 pointI don't 'need' a truck either, but I choose to keep it around. It's my hobby. Nothing is permanent.1 point
-
1 point
-
1 pointThat would be why it smokes! Thou it shouldn't be spraying outside the bowl, the 04.5-07 injector nozzle is a narrower spray pattern and sprays deeper into the piston. The diagram above shows this.1 point
-
1 point
-
1 pointMy little truck had 2 breathers in the valve cover. Just push in type through grommet. Never had any issues with them or unusual oil deposits under them. Along these lines. Nothing special. Valve Cover Breather The motor had maybe 3000 miles on a non stock rebuild.
 1 point
 -
1 pointIf the gasket was not painted and black in color, it's a good possibility it was the OEM gasket. Would also recommend a replacement.1 point
-
1 pointMy version of cheap is $5 not 25 haha. but okay ill get a new gasket at the parts store.1 point
-
1 point
-
Not twin turbos but did get my interior cleaned as well. I pulled my door sills to scrub them.
 1 point


This leaderboard is set to Boise/GMT-06:00