Mopar1973Man
Owner
-
Joined
-
Last visited
Everything posted by Mopar1973Man
-
Here is the local river...
-
Not bad... Some of those I've been too... But as for camping I'm just getting started.Smokey Boulder RoadKirkham HotspringsGot get out and do some more...
-
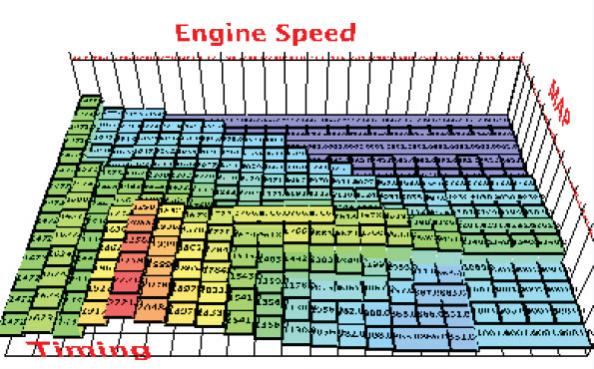
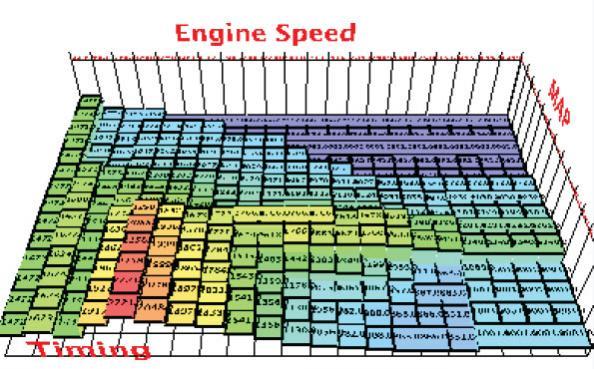
VP44 is very simular in timing table...
-
Well that's what the Jayco Travel Trailer and the 8x8 Utility Trailer are for too.. Load... But even then there is very little change from the normal. Even with my last trip I scaled the truck and trailer GCW 16,080# and pulled 14.13 MPG hand calc'd. But that was with my stock injectors but still using the IAT fooler locked at 143*F. No kidding I know I'm not going to be able to lock down the timing to a single place. Because I know there is load, boost, manifold temp, fuel temp, engine coolant temp, and throttle position that play a role in how the timing curve is created by the ECM then the Edge Comp will modify it again. But like Quadzilla told me that the idea of locking the IAT down to a signle spot is a good thing then on top the warm temp will retard the timing but since the ECM & VP44 are talking the Edge Comp can bump the timing up even quicker. But there is only so quick the timing can forced because if it forced too early the VP44 can and will shut it down. (Timing). As for the emissions part that always the main reason of the stock tune. Cleanest burn reduces NOX oxides of nitrogen. Because if it was all about performance then timing curve would already be bumped. But lets say the 60% of the stock tune is emmisions and the other 40% is performance.
-
I'm currently setup with rheostat next to my transfer case lever and I can adjust IAT temps while on the fly. As for changes there don't seem to be any huge changes in EGT's or boost... I'm not saying there isn't any change at all but it most likely very slight changes. My 55 MPH mark seem to stay fairly constant 2-3 PSI of boost and 550-600*F EGT's. But what does change is the MPG's warmer the temp the better the MPG number. Which follows the Autoignition Temperature Also under normal engine configuration and 40 cetane diesel fuel it takes roughly 13* of crank travel before diesel ignites normally hence why the initial timing typically is right around 12-13* BTDC But the tabling for the dynamic timing was designed more so around the emission controls more so than driviblity/performance. Why else did all the proformance boxes (Edge, Quadzilla, etc) come out with with more aggressive timing curves? (Gotcha!)
-
Go anyway where in Idaho there is water flowing. Most of the highways follow a river or stream of some sort. Even AH64ID can tell you that... Just across the highway from me is the Little Salmon River. I'll admit the water flow is down everywhere but there is always water flowing Idaho.
-
Cheater...
-
On my way home from Lowman, ID
-
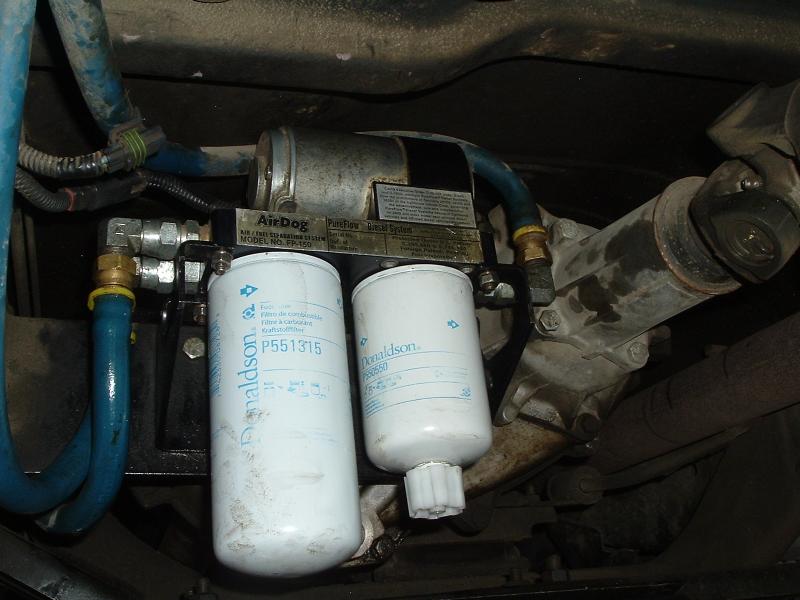
Yea its a 150... Its a good pump been reliable... Makes very little noise at all... From what I learn a loud pump could be cause by fuel restriction... Or just a wore out pump motor.
-
(Subscribed - Interesting thread - Carry on boys!)
-
Nope... Just pull them out about 1/2 inch to get the injector out and then push them back in...
-
That's good...I got a pair of donaldson filters on there now...So far they are runing prefect... Very smooth idle and lots of good power when you stomp the pedal to the carpet.Really changed the attitude of the running performance. Like ISX had done is soaked injector overnight in solvent and nothing happen... So now I tend to believe that most injector cleaner are incapable of removing any kind of gum or varnish on the pintle that gets cooked on the pintle. If you want it done right you just got to break them down and clean them by hand.As for #5 I double check it ID on OD and it a prefect match... But it showed me there is no way to interchange part of a injector with another injector...I'm curious wha the trailer does next...About 1,600 RPM's 5 Speed NV4500 Same here... My 4th gear is exactly the same as your OD locked out. Actually the peak of the torque curve is there but economy comes at lower RPM's according to Cummins. Correct... So yes you want to travel at a safe speed for the trailer which most trailer tire are only rated up to 65 MPH. so 55-60 MPH is a safe zone for hauling. But your still high enough in the RPM's to create plenty of torque. So like when I start pulling a grade I'll drop a gear and bounce the tach up to 2K and hold it and watch the EGT's if it manageable I hold it if it still rising then drop another gear and kick up to 2K and hold again. So far I've never had to pull any lower than 3rd.Nothing on the check ball... I was stuck to the spring again and it fell off before I could get a picture of it wedge on spring. So I took a pair of pilars and slightly bent the last coil on each end in a oval shape just every so slight to hopefully stop this from happening.Biodiesel not available out here.He needs it... But its all good I would kick his ar$e and then show him around the neighborhood...Use backing nuts and make the top nut flush with the threads and then it won't touch the BHAF... (Heat shield required)I should know better... But would you believe it I don't think there is any cheap hairspray here at the house.Sound like someone found you a odometer CajFlynn... :lmao:Time for another 999,999 again...Not Me... I won't wear those things...