Search the Community
Showing results for tags 'vp44'.
-
How to remove the Bosch VP44 Injection Pump the quick and easy way. Takes approximately 45 minutes for me to remove the VP44 Injection pump. Remove the Mopar1973Man Crankcase vent (if applicable) Using a 10mm socket remove the four air horn bolts and one dipstick bolt. Using a 7/16 or 11mm socket loosen the top clamp of the intake boot. Move the grid heater and intake horn out of your way. Pack a shop rag in the intake to prevent stuff from falling in the intake manifold. Using a 13mm socket loosen the 3 bolts holding the APPS sensor and unplug and move over toward the driver side fender. Now unplug the VP44 main connector and wire tap . This connector is a two step plug lock. Pull the release tab and wiggle the plug out then pull a bit more on the release and the plug should release fully. Now using a 10mm loosen the 3 bolts holding the 1,2,4 injection rail in place. Using a 3/4" wrench loosen 1,2,4 injection lines. Now remove 1,2,4 injection lines as a group. Using a 3/4" wrench remove the overflow valve banjo and remove your supply line (may differ from mine being a big line kit) Now remove the crankcase vent. Just unscrews normal right hand threads. Do not pry on the nipple. Use an oil filter wrench or a strap wrench to loosen stubborn vent covers. Now remove the pump shaft nut with a 1 1/16 inch socket. Be careful removing the nut and lock washer that you don't drop them down into the gear case. A stubby Phillips screwdriver and a magnet is handy you can slide it off the shaft onto the Phillips screwdriver. Using a 23mm socket roll the alternator towards the coolant bottle to bring the keyway on the pump gear to TDC position and then install your gear puller and pull the gear loose on the shaft. Now loosen the 3,5,6 lines but you do not have to remove the injection line set. Now you want to loosen the 2 bolts on the rear bracket with a 13mm socket. Now remove the 4 nuts holding the pump to the gear case. Now careful kick the 3,5,6 lines out there nipples towards the block. Now lightly pry the VP44 injection pump away from the case and remove. Check for the key in the shaft make sure its present. This is what you should have after removal...
- 1 review
-
- 5
-

-

-
- vp44 injection pump
- injection pump
- (and 1 more)
-
 I have a new proto type with custom circuit boards so I don't have to worry about a big mess of wires and components moving around and causing problems. I can move on to working out more of the code. My tune tables need some work and I need to build an ECU to operate my guage cluster and OBD2 port. Got my transmission signal working pretty good. I need to make a TPS calibration routine. Here's a new video of it running.
 -

Fuel Pressure Specification For Bosch VP44 Injection Pump
Mopar1973Man posted an Cummins article in Fuel
Fuel Pressure Specification For Bosch VP44 Injection Pumps Here is a copy of the fuel system specifications from the Dodge Factory Service Manual. This is for your Dodge Cummins Turbo diesel truck with a Bosch VP44 injection pump. Fuel pressure Normal fuel pressure should float about 14-15 PSI running down the pavement. It should never fall below 10 PSI at all. Here is a colorize fuel pressure gauge to give you a clue of the fuel pressure span you want. You want the needle to stay in the green at all times. Yellow zone is a warning that you should check the fuel filter, lift pump performance, overflow valve, etc. This is undocumented maximum pressure is 20 PSI. Now take notice to the overflow valve is set for 14 PSI so excessive pumping of fuel does nothing for performance except create more heat in the fuel, which in turns reduces the cooling ability of the fuel and adds more stress to the lift pump. So a little extra fuel pressure is a good thing because it ensures the Bosch VP44 injection pump stays cooled and lubricated properly. However, excessive fuel pressure will heat the fuel and reduced the cooling ability of the fuel. Now always remember that the only lubrication the Bosch VP44 injection pump will see is the fuel itself so if you don't have enough fuel pressure it will cause damage to the Bosch VP44 injection pump. It's like the same as running the engine with low oil pressure it will continue to run, but the damage to the engine will occur. On the other hand, the Bosch VP44 injection pumps, which happen to be about $1,200 to replace. Pressure Drop The amount of fuel pressure drop between idle and wide-open throttle. 2-3 PSI drop from idle to WOT is normal. However, 5 PSI or more pressure drop from idle to WOT is pointing out a failed lift pump, plugged filter, and/or plumbing restrictions. 2-3 PSI Is Normal Dropping more than 5 PSI is pointing towards a failed lift pump, plugged filter, or restrictive plumbing. Just to show you the difference in the stock plumbing which is 6mm ID plumbing and most performance pumps come with 1/2" ID plumbing. These pictures will give you an idea... The first picture is a Big Line fitting over the top of the stock plumbing. Then the second picture compares the stock 6mm ID steel lines to a 1/2" ID Big Line hose. The best way to show this example of restrictions is to let's say your house is on fire. You know your garden hose has 80 PSI of pressure, but the garden hose is only 5/8" ID hose. Your wife calls 911 and gets the fire department coming in the meantime you keep fighting the fire with your little 5/8" garden hose and losing the battle. The fire department shows up and pulls a 2 1/2" hose off the truck and charges it at 80 PSI and now winning the battle. Your fire is put out! What is so different? No matter what the size of the fuel line will dictate how much volume can be pushed through the fuel line. Like the story above the water pressure was the same at 80 PSI, but the hose size jumped from 5/8" to 2 1/2" ID hose and the volume changes are the size of hose. So the same thing applies to the stock fuel system. The stock banjo bolts and 6mm ID pipes are just too restrictive and cannot supply enough volume of fuel for that Bosch VP44 injection pump demands. This why I highly suggest you go up to 1/2" ID plumbing. Reasons Why Fuel Pressure Is Critical Let's take a look at a Bosch VP44 injection pump. I've labeled the fuel lines supplying fuel and return line plus the overflow valve. Now I know there is a ton of rumors on the internet of all kinds of minimum pressures for a Bosch VP44 injection pump. I'm going to say stick with the Dodge Factory Service Manual Specifications for fuel pressure. Now let's talk a bit more about the flow of the fuel. The lift pump supplies pressurized fuel to the Bosch VP44 injection pump the overflow valve regulates how much fuel pressure is held. Excessive fuel pressure is returned to the fuel tank. The picture below is of the bleed hole in the overflow valve this image was magnified x10 to show you how small the bleed hole really is. Give you an idea the size of the hole use a single strand of 14 AWG copper wire, and it will NOT fit the hole. The bleed hole is there solely for bleeding air out of the system which air will pass through this tiny hole rather easy but fuel will not. However, if you're looking for long life from a Bosch VP44 injection pump, I would personally suggest you adjust your minimum pressure to 14 PSI this will ensure the overflow valve remain open and a constant fuel flow through the Bosch VP44 injection pump and keep it cool all the time. Let me play out a simple scenario. Let's say my fuel pressure is roughly 10-11 PSI. I'm going to drive up into the back country approximately 40 miles with my Dodge Cummins towing an 8x8 utility trailer. Now the whole trip heading uphill into the mountain towing an empty trailer is going to be enough fuel flowing to the injectors to keep the Bosch VP44 injection pump happy. However, I've spent the day and loaded up with firewood and now coming back down the mountain loaded. I'm using my exhaust brake and coasting most of the way down taking it slow and easy. At this point, the injectors are no longer firing so the Bosch VP44 injection pump is not pumping fuel out to the injectors. Furthermore, the overflow valve closes at about 10-11 PSI so let's say it did close. Now where is the fuel going??? Nowhere! It is pooled up in the injection pump and gaining heat and being broke down. You've also removed the cooling and lubricating of the Bosch VP44 injection pump so now it actually taking on damage. To give you a feel for the fuel flow coming from the injection pump with an AirDog 150 at 17.5 PSI of fuel pressure, I've got a video to explain that quickly. I've heard rumors of some people trying to develop a cool down system for the Bosch VP44 Injection pump but after making the video above, there is just no way to cool down the injection pump using the lift pump of even the AirDog/FASS series. The whole problem is the restrictions inside the Bosch VP44 injection pump and the overflow valve as seen in the video above. So the only way to keep the Bosch VP44 injection pump cool is to keep fuel flowing through it at all times. So to keep the overflow valve open I suggest the 14 PSI minimum pressure. I'm currently at 136K miles on my Bosch VP44 injection pump and still going strong using a 16 PSI minimum pressure and an 18 PSI idle pressure. Here is a short video of stable fuel pressure from 55 MPH to 70 MPH at WOT. Here is another video done with idling, cruising, and WOT operation. Yes. I got a bit carried away and sloshed the fuel in the tank and sucked an air bubble and the pressure fell off. Cranking Pressure Test Here is a simple test on how to do the test for cranking fuel pressure. Pull the fuel pump relay in the PDC and then attempt to start the engine. Pay attention to the fuel pressure gauge during cranking. Be aware this test will trip a P1689 code and light the CHECK ENGINE light. Excessive cranking pressure can lead to difficult starting problems. Suggested Lift Pump Replacement You should replace the stock fuel system completely since it cannot supply enough fuel for even stock requirements without causing damage to the Bosch VP44 injection pump or adding stress to the lift pump. The pumps I suggest are proven and come with a lifetime warranty. These pumps come with a full kit and replace everything from the fuel tank to Bosch VP44 injection pump. AirDog 100, 150, or 165 Raptor 100 or 150 FASS 100 or 150 FASS DDRP (DDRP Ver.2 - 89 GPH) I don't suggest these pumps... Because they don't address the pump location, plumbing restrictions, or come with much of warranty. Stock Carter or Carter Campaign Pump (4090046) Holley Blue or Holley Black FASS DDRP (DDRP Ver.1 - 40 GPH) AirTex Mopar's Notes: That was true for the DDRP Ver.1 However, DDRP-02 is rated at 89 GPH and will hold pressure. It is listed as a Stock replacement pump designed to perform better than the Stock pump, but not for Chips that add fueling. I place a Power Puck on my truck with the DDRP-02 and saw no difference in FP at either idle or WOT, (PP is a timing chip doesn't change the amount of fuel). That said the PP is currently removed from my truck as I overpowered my clutch both loaded and unloaded, back to the stock clutch is fine. Looking for a Valair possible DD organic, or SD Kevlar/Ceramic. It is currently in the stock location and giving 15 psi at idle and 10 at WOT. Information Provided By: rhagfo http://www.cumminsforum.com/forum/98-5-02-powertrain/404412-fass-ddrp-02-a.html#post4197714 Additional Information (About Performance Crowds & Fuel Pressure) I've seen several times where people will link back to performance pump builders and quoting where they say, "(Un-named) proved that 5 PSI, under load, made all the horsepower the VP44 pump could make, even with stock fuel lines, fittings and supply pump." This might be true but there is nothing ever said about the life span of the pump at these conditions. So... Please do not follow these performance crowds into destroying a perfectly good Bosch VP44 injection pump. The fact still remains from Bosch the actual designer of the Bosch VP44 injection pump states that injection pump should return 70% of the fuel back to the fuel tank for cooling and lubrication purpose of the VP44. Being the only way a Bosch VP44 injection pump can do this is to have fuel pressure above 14 PSI to open the overflow valve. Then if the stock Bosch VP44 injection pump with an enhancement box say an Edge Comp on 5x5 can consume 15-20 GPH that means the stock 35 GPH pump cannot keep up with Bosch's design of 70% return volume. So this why products like AirDog, Raptor and FASS was created because they actually meet the demands of the Bosch VP44 injection pump. Then another fact that Bosch will let you know of is that diaphragm damage occurs from operating the Bosch VP44 injection pump at low fuel pressures. Making matters worse is that no Bosch injection re-builder will void warranty a VP44 injection pump with diaphragm damage. Dead give away that you had a bad lift pump or low fuel pressure problems. Please view the Bosch VP44 exploded view page to see there is no diaphragm in the Revision 027 Bosch VP44 Injection Pump Then the other fact is right from the Dodge Factory Service Manual has the minimum fuel pressures (picture at the top of the page). It even states the pressure that the overflow valve requires to open. Refer to the Overflow Valve Testing from the Dodge Factory Service Manual and see that the overflow valve should remain closed at 10 PSI and open by 14 PSI. So if the overflow valve is close by 10 PSI, then you extra cooling and lubrication just disappeared. So ultimately it suggested having a fuel system of no less than 100 GPH supply that can maintain a minimum pressure of 14-15 PSI at WOT. This will great extend the life of the VP44 because it keeps the electronics cooler longer and keeps the rotating parts lubricated properly. So please people let the facts and information from the actual designers of the injection pump (Bosch) and engine (Cummins) provide you proper information for your fuel system for your engine. Don't be swayed by performance shops claim of high horse output with little fuel pressure. As I proved right here doesn't work for the longevity of the VP44 injection pump... Another thing to bring up there are people that are increasing fuel pressures above 20 PSI. Please don't do this. The return port leaving the VP44 pump isn't very big at all. The return port is on the left and supply is on the right. As you can see increasing fuel pressures above 20 PSI put you at risk for shaft seal failure. Increasing the pressure above 20 PSI isn't going to improve the return flow. I say stick with the 14-20 PSI pressure range for seal safety. Additional Information (About Maximum Flow Rates) Here are some calculated flow abilities of the stock fuel system vs. 1/2" big line kits. This is not calculating bend, turns, offices just straight flow for open end plumbing and this is a rough calculation. Pipe Size Gallon Per Hour Flow Rate Gallon Per Minute Flow Rate 6mm ID pipe 75 GPH @ 15 PSI 1.2 GPM @ 15 PSI 1/2" ID pipe 570 GPH @ 15 PSI 9.5 GPM @ 15 PSI Use The banjo bolt Shrader valve to test for fuel pressure, Item 3 in the above diagram. If you have a 98-99 truck the port might be on top of the fuel filter housing. You can see the 90* bend fitting coming out of the top of the fuel filter housing in the below picture. Install a Shrader valve and test from there. I'm hearing of tales of shops, mechanics, or dealers doing the old hook up the fuel pressure gauge and only checking fuel pressure at idle. This is wrong. Because I've seen lots of cases where fuel line restriction, fuel filter plugging, gelling fuel and other thing causing fuel pressure to drop out under load. Like this video from a friend of mine, you'll see he's got awesome fuel pressure at an idle (where most shops gave him the green light). However, what the shops did not test for is WOT at highway speed, and you'll see in the video, he can pull way down to 0 PSI. Anything under 14 PSI is a concern... Anything under 10 PSI is a serious problem. As for having a gauge in the cab all Dodge Cummins trucks should have a fuel pressure gauge in the cab. Because like you seen bench testing with an idle pressure is meaningless if you can't see the WOT pressure at highway speed.- 3 reviews
-
- 2
-
-
-
- lift pump
- injection pump
- (and 3 more)
-
Bosch VP44 injection pumps key part numbers key# Cummins# 026 - 3944021 027 - 3944022 028 - 3944023 029 - 3944024 030 - 3944025 031 - 3944026 032 - 3944027 033 - 3944028 034 - 3944029 035 - 3944030 036 - 3944031 037 - 3944032 038 - 3944033 039 - 3944034 040 - 3944035 041 - 3944036 042 - 3944037 043 - 3944038 044 - 3944039 045 - 3944040 046 - 3944041
-
Bosch VP44 Injection Pump Overflow Valve Overflow Valve Description The overflow valve is located on the side of the Bosch VP44 injection pump. It is also used to connect the fuel return line (banjo fitting) to the Bosch VP44 injection pump for your Cummins powered Dodge truck. Overflow Valve Operation Fuel volume from the fuel transfer (lift) pump will always provide more fuel than the fuel injection pump requires. The overflow valve (a check valve) is used to route excess fuel through the fuel return line and back to the fuel tank. Approximately 70% of supplied fuel is returned to the fuel tank. The valve opens at approximately 97 kPa (14 psi). If the check valve within the assembly is sticking open, fuel drainage of the Bosch VP44 injection pump could cause hard starting. If a Diagnostic Trouble Code (DTC) has been stored for “P0168 decreased engine performance due to high injection pump fuel temperature”, the overflow valve may be stuck in closed position. Overflow Valve Diagnosis And Testing A rubber tipped blow gun with regulated air line pressure is needed for this test. 1. Clean area around overflow valve and fuel return line at Bosch VP44 injection pump before removal. 2. Remove overflow valve from Bosch VP44 injection pump and banjo fitting. 3. Discard old sealing gaskets. 4. Set regulated air pressure to approximately 97kPa (14–16 psi). 5. Using blow gun, apply pressure to overflow valve inlet end ( the end that goes into Bosch VP44 injection pump). 6. The internal check valve should release, and air should pass through overflow valve at 97 kPa (14–16 psi). If not, replace overflow valve. 7. Reduce regulated air pressure to 10 psi and observe overflow valve. Overflow valve should stay shut. If not, replace overflow valve. 8. Install new sealing gaskets to overflow valve. 9. Install overflow valve through banjo fitting and into Bosch VP44 injection pump. 10. Tighten to 30 N·m (24 ft. lbs.) torque. Overflow Valve Removal The overflow valve (pressure relief valve) is located at the outside of fuel injection pump. It connects the fuel return line (banjo fitting) to the pump. The overflow valve has no internally serviceable parts and must be replaced as an assembly. Two sealing gaskets are used. One gasket is located between pump and banjo fitting. The other is located between the banjo fitting and end of the valve. 1. Clean area around overflow valve and fuel return line at injection pump before removal. 2. Remove valve from pump and banjo fitting. 3. Discard old sealing gaskets. Overflow Valve Installation The overflow valve (pressure relief valve) is located at the outside of fuel injection pump. It connects the fuel return line (banjo fitting) to the pump. The valve has no internally serviceable parts and must be replaced as an assembly. Two sealing gaskets are used. One gasket is located between pump and banjo fitting. The other is located between the banjo fitting and end of the valve. 1. Install new sealing gaskets to valve. 2. Install valve through banjo fitting and into the pump. 3. Tighten to 30 N·m (24 ft. lbs.) torque. Few notes... Here is a close up of the bleed hole in the overflow valve. This picture is magnified X10 so you can even see the tiny hole used to bleed air from the system. There is a lot of controversy about the operation of the overflow valve on a Bosch VP44 injection pump Cummins selected. From my personal opinion that the overflow valve is the last check valve to hold the pressure up to 14 PSI for the injection pump. As for the bleed hole in the side that hole is so small, it can't possibly create enough flow to aid in cooling the Bosch VP44 injection pump unless the overflow valve is opened which listed above requires 14 PSI to be open.
-
Bosch VP44 Injection Pump Replacement Removal 1. Disconnect both negative battery cables at both batteries. Cover and isolate ends of cables. 2. Thoroughly clean fuel lines at cylinder head and injection pump ends. Thoroughly clean Bosch VP44 injection pump and supply/return lines at side of pump. 3. Disconnect 9–way electrical connector at Fuel Pump Control Module (FPCM) (Fig. 22). 4. Remove fuel return line at side of Bosch VP44 injection pump by removing overflow valve (Fig. 23). Place rag beneath overflow valve to catch excess fuel. 5. Remove fuel supply line at side of Bosch VP44 injection pump by removing banjo bolt (Fig. 23). Also remove same line at top of fuel filter housing (banjo bolt). 6. Remove all high-pressure fuel lines, intake air tube, accelerator pedal position sensor, air intake housing, engine oil dipstick tube, wiring clips, electrical cables at intake heaters and engine lifting bracket. a. Remove the APPS sensor. Just unbolt the APPS and unhook the wires and tuck it back towards the firewall with the throttle cable attached. b. Remove the intake elbow 4 bolts and remove the air pipe on the driver side. As for the dipstick tube it can be move out of the way by twisting it carefully. c. Remove grid heater leaving the wires attached to the grid heater and tuck back out of the way. Mopar's Notes: Now you only need to remove 1,2,4 high pressure injector lines. The other 3,5,6 can remain attached to the engine but need to be removed from the Bosch VP44 injection pump. 7. Remove hose clamp at crankcase vent hose (Fig. 24) and remove the hose from the canister. 8. Remove (unscrew - right-hand thread) canister (Fig. 24) from gear cover. 9. Remove nut and washer retaining injection pump gear to Bosch VP44 injection pump shaft (Fig. 25) 10. The engine can be rotated with a barring tool such as Snap-On No. SP371, MTE No. 3377371 (Cummins Tool Division, or an equivalent. The opening for barring tool is located in rear flange of the engine on exhaust manifold side (Fig. 26). Remove rubber access plug covering this opening. A 15/16" socket on the alternator can be used as a barring tool. 11. Insert barring tool into flywheel housing opening (Fig. 26). 12. Rotate engine until keyway is at 12 o’clock position (Fig. 27). 13. Use T-bar type puller (Fig. 28) to separate injection pump gear from Bosch VP44 injection pump shaft. Attach two M8 X 1.24 MM (metric) screws through puller and into two threaded holes supplied in pump gear. Pull injection pump gear forward until it loosens from injection pump shaft. Pull on gear only enough to loosen it from the injection pump shaft. Pulling gear too far may cause damage or breakage to gear cover. 14. Remove 2 rear/lower pump bracket bolts (Fig. 29). 15. Remove 4 Bosch VP44 injection pump-to-gear housing mounting nuts. 16. Remove Bosch VP44 injection pump from gear housing. Take care not to nick injection pump shaft on aluminum gear housing when removing the pump. Also, be very careful not to drop pump keyway into gear housing. WARNING: Whenever the Bosch VP44 fuel injection pump is removed from the engine, the pump drive gear is laying loose on the camshaft drive gear. Never attempt to crank or rotate the engine with the pump removed from the engine. Serious damage will occur. To prevent pump/gear keyway from falling into gear housing, the engine must be rotated until keyway is at 12 o’clock position (Fig. 27). If gear retainer nut, washer or key drops into gear housing, the cover may have to be removed to retrieve them before the engine is started. Installation 1. Inspect pump mounting surfaces at the pump and the mounting flange for nicks, cuts or damage. Inspect o-ring surfaces for nicks, cuts or damage. 2. Clean injection pump mounting flange (Fig. 31) at gear housing. Also the clean front of the injection pump. 3. Install new rubber o-ring (Fig. 33) at pump mounting area. 4. Apply clean engine oil to the injection pump o-ring only. The machined tapers on both injection pump shaft and injection pump gear (Fig. 34) must be absolutely dry, clean and free of any dirt or oil film. This will ensure proper gear-to-shaft tightening. 5. Clean pump gear and pump shaft at machined tapers (Fig. 34) with an evaporative type cleaner such as brake cleaner. Keyway Installation: 6. The pump/gear keyway has an arrow and a 3–digit number stamped at top edge (Fig. 33). Position keyway into pump shaft with the arrow pointed to the rear of the pump. Also be sure 3–digit number stamped to top of keyway is same as 3–digit number stamped to injection pump data plate (Fig. 35). If wrong keyway is installed, a diagnostic trouble code may be set. Mopar's Notes: A suggestion is once you ready to place the key in the shaft take a few drops of super glue and glue it in place. This will keep the key from falling out during installation of the pump. 7. Position Bosch VP44 injection pump assembly to mounting flange on gear cover while aligning Bosch VP44 injection pump shaft through back of injection pump gear. When installing pump, dowel (Fig. 34) on mounting flange must align to hole in front of pump. 8. After Bosch VP44 injection pump is positioned flat to mounting flange, install four pump mounting nuts and tighten finger tight only. Do not attempt a final tightening at this time. Do not attempt to tighten (pull) Bosch VP44 injection pump to gear cover using mounting nuts. Damage to pump or gear cover may occur. The pump must be positioned flat to its mounting flange before attempting to tighten mounting nuts. 9. To prevent damage or cracking of components, tighten nuts/bolts in the following sequence: a. Install Bosch VP44 injection pump shaft washer and nut to pump shaft. Tighten nut finger tight only. b. Install 2 rear/lower pump mounting bolts finger tight only. c. Do preliminary tightening of Bosch VP44 injection pump shaft nut to 30 N·m (15–22 ft. lbs.) torque. This is not the final torque. d. Tighten 4 Bosch VP44 injection pump mounting nuts to 43 N·m (32 ft. lbs.) torque. e. Tighten 2 rear/lower Bosch VP44 injection pump bracket-to-pump bolts 24 N·m (18 ft. lbs.) torque. f. Do final tightening of Bosch VP44 injection pump shaft nut to 170 N·m (125 ft. lbs.) torque. Use barring tool to prevent engine from rotating when tightening gear. 10. Install canister (Fig. 24) to gear cover. 11. Install crankcase vent hose (Fig. 24) to canister and install hose clamp. 12. Using new gaskets, install fuel return line and overflow valve to side of Bosch VP44 injection pump (Fig. 23). Tighten overflow valve to 24 N·m (18 ft. lbs.) torque. 13. Using new gaskets, install fuel supply line to side of Bosch VP44 injection pump and top of fuel filter housing (Fig. 23). Tighten banjo bolts to 24 N·m (18 ft. lbs.) torque. 14. Install all high-pressure fuel lines, intake air tube, accelerator pedal position sensor, air intake housing, engine oil dipstick tube, wiring clips, electrical cables at intake heaters and engine lifting bracket. Tighten the fuel line(s) at the head to the injector connector(s) to 38 N·m (28 ft. lbs.) torque. 15. Connect 9–way electrical connector to Fuel Pump Control Module (FPCM) (Fig. 22). 16. Connect both negative battery cables to both batteries. 17. Bleed air from fuel system. 18. Check system for fuel or engine oil leaks.
-
Bosch VP44 Injection Pump Requirements I'm going to do a quick article on requirements for long life from a Bosch VP44 injection pump. Here is the list of thing that are required to keeping a Bosch VP44 injection pump happy in your Cummins powered Truck. Fuel Pressure Fuel Filtration Fuel Lubricity Clean DC Power Fuel Pressure I know there is a lot of controversy about fuel pressure but I'm going to be to the point I suggest 14-20 PSI for optimal return flow for proper cooling and lubrication of the VP44. Fuel Filtration With the all the different fuel pump and fuel systems out there. I've been quite pleased with my Airdog fuel system. I've got a pre-filter and water separator before the pump then the 3-micron filter after the Air Dog pump. Then I kept the stock filter as well and dropped a 10-micron Fleetguard filter in place. This has worked flawlessly on polishing fuel for the Bosch VP44 Injection Pump. Also being the AirDog flows a majority back to the fuel tank it tends to continually polish the fuel in the tank. I always will suggest in purchasing fuel from a high volume station like truck stops. Fuel Lubricity Bosch back in the day when designing the Bosch VP44 injection pump they based the design off of Europian fuel standards of 460 HFRR or less. Just about the time the Bosch VP44 was being introduced to the Cummins engine the US fuel was not adhering to any standards. So even before ULSD (ultra low sulfur diesel) came to be the US fuel had numbers as high as 500-600 HFRR. After a whole diesel industry getting damaged by the fuel the US standard was made at 520 HFRR. But that not going to meet the Bosch standards of <450 HFRR. So hence, the 2 cycle oil concept was born to band-aid this issue. Clean DC Power There have been so many years where people made claims of the electronics in the Bosch VP44 failed because of heat cycles. Well, that might have been true. Never the less there is another killer that I've uncovered is how clean is your power? Batteries are clean DC power just as they are but when you hook an alternator to the batteries there is always going to be some sort of ripple from AC waveform being converted to DC power. As alternators age the diodes start to fail and more and more AC power starts to leak out. I've set the limit at no higher than 0.1 AC volts measured at the batteries. The whole AC power problem could create these codes. P0215 P0251 P0252 P0253 P0254 P1688 P1689
-
How to remove the Bosch VP44 Injection Pump the quick and easy way. Takes approximately 45 minutes for me to remove the VP44 Injection pump. Remove the Mopar1973Man Crankcase vent (if applicable) Using a 10mm socket remove the four air horn bolts and one dipstick bolt. Using a 7/16 or 11mm socket loosen the top clamp of the intake boot. Move the grid heater and intake horn out of your way. Pack a shop rag in the intake to prevent stuff from falling in the intake manifold. Using a 13mm socket loosen the 3 bolts holding the APPS sensor and unplug and move over toward the driver side fender. Now unplug the VP44 main connector and wire tap . This connector is a two step plug lock. Pull the release tab and wiggle the plug out then pull a bit more on the release and the plug should release fully. Now using a 10mm loosen the 3 bolts holding the 1,2,4 injection rail in place. Using a 3/4" wrench loosen 1,2,4 injection lines. Now remove 1,2,4 injection lines as a group. Using a 3/4" wrench remove the overflow valve banjo and remove your supply line (may differ from mine being a big line kit) Now remove the crankcase vent. Just unscrews normal right hand threads. Do not pry on the nipple. Use an oil filter wrench or a strap wrench to loosen stubborn vent covers. Now remove the pump shaft nut with a 1 1/16 inch socket. Be careful removing the nut and lock washer that you don't drop them down into the gear case. A stubby Phillips screwdriver and a magnet is handy you can slide it off the shaft onto the Phillips screwdriver. Using a 23mm socket roll the alternator towards the coolant bottle to bring the keyway on the pump gear to TDC position and then install your gear puller and pull the gear loose on the shaft. Now loosen the 3,5,6 lines but you do not have to remove the injection line set. Now you want to loosen the 2 bolts on the rear bracket with a 13mm socket. Now remove the 4 nuts holding the pump to the gear case. Now careful kick the 3,5,6 lines out there nipples towards the block. Now lightly pry the VP44 injection pump away from the case and remove. Check for the key in the shaft make sure its present. This is what you should have after removal... View full Cummins article
-
Hello all, I’m really hoping y’all can give me some kind of direction here. Sorry, in advance, for the long post. Let me start by telling you what I’ve got and what I know. I’m working on a 1999 Dodge 2500. A friend brought it to me after swapping from a v10 to a 24 valve. The engine, PCM, ECM, gauge cluster, fuel tank and engine harness came out of a wrecked 1999 dually so the year models match up. I’ve double checked all of the connections, battery cables, plugs, etc. and everything is how it should be. I was told it ran before he put it in but that it also sat for a year between it being pulled and then put into this current truck. Now, it won’t start aka it will crank but not start. Batteries are both good, cables are good, starter is good, engine turns at a good speed. I have NO codes, on the dash or with a code reader. So I started with diagnostics. Fuel system relay is functioning. It has an air dog lift pump, pushing a consistent 14psi to the VP. It has a new VP44 on it as the old pump had a seized rotor and was only putting fuel to 2 injector lines. While I was changing the VP, I did a compression test and pop tested the injectors. Compression checked out. 4 of the six injectors would just pee out fuel, the other 2 would bypass to return without opening. So he pick up some new injectors. Here we are, back together with a new VP and new injectors…. Still no start. Back to diagnostics. I check ground and voltage to the plug on the back of the VP. Pin 7 has battery voltage, Pin 6 has a good ground. Plug it back in, check voltage at pin 5, no voltage at pin 5 with key on. So these three things are telling me that the VP is getting the appropriate signal and should be running. Next step is to Hotwire the pump. I Hotwire it and it fires right up and idles. So it’s an electrical issue… I understand that the MAP sensor, APPS, cam and crank pos sensors all play a role in a happy VP truck but I’m not sure where to go from here. Again, I have NO codes. Can someone point me in the direction of what else to check and how to diagnose it? Or if I over looked something?
-
 I have a 2001 Dodge 2500 5.9l that is stock other than a Predator mechanical fuel pump that I have recently put on. I have had the issue even before I've done any work to the truck of there being brief second of no power and then returning like nothing happened. I will be driving normal (Smooth accelerations) and every once in a while the truck will loose power and go back to normal in a matter of a second. I've always thought it was a problem with the stock lift pump on the side of the motor so i recently replaced it with a predator lift pump and haven't seen it run below 14psi. But even after I did so it still does this intermittent loss of power issue. It can vary from every other ride to weeks between cycles. I have no codes or lights on the dash and am starting to think it might be the VP disagreeing with me and wanting to quit. I have no tunes or anything going on with it and I tried resetting the APPS and nothing has changed it. Only other thing I could think of is air or suds making its way to the Injection pump every so often. Anyone have any thoughts?
 -
So I thought I would pose a question today, since this is something I’ve been dealing with all day. What exactly does the offset key do in regards to timing? I’ve searched the inter webs and I can’t find anything more than a generic, “It works with timing the pump”, or “The key has to be calibrated to each pump”. What does it do? Is there a hidden ignition pickup or sensor in the gear cover that reads the key? Reason I’m asking is because my key is crushed (My F-up). I think at some point between 1998.5-2002, Dodge took either the crank or cam sensor out of the truck when built. I have an 01, and it only has one of those sensors. I’m wondering if the key is irrelevant on those later trucks not equipped with the cam/crank sensor (still can’t remember which one I have). Any clarity on what the hell that key affects regarding timing would be much appreciated.
-
Anybody here have any tricks to getting the VP44 out of the back of the case? Trying to get the pushrod cover gasket replaced. I have removed everything including the nut and lock washer on the end of the pump shaft and 4 nuts on the pump. TDC is set but that o ring is being a mother! I don’t really want to beat on it to get it out, and prying does little but separate it just a hair on the lower driver side (Only place I can get some leverage). Truck has almost 300k on the Odo, but the pump has been replaced at least once. That O ring in there is really on there good. Any ideas?

-
 So I'm pulling the trigger on ordering a VP44. I got dead pedal 3 times yesterday and have had enough of that. I'm planning on getting it from DAP. Does anyone have any pluses or minuses about this or any other suggestions? I figured this would happen as my brother's ignorance with the VP44 is probably what lead to its premature death. With 2 stock lift pumps in it with no TCW3 and more than likely constant low pressure sound like a death sentence. He also used if for towing 2 to 3 horses and very little non towing. The silvermoose had a very demanding first 60k miles. This is going to be one expensive week. My tires will be getting replaced as well. They currently have over 50k on them and there is still a good amount of tread left but they are dated 2014 and are not behaving nicely. Thank and appreciate any input. L8tr D
 -
Hi, I am looking for a flashing LED or similar alarm kit to install by my fuel pressure gauge to alert me that the feed pressure at the VP44 inlet is at or below 10 psi. I want this set point because that is what Cummins specify is the minimum required and everything I have read indicates that below that pressure I am damaging the VP44. So far all the alarms I have found listed for my truck activate at 5 psi or less, I emailed three suppliers, two haven't replied and the one who did admitted that although his alarm kit is listed for my truck the 5 psi setting is too low to be any real use to protect the VP44. Thanks.
-
I need help with tuning my quadzilla 4K for my truck. Truck has 188/220 cam,103 springs,7x13 injectors, pushrods and studs and t4 manifold but I can’t figure out tunes for my setup it pops at higher rpms and sometimes even shuts the truck off. I have a brand new fass 165 set to 20psi and 15 at wot. Any help will be appreciated.
-
Fuel Pressure Specification For Bosch VP44 Injection Pumps Here is a copy of the fuel system specifications from the Dodge Factory Service Manual. This is for your Dodge Cummins Turbo diesel truck with a Bosch VP44 injection pump. Fuel pressure Normal fuel pressure should float about 14-15 PSI running down the pavement. It should never fall below 10 PSI at all. Here is a colorize fuel pressure gauge to give you a clue of the fuel pressure span you want. You want the needle to stay in the green at all times. Yellow zone is a warning that you should check the fuel filter, lift pump performance, overflow valve, etc. This is undocumented maximum pressure is 20 PSI. Now take notice to the overflow valve is set for 14 PSI so excessive pumping of fuel does nothing for performance except create more heat in the fuel, which in turns reduces the cooling ability of the fuel and adds more stress to the lift pump. So a little extra fuel pressure is a good thing because it ensures the Bosch VP44 injection pump stays cooled and lubricated properly. However, excessive fuel pressure will heat the fuel and reduced the cooling ability of the fuel. Now always remember that the only lubrication the Bosch VP44 injection pump will see is the fuel itself so if you don't have enough fuel pressure it will cause damage to the Bosch VP44 injection pump. It's like the same as running the engine with low oil pressure it will continue to run, but the damage to the engine will occur. On the other hand, the Bosch VP44 injection pumps, which happen to be about $1,200 to replace. Pressure Drop The amount of fuel pressure drop between idle and wide-open throttle. 2-3 PSI drop from idle to WOT is normal. However, 5 PSI or more pressure drop from idle to WOT is pointing out a failed lift pump, plugged filter, and/or plumbing restrictions. 2-3 PSI Is Normal Dropping more than 5 PSI is pointing towards a failed lift pump, plugged filter, or restrictive plumbing. Just to show you the difference in the stock plumbing which is 6mm ID plumbing and most performance pumps come with 1/2" ID plumbing. These pictures will give you an idea... The first picture is a Big Line fitting over the top of the stock plumbing. Then the second picture compares the stock 6mm ID steel lines to a 1/2" ID Big Line hose. The best way to show this example of restrictions is to let's say your house is on fire. You know your garden hose has 80 PSI of pressure, but the garden hose is only 5/8" ID hose. Your wife calls 911 and gets the fire department coming in the meantime you keep fighting the fire with your little 5/8" garden hose and losing the battle. The fire department shows up and pulls a 2 1/2" hose off the truck and charges it at 80 PSI and now winning the battle. Your fire is put out! What is so different? No matter what the size of the fuel line will dictate how much volume can be pushed through the fuel line. Like the story above the water pressure was the same at 80 PSI, but the hose size jumped from 5/8" to 2 1/2" ID hose and the volume changes are the size of hose. So the same thing applies to the stock fuel system. The stock banjo bolts and 6mm ID pipes are just too restrictive and cannot supply enough volume of fuel for that Bosch VP44 injection pump demands. This why I highly suggest you go up to 1/2" ID plumbing. Reasons Why Fuel Pressure Is Critical Let's take a look at a Bosch VP44 injection pump. I've labeled the fuel lines supplying fuel and return line plus the overflow valve. Now I know there is a ton of rumors on the internet of all kinds of minimum pressures for a Bosch VP44 injection pump. I'm going to say stick with the Dodge Factory Service Manual Specifications for fuel pressure. Now let's talk a bit more about the flow of the fuel. The lift pump supplies pressurized fuel to the Bosch VP44 injection pump the overflow valve regulates how much fuel pressure is held. Excessive fuel pressure is returned to the fuel tank. The picture below is of the bleed hole in the overflow valve this image was magnified x10 to show you how small the bleed hole really is. Give you an idea the size of the hole use a single strand of 14 AWG copper wire, and it will NOT fit the hole. The bleed hole is there solely for bleeding air out of the system which air will pass through this tiny hole rather easy but fuel will not. However, if you're looking for long life from a Bosch VP44 injection pump, I would personally suggest you adjust your minimum pressure to 14 PSI this will ensure the overflow valve remain open and a constant fuel flow through the Bosch VP44 injection pump and keep it cool all the time. Let me play out a simple scenario. Let's say my fuel pressure is roughly 10-11 PSI. I'm going to drive up into the back country approximately 40 miles with my Dodge Cummins towing an 8x8 utility trailer. Now the whole trip heading uphill into the mountain towing an empty trailer is going to be enough fuel flowing to the injectors to keep the Bosch VP44 injection pump happy. However, I've spent the day and loaded up with firewood and now coming back down the mountain loaded. I'm using my exhaust brake and coasting most of the way down taking it slow and easy. At this point, the injectors are no longer firing so the Bosch VP44 injection pump is not pumping fuel out to the injectors. Furthermore, the overflow valve closes at about 10-11 PSI so let's say it did close. Now where is the fuel going??? Nowhere! It is pooled up in the injection pump and gaining heat and being broke down. You've also removed the cooling and lubricating of the Bosch VP44 injection pump so now it actually taking on damage. To give you a feel for the fuel flow coming from the injection pump with an AirDog 150 at 17.5 PSI of fuel pressure, I've got a video to explain that quickly. I've heard rumors of some people trying to develop a cool down system for the Bosch VP44 Injection pump but after making the video above, there is just no way to cool down the injection pump using the lift pump of even the AirDog/FASS series. The whole problem is the restrictions inside the Bosch VP44 injection pump and the overflow valve as seen in the video above. So the only way to keep the Bosch VP44 injection pump cool is to keep fuel flowing through it at all times. So to keep the overflow valve open I suggest the 14 PSI minimum pressure. I'm currently at 136K miles on my Bosch VP44 injection pump and still going strong using a 16 PSI minimum pressure and an 18 PSI idle pressure. Here is a short video of stable fuel pressure from 55 MPH to 70 MPH at WOT. Here is another video done with idling, cruising, and WOT operation. Yes. I got a bit carried away and sloshed the fuel in the tank and sucked an air bubble and the pressure fell off. Cranking Pressure Test Here is a simple test on how to do the test for cranking fuel pressure. Pull the fuel pump relay in the PDC and then attempt to start the engine. Pay attention to the fuel pressure gauge during cranking. Be aware this test will trip a P1689 code and light the CHECK ENGINE light. Excessive cranking pressure can lead to difficult starting problems. Suggested Lift Pump Replacement You should replace the stock fuel system completely since it cannot supply enough fuel for even stock requirements without causing damage to the Bosch VP44 injection pump or adding stress to the lift pump. The pumps I suggest are proven and come with a lifetime warranty. These pumps come with a full kit and replace everything from the fuel tank to Bosch VP44 injection pump. AirDog 100, 150, or 165 Raptor 100 or 150 FASS 100 or 150 FASS DDRP (DDRP Ver.2 - 89 GPH) I don't suggest these pumps... Because they don't address the pump location, plumbing restrictions, or come with much of warranty. Stock Carter or Carter Campaign Pump (4090046) Holley Blue or Holley Black FASS DDRP (DDRP Ver.1 - 40 GPH) AirTex Mopar's Notes: That was true for the DDRP Ver.1 However, DDRP-02 is rated at 89 GPH and will hold pressure. It is listed as a Stock replacement pump designed to perform better than the Stock pump, but not for Chips that add fueling. I place a Power Puck on my truck with the DDRP-02 and saw no difference in FP at either idle or WOT, (PP is a timing chip doesn't change the amount of fuel). That said the PP is currently removed from my truck as I overpowered my clutch both loaded and unloaded, back to the stock clutch is fine. Looking for a Valair possible DD organic, or SD Kevlar/Ceramic. It is currently in the stock location and giving 15 psi at idle and 10 at WOT. Information Provided By: rhagfo http://www.cumminsforum.com/forum/98-5-02-powertrain/404412-fass-ddrp-02-a.html#post4197714 Additional Information (About Performance Crowds & Fuel Pressure) I've seen several times where people will link back to performance pump builders and quoting where they say, "(Un-named) proved that 5 PSI, under load, made all the horsepower the VP44 pump could make, even with stock fuel lines, fittings and supply pump." This might be true but there is nothing ever said about the life span of the pump at these conditions. So... Please do not follow these performance crowds into destroying a perfectly good Bosch VP44 injection pump. The fact still remains from Bosch the actual designer of the Bosch VP44 injection pump states that injection pump should return 70% of the fuel back to the fuel tank for cooling and lubrication purpose of the VP44. Being the only way a Bosch VP44 injection pump can do this is to have fuel pressure above 14 PSI to open the overflow valve. Then if the stock Bosch VP44 injection pump with an enhancement box say an Edge Comp on 5x5 can consume 15-20 GPH that means the stock 35 GPH pump cannot keep up with Bosch's design of 70% return volume. So this why products like AirDog, Raptor and FASS was created because they actually meet the demands of the Bosch VP44 injection pump. Then another fact that Bosch will let you know of is that diaphragm damage occurs from operating the Bosch VP44 injection pump at low fuel pressures. Making matters worse is that no Bosch injection re-builder will void warranty a VP44 injection pump with diaphragm damage. Dead give away that you had a bad lift pump or low fuel pressure problems. Please view the Bosch VP44 exploded view page to see there is no diaphragm in the Revision 027 Bosch VP44 Injection Pump Then the other fact is right from the Dodge Factory Service Manual has the minimum fuel pressures (picture at the top of the page). It even states the pressure that the overflow valve requires to open. Refer to the Overflow Valve Testing from the Dodge Factory Service Manual and see that the overflow valve should remain closed at 10 PSI and open by 14 PSI. So if the overflow valve is close by 10 PSI, then you extra cooling and lubrication just disappeared. So ultimately it suggested having a fuel system of no less than 100 GPH supply that can maintain a minimum pressure of 14-15 PSI at WOT. This will great extend the life of the VP44 because it keeps the electronics cooler longer and keeps the rotating parts lubricated properly. So please people let the facts and information from the actual designers of the injection pump (Bosch) and engine (Cummins) provide you proper information for your fuel system for your engine. Don't be swayed by performance shops claim of high horse output with little fuel pressure. As I proved right here doesn't work for the longevity of the VP44 injection pump... Another thing to bring up there are people that are increasing fuel pressures above 20 PSI. Please don't do this. The return port leaving the VP44 pump isn't very big at all. The return port is on the left and supply is on the right. As you can see increasing fuel pressures above 20 PSI put you at risk for shaft seal failure. Increasing the pressure above 20 PSI isn't going to improve the return flow. I say stick with the 14-20 PSI pressure range for seal safety. Additional Information (About Maximum Flow Rates) Here are some calculated flow abilities of the stock fuel system vs. 1/2" big line kits. This is not calculating bend, turns, offices just straight flow for open end plumbing and this is a rough calculation. Pipe Size Gallon Per Hour Flow Rate Gallon Per Minute Flow Rate 6mm ID pipe 75 GPH @ 15 PSI 1.2 GPM @ 15 PSI 1/2" ID pipe 570 GPH @ 15 PSI 9.5 GPM @ 15 PSI Use The banjo bolt Shrader valve to test for fuel pressure, Item 3 in the above diagram. If you have a 98-99 truck the port might be on top of the fuel filter housing. You can see the 90* bend fitting coming out of the top of the fuel filter housing in the below picture. Install a Shrader valve and test from there. I'm hearing of tales of shops, mechanics, or dealers doing the old hook up the fuel pressure gauge and only checking fuel pressure at idle. This is wrong. Because I've seen lots of cases where fuel line restriction, fuel filter plugging, gelling fuel and other thing causing fuel pressure to drop out under load. Like this video from a friend of mine, you'll see he's got awesome fuel pressure at an idle (where most shops gave him the green light). However, what the shops did not test for is WOT at highway speed, and you'll see in the video, he can pull way down to 0 PSI. Anything under 14 PSI is a concern... Anything under 10 PSI is a serious problem. As for having a gauge in the cab all Dodge Cummins trucks should have a fuel pressure gauge in the cab. Because like you seen bench testing with an idle pressure is meaningless if you can't see the WOT pressure at highway speed. View full Cummins article
-
 Hey guys, need a lil help here. So i had to do some serious tear down of the truck to get to my tappet cover. I found that it was leaking back when i did my rear main crank seal last time i was underneath the truck. Needless to say to get to the tappet cover you have to pull the injection pump and lines 1,2, and 4 so that you can get the vp44 out of the way. I was very careful when i was removing the vp44 to make sure that I didnt drop the key down the timing cover. I aligned the key-way with the TDC mark on the top of the timing cover so that wouldnt happen. Removed the pump and went about my business. On re-installation i put the pump back in made sure everything was aligned and bolted the vp44 down they way you are supposed to. needless to say after I started it up i pop a p0216. I didn't move the gear around while it was disassembled either. Anybody have any ideas if I should pull the pump again and verify if things are lined up that way or should I go about pulling the timing cover to check and see whats going on? BTW this pump was good before I began the work. Any help would be appreciated.
 -
 I had my 2001 3500 with Edge comp box an Smarty S03 stack. Always had smarty on lvl9 an comp box on 5x5. Loved it! Truck loved it! Had to remove vp44 to do the tappet cover gasket an damaged the vp44 case installing it back in. Took the pump in to get it fixed an figured to get it rebuilt while its out. An now its tripped some timming code an killd my new vp44 on same settings i had for years before on old pump. Any ideas why this combo would do this to new/rebuilt vp44. The shop that rebuilt it fixed the pump again under warranty an had no answers for me why it would do that. Just scared to do that setup again an have to go thru all that work again pulling pump.
 -
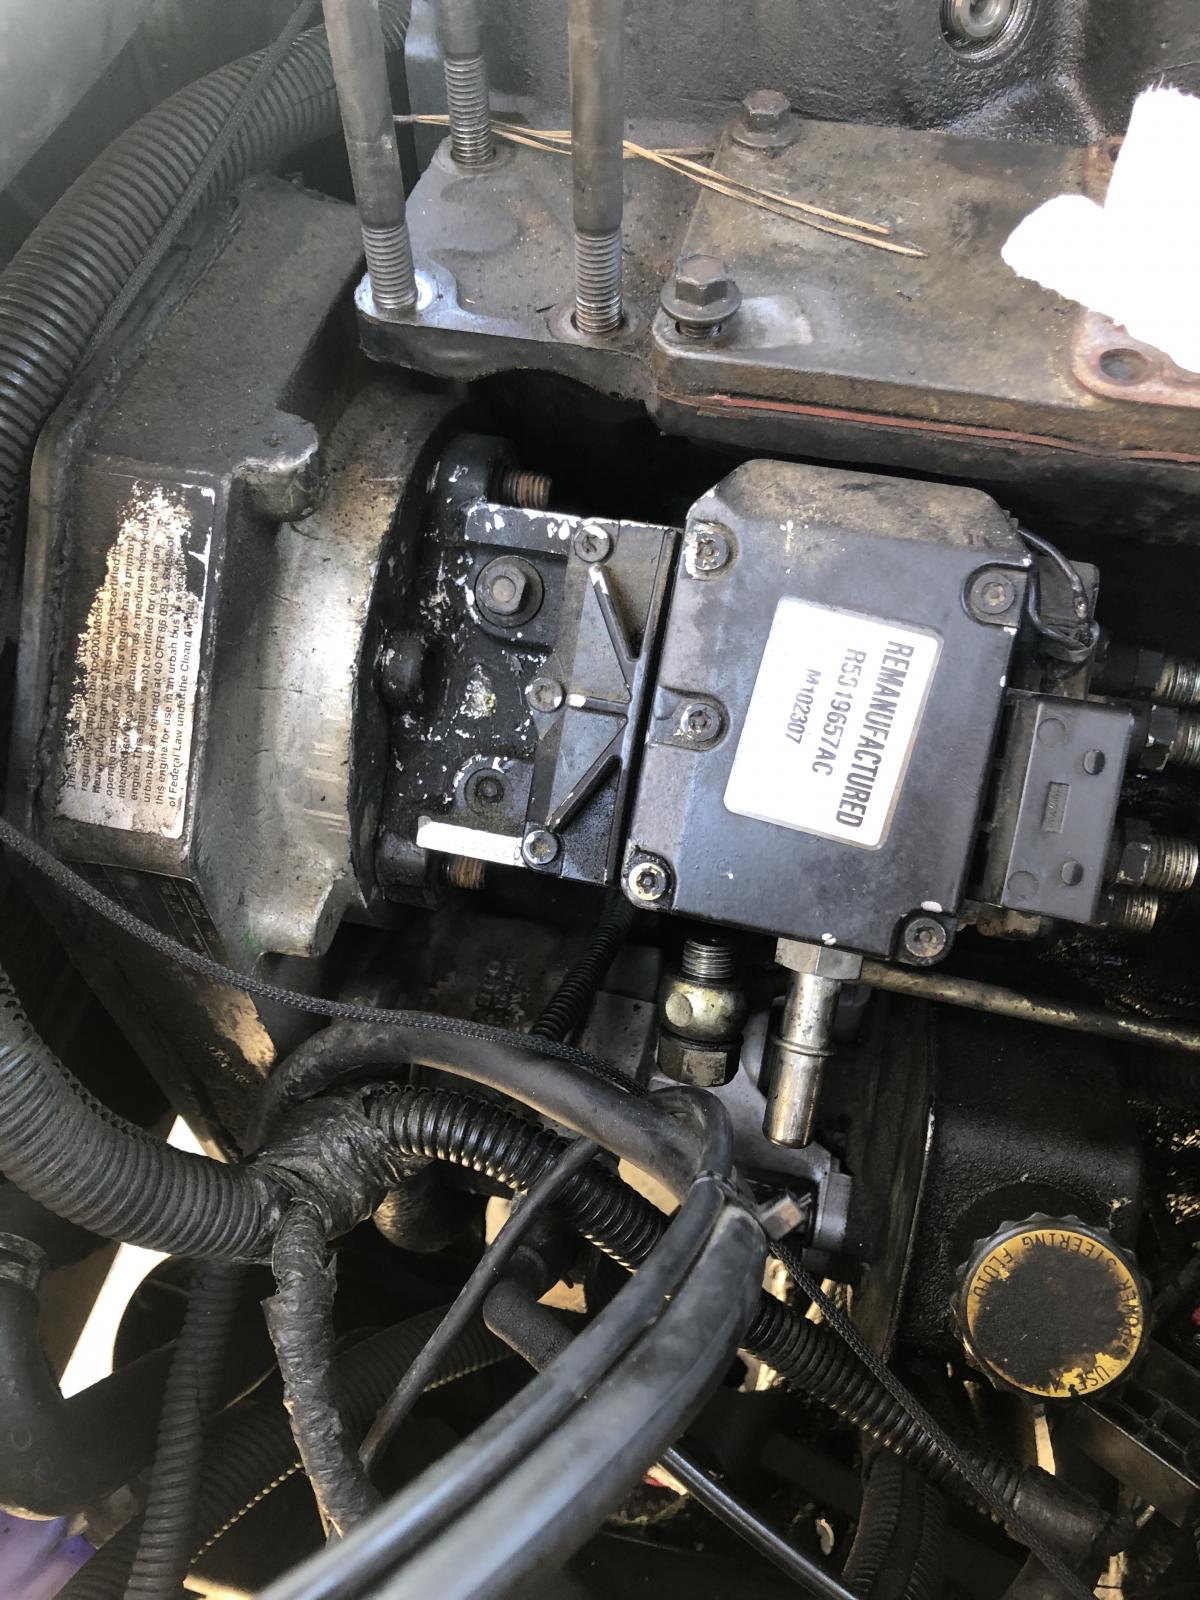
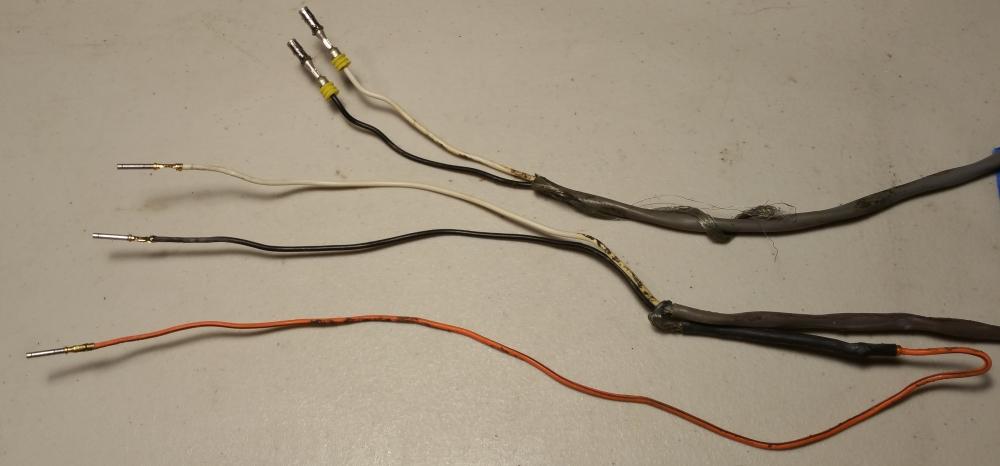
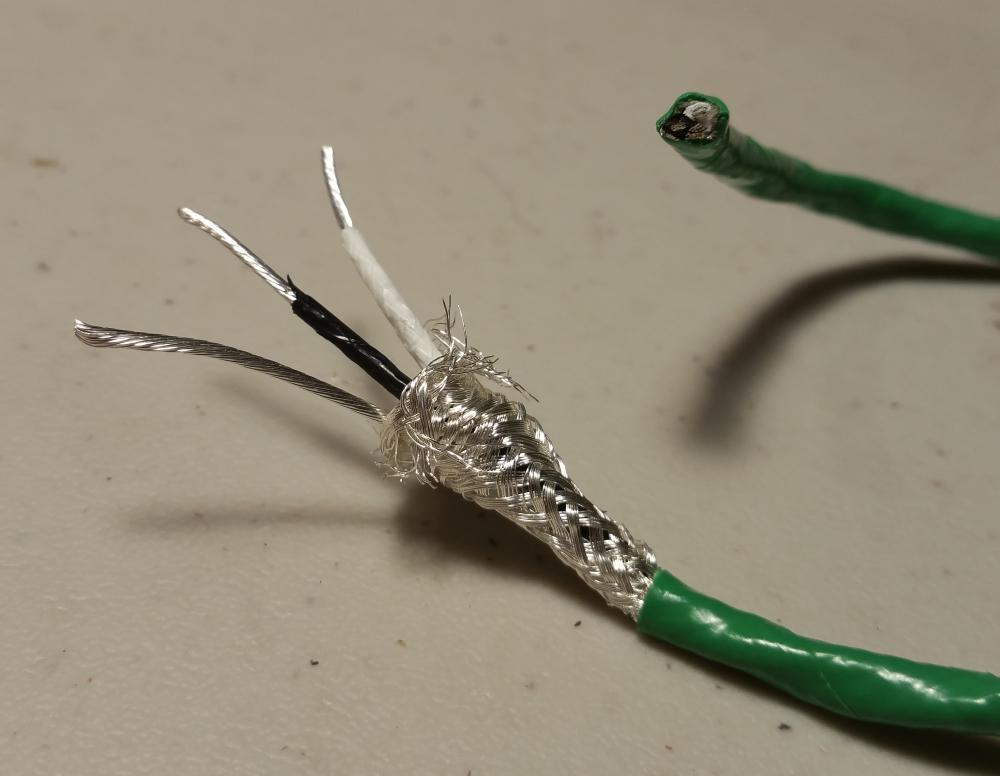
 I'm replacing this wire: The wire is a shielded twisted-pair with a drain (SAE J1939/11). The wire seen here is the stock wire. It's comically unkempt. Note that the orange wire is about five inches too long, so that it must be doubled-back to make it the proper length. Also, the shielding is missing from the first six inches, and the last four inches. Neither of these is a problem from a functionality standpoint. I mean, it probably doesn't hurt anything. It's just sloppy. That loose twist of shielding provides no benefit, so why did they leave it loose like that? This is what I made to replace it. All new wire and connectors. It was hard to find a short length of J1939 wire. I found a few sources that were happy to sell me a 250ft spool, but I wasn't happy enough to buy it. I found a guy on ebay selling teflon/silver shielded twisted pair. $35 bought me 25ft. I wasn't trying to get silver. In fact, I wouldn't have bought it if I had realized that this is what it was. However, this is remarkable wire, so I'm going to give it a try. It's temperature rated to 200ºC. I don't know if it's oil rated.
-
I've done the P1689 troubleshooting steps. I made it to the end of step #8. According to the steps, that means my ECM is bad. In keeping with the idea that "it's probably not the ECM," I've been trying to double-check the communication between the ECM and the VP44. I tried to put an oscilloscope on the VP44 today, to see if I could see the data. If I see the ECM's data, then it's the VP44 computer, not the ECM. I saw something that looked like PCM data, but I couldn't figure out how to set a stable trigger on it. I put channel #1 on the black & white wires (Pins 1 & 2), and put channel #2 on the green wire (Pin 8). Then I tried to trigger off of channel #2. If I tuned the trigger just right, it would hold-still for a couple seconds. I was expecting that the green wire (sync signal) would provide a perfect trigger. Does anyone know the correct scope setup to see this signal?
-
Here you go gang... How to remove the VP44 the quick and easy way. Takes approximately 45 minutes for me to do this much. Remove the Mopar1973Man Crankcase vent (if applicable) Using a 10mm socket remove the air horn bolts and dipstick bolt. Using a 7/16 or 11mm loosen the top clamp of the boost boot. Move everything out of your way. Pack a shop rag in the intake to prevent stuff from falling in. Using a 13mm socket loosen the 3 bolts holding the APPS sensor and unplug and move. Now unplug the VP44 main connector and wire tap . This connector is a two step plug lock. Pull the release tab and wiggle the plug out then pull a bit more on the release and the plug should release fully. Now using a 10mm loosen the 3 bolts holding the 1,2,4 injection rail in place. Using a 3/4" wrench loosen 1,2,4 injection lines. Now remove 1,2,4 injection lines as a group. Using a 3/4" wrench remove the overflow valve banjo and remove your supply line (may differ from mine being a big line kit) Now remove the crankcase vent. Just unscrews normal right hand threads. Do not pry on the nipple. Now remove the pump shaft nut with a 1 1/16 inch socket. Using a 23mm socket roll the alternator towards the coolant bottle to bring the keyway on the pump gear to TDC position and then install your gear puller and pull the gear loose on the shaft. Now loosen the 3,5,6 lines but you do not have to remove. Now you want to loosen the 2 bolts on the rear bracket with a 13mm socket. Now remove the 4 nuts holding the pump to the gear case. Now careful kick the 3,5,6 lines out there nipples towards the block. Now lightly pry the pump away from the case and remove. Check for the key in the shaft make sure its present. This is what you should have after removal...
- 39 replies
-
- 3
-
-
-
- vp44
- bosch vp44 injection pump
- (and 1 more)
-
 This is my first time reaching out to a forum for help. So please be patient with me. My 2001 Dodge has me stumped. Sorry about being long winded. My truck right now so underpowered it is unusable. 2 years ago noticed a significant loss of power. The truck threw the VP44 code. I bought a remanufactured VP44 from alligator performance in ID & changed out the lift pump. I put on about 100 miles and everything appears normal. I then loaned my tuck to a friend to tow some stuff about 800 miles. During his trip, he received a stellar deal on some fuel from Mexico. From looking at the fuel filters I guessing it was mud mixed with a little diesel. After suspect fill up he tows about 300 miles and calls me reports huge loss of power. He also tells me about his huge score of cheap suspect diesel but everything will be okay that filter will clean it and the truck has a water sensor. At the time I thought he was just pulling my leg. 100 miles later, he calls me to tell me the truck has been sputtering for the last 30 miles the AC quit working and now the truck died. When on the phone he tries to start the truck. It starts. I asked him to check the fuel filter. He tells me he is running late and cannot afford the time to check the filter. Against my instructions, he drives the truck with empty trailer another 200 miles. When I get the truck back, I check the fuel filter. It is covered in mud & slime. I drain the little remaining diesel that’s left in the truck. It looks like muddy water. The next 100 miles I go through 4 more fuel filters. Then the filters stop plugging up and everything appears to be normal. Might be important.. ***Loss of power noticed when I get the truck back*** I don’t know if the truck overheated. It was outside Phoenix in the summer where it just died on my former friend. The truck is all stock except for gages and lift pump. I did not have gages on the truck when my friend used it. No oil in water or water in oil. No consumption of fluids. The motor has 200100 miles. Tested turbo system to 19 LBS and its good. No leaks in the intercooler or boots. When I stomp on the gas the truck the lift pump is still pushing out 10#. I think the EGT’s get a little hotter than they should be. The truck will drive empty at 75. If you put any load behind it it’s only doing 45-50 if I’m lucky. 12,000# trailer up a hill outside St George the truck would only do 12MPH. In the past same hill same load it would do 40MPH no problems. Truck starts up and runs fine. Running down the freeway occasionally it will seem like a miss for a half a second then it’s back to running normal. I think that there is a slight difference in motor sound now vs before. It seems to be using much more fuel than before. However when I get on it there is no tail tail black smoke from the exhaust. The cruise control just recently quit working. If that helps troubleshoot anything. I’m looking for ideas.
- 56 replies
-
- 1
-
-
- power loss miss
- Miss
- (and 1 more)
-
So, my truck has been driving okay, then out of nowhere, it starts to surge. buck and have no power. I was about 6 miles from home, so I limp it home. it idles okay, but any acceleration and it surges. sputters, etc. Put it on the code reader, and the first one was P0216, VP44 timing, the next code, P0230, and then the companion code P1693. along with P0521, P0460, P1693. Dead VP44?! (Blue Chip) and I've only put abut 80k with a new Raptor lift pump. My fuel gauge was not working, and the float level error code with almost no fuel pressure ~10 psi.
-
Hey everyone, New member here but long time reader, I recently bought another dually (lucky number 3) to replace my 2000 24v. Sorry in advance for the long post, just want to give all info Amazing truck and very well built, however.... i bought it and the abs module was unplugged, never really considered this a problem ( not a fan of abs) but im sure you all know that the speedodoesnt work without it and is a requirement for certification in Ontario. So i plugg the moduleback in, everything is fine...until it isnt, the truck began to stutter at various rpm (changed ECT Sensor) once i did that the "Stutter" was only in 6th gear at 2100rpm (had a comp box and a CAT 95gph LP at the time) Unplug the Module and everything is right as rain and has excellent power. Decided to switch over to a fass (in case of contamination) and also switched to the Juice w/Attitude ( just a personal preference... i love the dummy settings because im a dummy) Changed the MAP at this point because i had no electronic reading for boost. Plugged back in at this point and test drove it for about 5 minutes before the issue came back. I am stumped on this one gentlemen, I sure hope someone has encountered this issue before. Thank you in advanced. Chad Pressure @ VP >16psi....Boost Max 47psi...EGT never exceed 1200F* 2002 Dodge Ram 3500 Sport (Daily/Plow Truck) -Edge Juice w/attitude (unlocked plus EGT on manifold) -BD Super B Special -BD SS Manifold -BD Intake Horn -Hamilton 100lb Valve Spring -Hamilton Pushrods -ARP 625 Headstuds -Southbend 3250 Clutch -Hewitt Mechanical Gauges (Fuel,EGT{After turbo},Fuel Pressure) -Fass 150 gph LP -Colt Cam (Big Stick) Stage 3 -VP44 (100+ aftermarket)
-
Ok guys I've posted on Cummins forum but not much help. My vp went bad about 10 months ago I replaced it truck ran good. 2 moths later dead pedal started I bumped my fuel pressure up on airdog165 local shop had it way low. Truck ran good for 6 months. Dead pedal came back also had a low voltage to apps code changed apps with a timbo and adjusted it per instructions. No more codexpensive but I still have the dead pedal. Spoke with local shop and changed ecm. Still have the dead pedal!! For giggles I changed my fairly new filters and added 2 grounds along with changing terminals made it 2 and 1/2 months and dead pedal is back. Spoke with a few people including calling blue chips tech line and they think psg is bad on pump. My pump is under warranty so I pull it and warranty it out. Driving home tonight and the POS is still dead pedaling. I check alternator which is under a year old a/c voltage is .028 at worst. Some one please help or I'm trading this thing in and getting a powerstroke! Thanks in advance


.thumb.jpg.0a8467e96b4e6a8607a9e199db777bca.jpg)