Search the Community
Showing results for tags 'lift pump'.
-
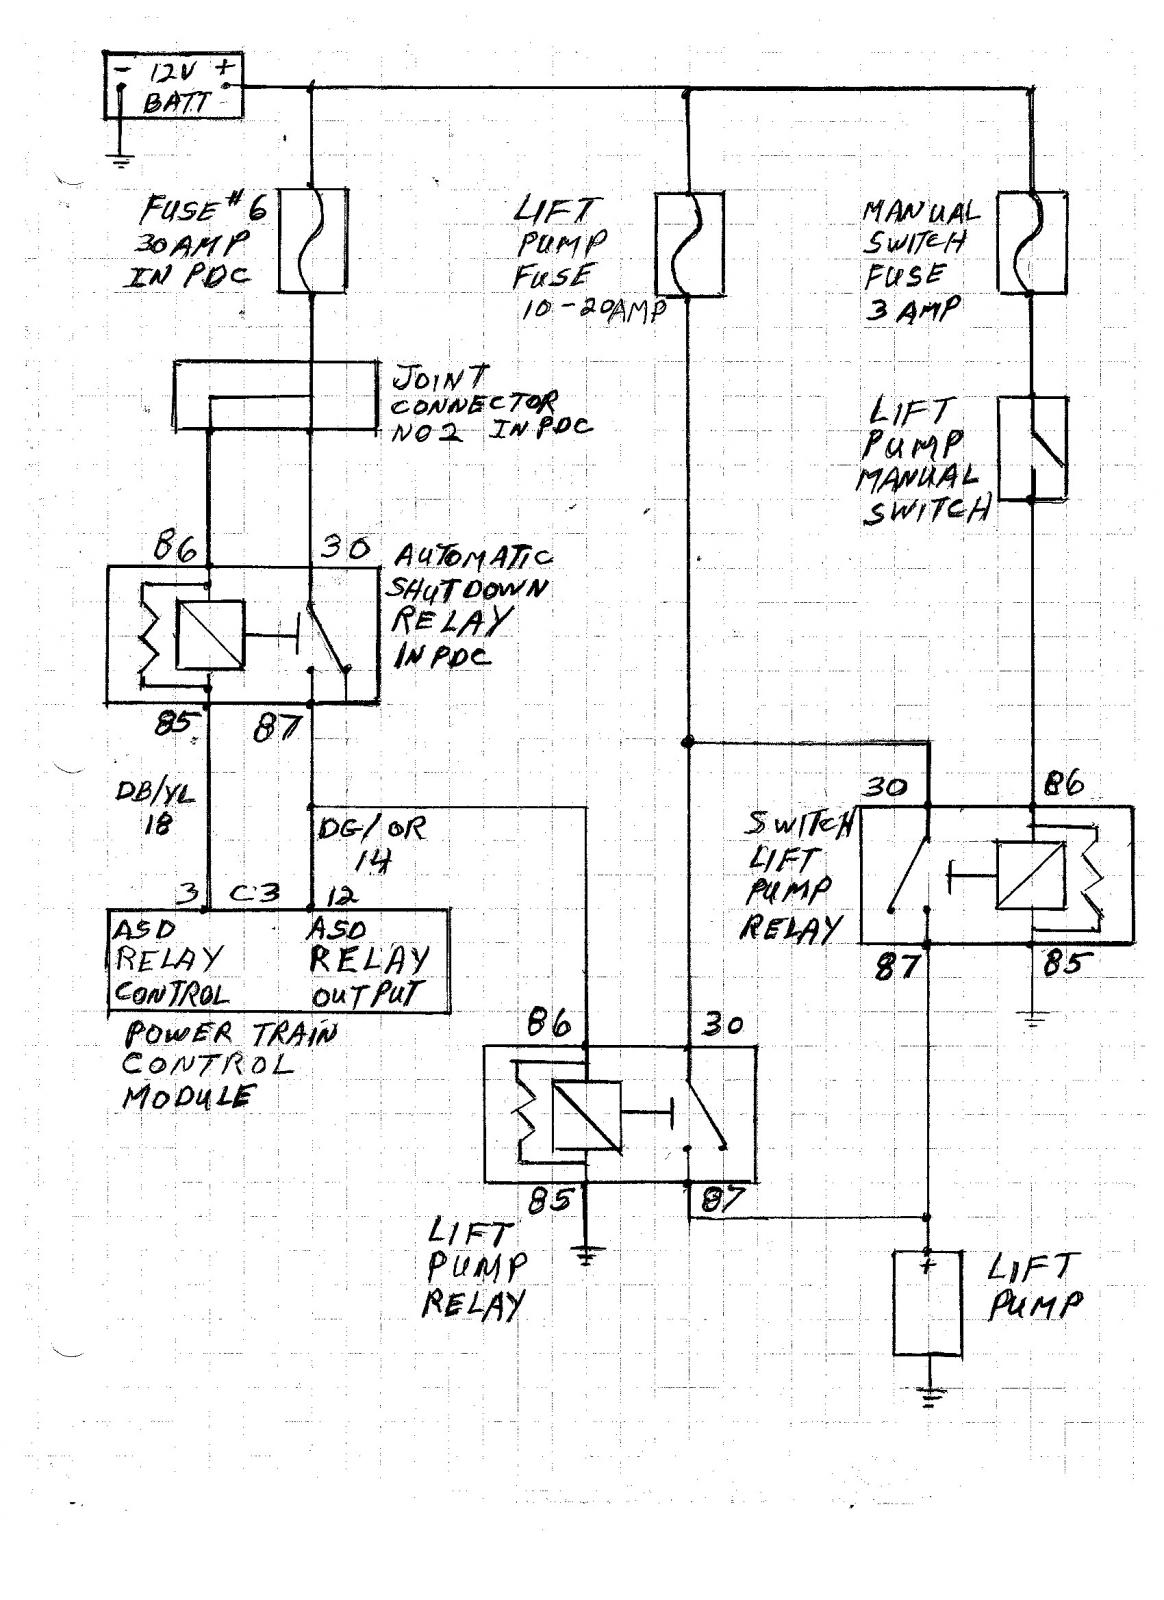
ASD Relay Controlled Lift Pump If the ECM is no longer powering the electric lift pump and you’re using a manual switch wired directly to the fuel pump relay for control there is a danger of the fuel pump feeding a fire in the event of an accident even if the engine stalls. The automatic shutdown relay is an alternative that will turn the fuel lift pump off if the engine stops and still be able to prime the VP44 if needed. The automatic shutdown relay (ASD) in the power distribution center (PDC) is energized by the powertrain control module (PCM) by grounding pin 85 of the relay when the engine is started. This closes the contacts and battery voltage is supplied to terminal 87 of the relay. The terminal 87 of the ASD relay supplies power to the PCM through a 14 gauge dark green/orange (DG/OR) wire. When the engine stalls the PCM opens the grounding circuit within 3 seconds and the voltage is removed from terminal 87. The lift pump relay can be controlled by connecting a wire between terminal 87 of the ASD relay, or splicing into the DG/OR wire) and terminal 86 of the lift pump relay. The power draw of the lift pump relay solenoid is less than 1 amp so an 18 gauge wire can be used. There is an option to run the lift pump without the engine on, a bypass switch and second relay can be installed. The second relay is used to isolate the PCM and not power up systems unless the key is in the on position. Also if the bypass switch was wired directly to pin #86 of the fuel pump relay the amp draw from the PCM would blow the 3 amp fuse. If installed improperly the lift pump could stay on in the event of an accident. Installer/user assumes responsibility for proper installation and use. Written by: J. Daniel Martin, Martin’s Mobile Maintenance AKA: IBMOBILE 3/24/19
-
This describes how to lift the bed up on a 2nd gen to get to the tank to replace the in tank lift pump/fuel level sending unit. First this was done on a 2x4, short bed truck. As I understand it, the long bed has to have the bumper removed or the bed will hit it. Tools: 10mm & 15mm socket Flat & Phillips tip screw drivers 7mm socket for hose clamps on filler tube (Optional). Hose loosening tool (Optional). strap Wrench (Maybe Optional). Prop rod for bed (48" on 2x4 truck) The first thing I did was to remove the spare tire to remove as much weight as possible. Im not sure if you could do this w/o removing the tire, having it out sure made things easier. Next I removed the license plate and the plastic piece that holds the plate onto the truck. I dont think that this needs to get removed, however I did not want to change smashing the plastic & lights, so I removed them. Next I removed the hoses that goto the filler neck and the vent line. You can use a flat tip screw driver, but I preffered using a 1/4" drive 7mm socket. I used the hose loosening tool to break the hoses loose from the tubes that come off of the filler neck so I would not have to pull on them hard. they are just aluminum & they go into a plastic piece & I can see breaking that by cranking on it hard to get the hoses loose. Next was to remove 4 of the 6 bed bolts, and to loosen the aft 2 bolts almost all of the way out. If this is for a long bed truck the bumper has to get removed, and there are 8 bolts (6 out & 2 loosened). on the Passenger side, there is a grounding strap that goes from the frame to the bed. I used a 10mm socket & removed it from the bed. Once I had everything out & ready to go, we lifted the bed up & I measured how long of a prop rod I would need, and we put the bed back down. on my truck it was exactly 48" long. Once I cut some 1" thick wall tubing, 48" long, we lifted the bed up & I put the prop rod in. I put it up against the frame between the front spring mount & the bed mount. Once the bed was propped up, it was easy to get to the tank. Next thing to do is to use a small flat tip screw driver & remove the 2 hoses going to the sending unit & the electrical connector on the sending unit. there is a little red latch that has to get slid aft then you can push the lock on the electrical connector & slide it off of the sending unit. Next is to get the ring that holds the sending unit to the tank. Mine was a bear to get lose. I used a strap wrench & got it off. then the sending unit will come straight up & out. assembly is just reverse of the removal, however there is something to keep in mind. the sending unit is 15.25" long & the tank is 14" deep (bottom of the tank to the top of the flange. so when your tightening the ring, you have to collapse the springs on the sending unit 1.25". if the ring that holds the sending unit is not tight, you will be able to push down on the sending unit & continue to push the springs down. make sure you tighten the ring enough to seal the sending unit to the top of the tank but not so tight you break the threads on the ring or tank. I had to use the strap wrench to get it tight enough to seal. I could easily see that if you were using your hands to tighten the ring that you would think it was tight, but it is not. Bob
-
With today's electronic lift pumps from FASS and Airdog, TYPICALLY they do not come with a way to easily adjust fuel pressure. There are options out there but they are quite spendy and there's easier ways to accomplish the same thing. So for those who have pumps that do not have an external/adjustable regulator, your pump more than likely uses a spring and ball to regulate fuel pressure. Springs should be provided from the pump manufacturer to provide adequate pressures. Typically between 16-18psi. The pumps use a hard plastic ball, either a Buna or Viton ball. This will create a seal when the pump is off and keep fuel from "leaking" or "moving" in the lines once the pump is off. The springs can be inconsistent which can cause erratic fuel pressure readings or lower then expected readings. Using this diagram of a FASS system, if you remove the hose/fitting that is connected to the "air/vapor return to the tank" you will find a spring a ball, it will look like this. If your spring comes out looking like this... You were more then likely experiencing erratic fuel pressures. You could either straighten out the spring and reinstall or replace the spring all together. I only have experience with FASS but I called FASS support and they sent me a replacement. I imagine the same would happen with Airdog. The next factor in all this are the balls. In my research I've found that FASS uses a Buna ball and Airdog uses a Viton ball. I was having a mixed bag of issues, erratic fuel pressures and also lower then expected fuel pressures. Upon removing the spring and ball I found my spring had twisted (previous pic) and that the ball had indented into the spring. You can see the indentation here. I tried a couple replacement balls from FASS with the same results. I then went with a Viton ball and the problems haven't returned. The Viton ball is stronger material and seems to be holding up well. If you're still having lower pressure issues then you can put a washer in to shim the spring and raise pressure. The following measurements should get you in the ball park but make sure you double check you're not adding any additional restriction by using to small of an ID. Here are the measurements: OD - .631" ID - .320" thickness - .039" ***This washer/shim should be added between the fitting and the spring NOT between the spring and ball.*** So what helped fixed my issues was going with a Viton ball and a 17lb spring. This isn't meant to say one company is better then the other, just what I found out in my research and what fixed my problem. The point of this article is to help educate others on potential fixes. ***Additional notes*** List of parts I used Viton Ball HERE 17lb spring HERE I understand these are labeled as Airdog parts but they worked fine in my FASS 150. The Airdog fitting DID NOT work on my FASS pump so if you're looking to replace that on your FASS 150 you would need to contact FASS to get a replacement. Here's the difference FASS LEFT AIRDOG RIGHT Pretty noticeable difference in threads and overall length so if replacing these fittings they must be brand specific.
-

Fuel Pressure Specification For Bosch VP44 Injection Pump
Mopar1973Man posted an Cummins article in Fuel
Fuel Pressure Specification For Bosch VP44 Injection Pumps Here is a copy of the fuel system specifications from the Dodge Factory Service Manual. This is for your Dodge Cummins Turbo diesel truck with a Bosch VP44 injection pump. Fuel pressure Normal fuel pressure should float about 14-15 PSI running down the pavement. It should never fall below 10 PSI at all. Here is a colorize fuel pressure gauge to give you a clue of the fuel pressure span you want. You want the needle to stay in the green at all times. Yellow zone is a warning that you should check the fuel filter, lift pump performance, overflow valve, etc. This is undocumented maximum pressure is 20 PSI. Now take notice to the overflow valve is set for 14 PSI so excessive pumping of fuel does nothing for performance except create more heat in the fuel, which in turns reduces the cooling ability of the fuel and adds more stress to the lift pump. So a little extra fuel pressure is a good thing because it ensures the Bosch VP44 injection pump stays cooled and lubricated properly. However, excessive fuel pressure will heat the fuel and reduced the cooling ability of the fuel. Now always remember that the only lubrication the Bosch VP44 injection pump will see is the fuel itself so if you don't have enough fuel pressure it will cause damage to the Bosch VP44 injection pump. It's like the same as running the engine with low oil pressure it will continue to run, but the damage to the engine will occur. On the other hand, the Bosch VP44 injection pumps, which happen to be about $1,200 to replace. Pressure Drop The amount of fuel pressure drop between idle and wide-open throttle. 2-3 PSI drop from idle to WOT is normal. However, 5 PSI or more pressure drop from idle to WOT is pointing out a failed lift pump, plugged filter, and/or plumbing restrictions. 2-3 PSI Is Normal Dropping more than 5 PSI is pointing towards a failed lift pump, plugged filter, or restrictive plumbing. Just to show you the difference in the stock plumbing which is 6mm ID plumbing and most performance pumps come with 1/2" ID plumbing. These pictures will give you an idea... The first picture is a Big Line fitting over the top of the stock plumbing. Then the second picture compares the stock 6mm ID steel lines to a 1/2" ID Big Line hose. The best way to show this example of restrictions is to let's say your house is on fire. You know your garden hose has 80 PSI of pressure, but the garden hose is only 5/8" ID hose. Your wife calls 911 and gets the fire department coming in the meantime you keep fighting the fire with your little 5/8" garden hose and losing the battle. The fire department shows up and pulls a 2 1/2" hose off the truck and charges it at 80 PSI and now winning the battle. Your fire is put out! What is so different? No matter what the size of the fuel line will dictate how much volume can be pushed through the fuel line. Like the story above the water pressure was the same at 80 PSI, but the hose size jumped from 5/8" to 2 1/2" ID hose and the volume changes are the size of hose. So the same thing applies to the stock fuel system. The stock banjo bolts and 6mm ID pipes are just too restrictive and cannot supply enough volume of fuel for that Bosch VP44 injection pump demands. This why I highly suggest you go up to 1/2" ID plumbing. Reasons Why Fuel Pressure Is Critical Let's take a look at a Bosch VP44 injection pump. I've labeled the fuel lines supplying fuel and return line plus the overflow valve. Now I know there is a ton of rumors on the internet of all kinds of minimum pressures for a Bosch VP44 injection pump. I'm going to say stick with the Dodge Factory Service Manual Specifications for fuel pressure. Now let's talk a bit more about the flow of the fuel. The lift pump supplies pressurized fuel to the Bosch VP44 injection pump the overflow valve regulates how much fuel pressure is held. Excessive fuel pressure is returned to the fuel tank. The picture below is of the bleed hole in the overflow valve this image was magnified x10 to show you how small the bleed hole really is. Give you an idea the size of the hole use a single strand of 14 AWG copper wire, and it will NOT fit the hole. The bleed hole is there solely for bleeding air out of the system which air will pass through this tiny hole rather easy but fuel will not. However, if you're looking for long life from a Bosch VP44 injection pump, I would personally suggest you adjust your minimum pressure to 14 PSI this will ensure the overflow valve remain open and a constant fuel flow through the Bosch VP44 injection pump and keep it cool all the time. Let me play out a simple scenario. Let's say my fuel pressure is roughly 10-11 PSI. I'm going to drive up into the back country approximately 40 miles with my Dodge Cummins towing an 8x8 utility trailer. Now the whole trip heading uphill into the mountain towing an empty trailer is going to be enough fuel flowing to the injectors to keep the Bosch VP44 injection pump happy. However, I've spent the day and loaded up with firewood and now coming back down the mountain loaded. I'm using my exhaust brake and coasting most of the way down taking it slow and easy. At this point, the injectors are no longer firing so the Bosch VP44 injection pump is not pumping fuel out to the injectors. Furthermore, the overflow valve closes at about 10-11 PSI so let's say it did close. Now where is the fuel going??? Nowhere! It is pooled up in the injection pump and gaining heat and being broke down. You've also removed the cooling and lubricating of the Bosch VP44 injection pump so now it actually taking on damage. To give you a feel for the fuel flow coming from the injection pump with an AirDog 150 at 17.5 PSI of fuel pressure, I've got a video to explain that quickly. I've heard rumors of some people trying to develop a cool down system for the Bosch VP44 Injection pump but after making the video above, there is just no way to cool down the injection pump using the lift pump of even the AirDog/FASS series. The whole problem is the restrictions inside the Bosch VP44 injection pump and the overflow valve as seen in the video above. So the only way to keep the Bosch VP44 injection pump cool is to keep fuel flowing through it at all times. So to keep the overflow valve open I suggest the 14 PSI minimum pressure. I'm currently at 136K miles on my Bosch VP44 injection pump and still going strong using a 16 PSI minimum pressure and an 18 PSI idle pressure. Here is a short video of stable fuel pressure from 55 MPH to 70 MPH at WOT. Here is another video done with idling, cruising, and WOT operation. Yes. I got a bit carried away and sloshed the fuel in the tank and sucked an air bubble and the pressure fell off. Cranking Pressure Test Here is a simple test on how to do the test for cranking fuel pressure. Pull the fuel pump relay in the PDC and then attempt to start the engine. Pay attention to the fuel pressure gauge during cranking. Be aware this test will trip a P1689 code and light the CHECK ENGINE light. Excessive cranking pressure can lead to difficult starting problems. Suggested Lift Pump Replacement You should replace the stock fuel system completely since it cannot supply enough fuel for even stock requirements without causing damage to the Bosch VP44 injection pump or adding stress to the lift pump. The pumps I suggest are proven and come with a lifetime warranty. These pumps come with a full kit and replace everything from the fuel tank to Bosch VP44 injection pump. AirDog 100, 150, or 165 Raptor 100 or 150 FASS 100 or 150 FASS DDRP (DDRP Ver.2 - 89 GPH) I don't suggest these pumps... Because they don't address the pump location, plumbing restrictions, or come with much of warranty. Stock Carter or Carter Campaign Pump (4090046) Holley Blue or Holley Black FASS DDRP (DDRP Ver.1 - 40 GPH) AirTex Mopar's Notes: That was true for the DDRP Ver.1 However, DDRP-02 is rated at 89 GPH and will hold pressure. It is listed as a Stock replacement pump designed to perform better than the Stock pump, but not for Chips that add fueling. I place a Power Puck on my truck with the DDRP-02 and saw no difference in FP at either idle or WOT, (PP is a timing chip doesn't change the amount of fuel). That said the PP is currently removed from my truck as I overpowered my clutch both loaded and unloaded, back to the stock clutch is fine. Looking for a Valair possible DD organic, or SD Kevlar/Ceramic. It is currently in the stock location and giving 15 psi at idle and 10 at WOT. Information Provided By: rhagfo http://www.cumminsforum.com/forum/98-5-02-powertrain/404412-fass-ddrp-02-a.html#post4197714 Additional Information (About Performance Crowds & Fuel Pressure) I've seen several times where people will link back to performance pump builders and quoting where they say, "(Un-named) proved that 5 PSI, under load, made all the horsepower the VP44 pump could make, even with stock fuel lines, fittings and supply pump." This might be true but there is nothing ever said about the life span of the pump at these conditions. So... Please do not follow these performance crowds into destroying a perfectly good Bosch VP44 injection pump. The fact still remains from Bosch the actual designer of the Bosch VP44 injection pump states that injection pump should return 70% of the fuel back to the fuel tank for cooling and lubrication purpose of the VP44. Being the only way a Bosch VP44 injection pump can do this is to have fuel pressure above 14 PSI to open the overflow valve. Then if the stock Bosch VP44 injection pump with an enhancement box say an Edge Comp on 5x5 can consume 15-20 GPH that means the stock 35 GPH pump cannot keep up with Bosch's design of 70% return volume. So this why products like AirDog, Raptor and FASS was created because they actually meet the demands of the Bosch VP44 injection pump. Then another fact that Bosch will let you know of is that diaphragm damage occurs from operating the Bosch VP44 injection pump at low fuel pressures. Making matters worse is that no Bosch injection re-builder will void warranty a VP44 injection pump with diaphragm damage. Dead give away that you had a bad lift pump or low fuel pressure problems. Please view the Bosch VP44 exploded view page to see there is no diaphragm in the Revision 027 Bosch VP44 Injection Pump Then the other fact is right from the Dodge Factory Service Manual has the minimum fuel pressures (picture at the top of the page). It even states the pressure that the overflow valve requires to open. Refer to the Overflow Valve Testing from the Dodge Factory Service Manual and see that the overflow valve should remain closed at 10 PSI and open by 14 PSI. So if the overflow valve is close by 10 PSI, then you extra cooling and lubrication just disappeared. So ultimately it suggested having a fuel system of no less than 100 GPH supply that can maintain a minimum pressure of 14-15 PSI at WOT. This will great extend the life of the VP44 because it keeps the electronics cooler longer and keeps the rotating parts lubricated properly. So please people let the facts and information from the actual designers of the injection pump (Bosch) and engine (Cummins) provide you proper information for your fuel system for your engine. Don't be swayed by performance shops claim of high horse output with little fuel pressure. As I proved right here doesn't work for the longevity of the VP44 injection pump... Another thing to bring up there are people that are increasing fuel pressures above 20 PSI. Please don't do this. The return port leaving the VP44 pump isn't very big at all. The return port is on the left and supply is on the right. As you can see increasing fuel pressures above 20 PSI put you at risk for shaft seal failure. Increasing the pressure above 20 PSI isn't going to improve the return flow. I say stick with the 14-20 PSI pressure range for seal safety. Additional Information (About Maximum Flow Rates) Here are some calculated flow abilities of the stock fuel system vs. 1/2" big line kits. This is not calculating bend, turns, offices just straight flow for open end plumbing and this is a rough calculation. Pipe Size Gallon Per Hour Flow Rate Gallon Per Minute Flow Rate 6mm ID pipe 75 GPH @ 15 PSI 1.2 GPM @ 15 PSI 1/2" ID pipe 570 GPH @ 15 PSI 9.5 GPM @ 15 PSI Use The banjo bolt Shrader valve to test for fuel pressure, Item 3 in the above diagram. If you have a 98-99 truck the port might be on top of the fuel filter housing. You can see the 90* bend fitting coming out of the top of the fuel filter housing in the below picture. Install a Shrader valve and test from there. I'm hearing of tales of shops, mechanics, or dealers doing the old hook up the fuel pressure gauge and only checking fuel pressure at idle. This is wrong. Because I've seen lots of cases where fuel line restriction, fuel filter plugging, gelling fuel and other thing causing fuel pressure to drop out under load. Like this video from a friend of mine, you'll see he's got awesome fuel pressure at an idle (where most shops gave him the green light). However, what the shops did not test for is WOT at highway speed, and you'll see in the video, he can pull way down to 0 PSI. Anything under 14 PSI is a concern... Anything under 10 PSI is a serious problem. As for having a gauge in the cab all Dodge Cummins trucks should have a fuel pressure gauge in the cab. Because like you seen bench testing with an idle pressure is meaningless if you can't see the WOT pressure at highway speed.- 3 reviews
-
- 2
-

-

-
- lift pump
- injection pump
- (and 3 more)
-
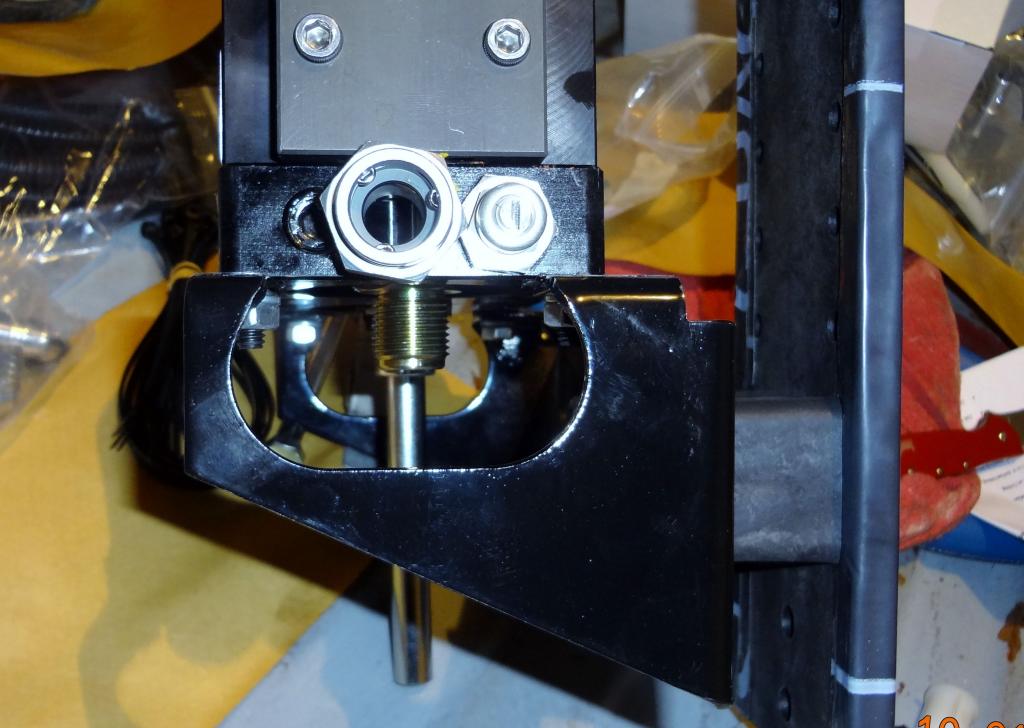
How To Install an AirDog 150 Fuel System The AirDog 150 fuel pump is a good design kit. It comes complete with all hardware, mountings, fitting, hoses etc. to hook up to your Dodge Cummins Truck. It was rather easy to install on my truck since I already had a Vulcan Big line Kit and Carter campaign lift pump. Mounting suggestion (for 4WD trucks) is that you push the pump forward towards the transfer case so the skid plate can protect the pump and filters from road debris. But make sure you leave enough room to access the transfer case for fluid checks and drain and fill service. As for doing plumbing it rather straight forward. Route the hose and cut to size. But I'll make another suggestion. Look your routing over very carefully for a place to protect the fuel line from damages (sharp body edges, tight spots that could pinch, or get snagged by road debris, etc) Also remember to include enough room for your connectors. Below is the return fuel setup. As for doing the electrical is also very straight forward too. It was designed rather good too. Looks just like stock wire harness. Suggestion for routing of wiring. The pump power leg should be routed with the taillight harness on the truck then you can zip-tie to the existing wiring and it look rather factory looking. The relay and fuse can be mounted on the firewall by the ABS controller. There is an existing ground wire in this location and I utilized the screw to mount both the fuse and relay on this ground screw. Draw straws Install (Old School) Now for the draw straw kit took some time and consideration. You got to ways of installing the draw straw by pulling the bed of the frame or to drop the tank. Since I've got a topper on my bed and lots of stuff in the bed of my truck it would be best to drop the tank. Here is a picture of the tank removed and I did prop it up on wood so the bottom of the tank didn't get flattened. Now you got to drill your hole for the draw straw. I use a 1¼" I drilled it on a high spot of the tank towards the front. After a period of time has passed now I found out that the hole should be smaller like 1 1/8" hole. Basically, now all you got to do is assemble the draw straw part and install it into the tank. But you'll find out that the straw is a bit too long and needs to be trimmed. I pushed the straw into place and measured the amount that it was sticking out of the grommet then trimmed it off. I did add some grooves to the bottom of the straw to keep it from sucking flat to the bottom. Now I get asked a lot about how much gap to the bottom of the tank you need for the draw straw. This is an easy answer you want to place a quarter (coin) on the bottom of the tank and the tip of the draw straw should just touch that. Seem tight, right? Well think about the weight of diesel at roughly 6.6 pounds per gallon there will be 60 pounds of diesel pressing down on the tank bottom at a quarter tank so this measurement will widen with more fuel and less as the tank empties. I lightly notched the tip of the draw straw to keep if from ever sucking flat to the bottom. As for performance I've managed to run down below 1/8 tank warning light several different times now with no problems. So now you should be complete. The Draw Straw should be all assembled and installed in the tank. So now re-install the fuel tank and hook up fuel line going to the AirDog 150. All you need to do now is re-prime your fuel system. My results were great. I've got awesome fuel pressure now.
-
 Hello, Curious if anyone has done this FASS 150 upgrade, and if so, your results/comments please. Thanks
 -
 ASD Relay Controlled Lift Pump If the ECM is no longer powering the electric lift pump and you’re using a manual switch wired directly to the fuel pump relay for control there is a danger of the fuel pump feeding a fire in the event of an accident even if the engine stalls. The automatic shutdown relay is an alternative that will turn the fuel lift pump off if the engine stops and still be able to prime the VP44 if needed. The automatic shutdown relay (ASD) in the power distribution center (PDC) is energized by the powertrain control module (PCM) by grounding pin 85 of the relay when the engine is started. This closes the contacts and battery voltage is supplied to terminal 87 of the relay. The terminal 87 of the ASD relay supplies power to the PCM through a 14 gauge dark green/orange (DG/OR) wire. When the engine stalls the PCM opens the grounding circuit within 3 seconds and the voltage is removed from terminal 87. The lift pump relay can be controlled by connecting a wire between terminal 87 of the ASD relay, or splicing into the DG/OR wire) and terminal 86 of the lift pump relay. The power draw of the lift pump relay solenoid is less than 1 amp so an 18 gauge wire can be used. There is an option to run the lift pump without the engine on, a bypass switch and second relay can be installed. The second relay is used to isolate the PCM and not power up systems unless the key is in the on position. Also if the bypass switch was wired directly to pin #86 of the fuel pump relay the amp draw from the PCM would blow the 3 amp fuse. If installed improperly the lift pump could stay on in the event of an accident. Installer/user assumes responsibility for proper installation and use. Written by: J. Daniel Martin, Martin’s Mobile Maintenance AKA: IBMOBILE 3/24/19 View full Cummins article
-
 First time posting. Just got a 2000 2500 2wd to tow a tiny house. Decided to get a Fuel Boss and hopefully not worry about fuel supply issues and trashing a VP44. The thing is bone stock (as far as I can tell) without gauges (I know I need to get them). I checked the engine bay and there is definitely a carter lift pump behind and below the stock fuel filter. It's plugged in to the harness and the fuel like is hooked up to the filter, but I haven't bumped the starter to see if it runs. I ordered a fuel boss thinking the install would be straightforward with the stock lift pump. Then I checked the tank. It really looks like it has an in tank pump: 4 wire harness, inlet, outlet, and vent. What the heck?!?!? Is it possible to have an in tank and stock pump? Isn't that too much current for the ECM? Is it possible to suction fuel through the in-tank pump to the fuel boss? Do I have to put in a draw straw? Saw this video: Fuel tank module upgrade from Throroughbred and they showed how to just cut out the in-tank pump and add an extension to the stock straw instead of installing an aftermarket straw. Any reason that wouldn't work? I'm not looking to add HP or anything, I just want a reliable fuel delivery system. Thanks, Justin
 -
Fuel Pressure Specification For Bosch VP44 Injection Pumps Here is a copy of the fuel system specifications from the Dodge Factory Service Manual. This is for your Dodge Cummins Turbo diesel truck with a Bosch VP44 injection pump. Fuel pressure Normal fuel pressure should float about 14-15 PSI running down the pavement. It should never fall below 10 PSI at all. Here is a colorize fuel pressure gauge to give you a clue of the fuel pressure span you want. You want the needle to stay in the green at all times. Yellow zone is a warning that you should check the fuel filter, lift pump performance, overflow valve, etc. This is undocumented maximum pressure is 20 PSI. Now take notice to the overflow valve is set for 14 PSI so excessive pumping of fuel does nothing for performance except create more heat in the fuel, which in turns reduces the cooling ability of the fuel and adds more stress to the lift pump. So a little extra fuel pressure is a good thing because it ensures the Bosch VP44 injection pump stays cooled and lubricated properly. However, excessive fuel pressure will heat the fuel and reduced the cooling ability of the fuel. Now always remember that the only lubrication the Bosch VP44 injection pump will see is the fuel itself so if you don't have enough fuel pressure it will cause damage to the Bosch VP44 injection pump. It's like the same as running the engine with low oil pressure it will continue to run, but the damage to the engine will occur. On the other hand, the Bosch VP44 injection pumps, which happen to be about $1,200 to replace. Pressure Drop The amount of fuel pressure drop between idle and wide-open throttle. 2-3 PSI drop from idle to WOT is normal. However, 5 PSI or more pressure drop from idle to WOT is pointing out a failed lift pump, plugged filter, and/or plumbing restrictions. 2-3 PSI Is Normal Dropping more than 5 PSI is pointing towards a failed lift pump, plugged filter, or restrictive plumbing. Just to show you the difference in the stock plumbing which is 6mm ID plumbing and most performance pumps come with 1/2" ID plumbing. These pictures will give you an idea... The first picture is a Big Line fitting over the top of the stock plumbing. Then the second picture compares the stock 6mm ID steel lines to a 1/2" ID Big Line hose. The best way to show this example of restrictions is to let's say your house is on fire. You know your garden hose has 80 PSI of pressure, but the garden hose is only 5/8" ID hose. Your wife calls 911 and gets the fire department coming in the meantime you keep fighting the fire with your little 5/8" garden hose and losing the battle. The fire department shows up and pulls a 2 1/2" hose off the truck and charges it at 80 PSI and now winning the battle. Your fire is put out! What is so different? No matter what the size of the fuel line will dictate how much volume can be pushed through the fuel line. Like the story above the water pressure was the same at 80 PSI, but the hose size jumped from 5/8" to 2 1/2" ID hose and the volume changes are the size of hose. So the same thing applies to the stock fuel system. The stock banjo bolts and 6mm ID pipes are just too restrictive and cannot supply enough volume of fuel for that Bosch VP44 injection pump demands. This why I highly suggest you go up to 1/2" ID plumbing. Reasons Why Fuel Pressure Is Critical Let's take a look at a Bosch VP44 injection pump. I've labeled the fuel lines supplying fuel and return line plus the overflow valve. Now I know there is a ton of rumors on the internet of all kinds of minimum pressures for a Bosch VP44 injection pump. I'm going to say stick with the Dodge Factory Service Manual Specifications for fuel pressure. Now let's talk a bit more about the flow of the fuel. The lift pump supplies pressurized fuel to the Bosch VP44 injection pump the overflow valve regulates how much fuel pressure is held. Excessive fuel pressure is returned to the fuel tank. The picture below is of the bleed hole in the overflow valve this image was magnified x10 to show you how small the bleed hole really is. Give you an idea the size of the hole use a single strand of 14 AWG copper wire, and it will NOT fit the hole. The bleed hole is there solely for bleeding air out of the system which air will pass through this tiny hole rather easy but fuel will not. However, if you're looking for long life from a Bosch VP44 injection pump, I would personally suggest you adjust your minimum pressure to 14 PSI this will ensure the overflow valve remain open and a constant fuel flow through the Bosch VP44 injection pump and keep it cool all the time. Let me play out a simple scenario. Let's say my fuel pressure is roughly 10-11 PSI. I'm going to drive up into the back country approximately 40 miles with my Dodge Cummins towing an 8x8 utility trailer. Now the whole trip heading uphill into the mountain towing an empty trailer is going to be enough fuel flowing to the injectors to keep the Bosch VP44 injection pump happy. However, I've spent the day and loaded up with firewood and now coming back down the mountain loaded. I'm using my exhaust brake and coasting most of the way down taking it slow and easy. At this point, the injectors are no longer firing so the Bosch VP44 injection pump is not pumping fuel out to the injectors. Furthermore, the overflow valve closes at about 10-11 PSI so let's say it did close. Now where is the fuel going??? Nowhere! It is pooled up in the injection pump and gaining heat and being broke down. You've also removed the cooling and lubricating of the Bosch VP44 injection pump so now it actually taking on damage. To give you a feel for the fuel flow coming from the injection pump with an AirDog 150 at 17.5 PSI of fuel pressure, I've got a video to explain that quickly. I've heard rumors of some people trying to develop a cool down system for the Bosch VP44 Injection pump but after making the video above, there is just no way to cool down the injection pump using the lift pump of even the AirDog/FASS series. The whole problem is the restrictions inside the Bosch VP44 injection pump and the overflow valve as seen in the video above. So the only way to keep the Bosch VP44 injection pump cool is to keep fuel flowing through it at all times. So to keep the overflow valve open I suggest the 14 PSI minimum pressure. I'm currently at 136K miles on my Bosch VP44 injection pump and still going strong using a 16 PSI minimum pressure and an 18 PSI idle pressure. Here is a short video of stable fuel pressure from 55 MPH to 70 MPH at WOT. Here is another video done with idling, cruising, and WOT operation. Yes. I got a bit carried away and sloshed the fuel in the tank and sucked an air bubble and the pressure fell off. Cranking Pressure Test Here is a simple test on how to do the test for cranking fuel pressure. Pull the fuel pump relay in the PDC and then attempt to start the engine. Pay attention to the fuel pressure gauge during cranking. Be aware this test will trip a P1689 code and light the CHECK ENGINE light. Excessive cranking pressure can lead to difficult starting problems. Suggested Lift Pump Replacement You should replace the stock fuel system completely since it cannot supply enough fuel for even stock requirements without causing damage to the Bosch VP44 injection pump or adding stress to the lift pump. The pumps I suggest are proven and come with a lifetime warranty. These pumps come with a full kit and replace everything from the fuel tank to Bosch VP44 injection pump. AirDog 100, 150, or 165 Raptor 100 or 150 FASS 100 or 150 FASS DDRP (DDRP Ver.2 - 89 GPH) I don't suggest these pumps... Because they don't address the pump location, plumbing restrictions, or come with much of warranty. Stock Carter or Carter Campaign Pump (4090046) Holley Blue or Holley Black FASS DDRP (DDRP Ver.1 - 40 GPH) AirTex Mopar's Notes: That was true for the DDRP Ver.1 However, DDRP-02 is rated at 89 GPH and will hold pressure. It is listed as a Stock replacement pump designed to perform better than the Stock pump, but not for Chips that add fueling. I place a Power Puck on my truck with the DDRP-02 and saw no difference in FP at either idle or WOT, (PP is a timing chip doesn't change the amount of fuel). That said the PP is currently removed from my truck as I overpowered my clutch both loaded and unloaded, back to the stock clutch is fine. Looking for a Valair possible DD organic, or SD Kevlar/Ceramic. It is currently in the stock location and giving 15 psi at idle and 10 at WOT. Information Provided By: rhagfo http://www.cumminsforum.com/forum/98-5-02-powertrain/404412-fass-ddrp-02-a.html#post4197714 Additional Information (About Performance Crowds & Fuel Pressure) I've seen several times where people will link back to performance pump builders and quoting where they say, "(Un-named) proved that 5 PSI, under load, made all the horsepower the VP44 pump could make, even with stock fuel lines, fittings and supply pump." This might be true but there is nothing ever said about the life span of the pump at these conditions. So... Please do not follow these performance crowds into destroying a perfectly good Bosch VP44 injection pump. The fact still remains from Bosch the actual designer of the Bosch VP44 injection pump states that injection pump should return 70% of the fuel back to the fuel tank for cooling and lubrication purpose of the VP44. Being the only way a Bosch VP44 injection pump can do this is to have fuel pressure above 14 PSI to open the overflow valve. Then if the stock Bosch VP44 injection pump with an enhancement box say an Edge Comp on 5x5 can consume 15-20 GPH that means the stock 35 GPH pump cannot keep up with Bosch's design of 70% return volume. So this why products like AirDog, Raptor and FASS was created because they actually meet the demands of the Bosch VP44 injection pump. Then another fact that Bosch will let you know of is that diaphragm damage occurs from operating the Bosch VP44 injection pump at low fuel pressures. Making matters worse is that no Bosch injection re-builder will void warranty a VP44 injection pump with diaphragm damage. Dead give away that you had a bad lift pump or low fuel pressure problems. Please view the Bosch VP44 exploded view page to see there is no diaphragm in the Revision 027 Bosch VP44 Injection Pump Then the other fact is right from the Dodge Factory Service Manual has the minimum fuel pressures (picture at the top of the page). It even states the pressure that the overflow valve requires to open. Refer to the Overflow Valve Testing from the Dodge Factory Service Manual and see that the overflow valve should remain closed at 10 PSI and open by 14 PSI. So if the overflow valve is close by 10 PSI, then you extra cooling and lubrication just disappeared. So ultimately it suggested having a fuel system of no less than 100 GPH supply that can maintain a minimum pressure of 14-15 PSI at WOT. This will great extend the life of the VP44 because it keeps the electronics cooler longer and keeps the rotating parts lubricated properly. So please people let the facts and information from the actual designers of the injection pump (Bosch) and engine (Cummins) provide you proper information for your fuel system for your engine. Don't be swayed by performance shops claim of high horse output with little fuel pressure. As I proved right here doesn't work for the longevity of the VP44 injection pump... Another thing to bring up there are people that are increasing fuel pressures above 20 PSI. Please don't do this. The return port leaving the VP44 pump isn't very big at all. The return port is on the left and supply is on the right. As you can see increasing fuel pressures above 20 PSI put you at risk for shaft seal failure. Increasing the pressure above 20 PSI isn't going to improve the return flow. I say stick with the 14-20 PSI pressure range for seal safety. Additional Information (About Maximum Flow Rates) Here are some calculated flow abilities of the stock fuel system vs. 1/2" big line kits. This is not calculating bend, turns, offices just straight flow for open end plumbing and this is a rough calculation. Pipe Size Gallon Per Hour Flow Rate Gallon Per Minute Flow Rate 6mm ID pipe 75 GPH @ 15 PSI 1.2 GPM @ 15 PSI 1/2" ID pipe 570 GPH @ 15 PSI 9.5 GPM @ 15 PSI Use The banjo bolt Shrader valve to test for fuel pressure, Item 3 in the above diagram. If you have a 98-99 truck the port might be on top of the fuel filter housing. You can see the 90* bend fitting coming out of the top of the fuel filter housing in the below picture. Install a Shrader valve and test from there. I'm hearing of tales of shops, mechanics, or dealers doing the old hook up the fuel pressure gauge and only checking fuel pressure at idle. This is wrong. Because I've seen lots of cases where fuel line restriction, fuel filter plugging, gelling fuel and other thing causing fuel pressure to drop out under load. Like this video from a friend of mine, you'll see he's got awesome fuel pressure at an idle (where most shops gave him the green light). However, what the shops did not test for is WOT at highway speed, and you'll see in the video, he can pull way down to 0 PSI. Anything under 14 PSI is a concern... Anything under 10 PSI is a serious problem. As for having a gauge in the cab all Dodge Cummins trucks should have a fuel pressure gauge in the cab. Because like you seen bench testing with an idle pressure is meaningless if you can't see the WOT pressure at highway speed. View full Cummins article
-
 I recently had Dead pedal problems. Also Wait to Start (wts) light is not coming on. Now I have no lift pump noise before starting truck. Or after bumping the starter. I changed the APPS and that fixed the dead pedal only. Now I tried hooking up programmer to check codes and the programmer won't load up with key on. After 20 seconds or so the odometer says NO BUS. So I'm 95% sure the ECM is shot. I bought a used ECM. Auto trans, same year. I have called 6 dealers, NOBODY has DRBIII software anymore to reprogram it to my vin. The software has all been updated to some new carp. So. Will my truck run and drive if I just swap ECM's? I've read conflicting stories. A lot of them say Yes just swap it.
 -
 got a airdog original pump on the truck right now and been looking at the Fuel Boss Mechanical Lift Pump System. I was wondering if anyone has had put one on yet? I want to use the airdog filter setup up on it, if it is possible or do I need to buy a different filter set up for it? Would really like it better then the airdog because im sick of messing around with the airdog and would like to have something that is really reliable. If anyone knows someone I can talk to on making the fuel boss work with the airdog filter setup that would be awesome thanks guys.
 -
 Hello, I have a 1999 24v what developed several problems. 1. batteries get drained overnight 2. takes it several minutes to get it to charge 14 volts. 3. lift pump will not come on with key switch 4. lift pump will not come on with bump of starter. Replaced alternator----same problem. disconnected batteries for 1 hr. Now lift pump will come on but it takes 5 to 7 seconds to come on after key is turned on. Still takes several minutes for charging to get to 14 volts. lift pump is not making enough pressure when running. Batteries are less than 1 yr old and they are interstates. lift pump is a fass that replaces the factory lift pump. its 2 yrs old. I have a quadzilla programmer set to level 3. level 0 does the same thing, level 0 is factory setting. quadzilla was installed 2 yrs ago. also new vp was installed 2 yrs ago. I am guessing its the pcm, but any ideas would be helpful thanks
 -
Carter Campaign Pump 4090046 Cummins Part Number $63.00 Dodge OEM Pump BSAAL6429X Mopar Part Number $209.00 Napa OEM Pump NFPP74213 Napa Part Number $179.99 Carter Fuel Pump (Generic) P4601HP $99.50 Carter Campaign Lift Pump This is a redesigned lift pump for the Cummins engines. From what I heard it was design for the Buses more than anything. But I found that the Campaign pump is exactly identical as the Dodge OEM pump that was supplied at manufacture. Just much cheaper in price! UPDATE - November 24, 2006 The campaign pump is doing fair with a stock engine configuration. My fuel pressure have slid a bit and now it idles at 13.5 PSI, Cruise at 12.5 PSI, and WOT 11.0 PSI. It's starting to get marginal. It might get even worse with the addition of the Edge COMP that is coming soon. Update - December 25, 2006 I have been notified by Cummins in Boise ID that the Campaign pump is no longer available. If you attempt to order 4090046 you find that the price jumped from $65 to $202. So it time to research the next new pump for replacement. Dodge OEM Lift Pump The OEM lift pump that Dodge use to supply for replacement is no longer. They now are converting over to a in-tank fuel pump. Basically the module has the pick up screen, fuel sender, and lift pump as a package. The problem is the pump is weaker in pressure compared to the old version and requires you to lift the bed of the truck to replace. In other words if you have a lift pump problem now your going to be stuck on the side of the road. Carter Fuel Pump - P4601HP I got one of these from Summit Racing. What I found out is the fuel pressure is much weaker. I got roughly 8 PSI at idle and 4-5 PSI at WOT. The other problem is the fuel fittings are 3/8" NPT. So it can not be used a replacement pump. The electrical connections are for ring terminals. So once again it will not work on the truck unless to change your plumbing and electrical connection. But why bother when the pressure is to low to use... Fuel System Pressures - UPDATE! I'm hearing a lot of people saying that it's OK to let it slide down below 10 PSI... Cummins set the pressure limit for a reason. This reason includes proper cooling and lubrication of the fuel system components under extreme loads (WOT). I highly suggest you stick the recommended pressure listing. You cannot have any fuel volume without pressure! Something has to PUSH it! http://mopar.mopar1973man.com/personal/2002/campaign-pump/campiagn-pump.htm
-
i have a 2001 2500 --has no pwer,misses,surges under accelration and blows lots of white smoke . checked codes has po230 and po234- . also when looking at data screen on scan tool has no cmp rpm but tach works fine. can you help me thanksED
-
 I just installed my gauge according to genos garage instructions using there universal fuel hose not much drive time yet but every thing seams to be working good i have 14 lbs pressure at idle 11 pounds cruising and 9 pounds wot.As of yet guage reading is steady no eratic movement.
 -
Ok gang! Going to make this as simple as possible. On another forum everyone is now believing that 5 psi is a good fuel pressure to run. This is being said by a supplier that sells VP pumps. Although the Dodge service manual says 10 psi is the minimum. I have recently had correspondence with Cummins on this topic and they say "10 psi is the minimum" for the engine. I want you all to know I run 17 psi and am HAPPY with this pressure. What do you feel is the proper pressure to run?
-
I'll have to check at the dealer in Canada to see if they have the heaters since we have Canadian warehouses that supply the dealers here. You might contact Mancini Racing in Detroit, www.manciniracing.com ? I think might be their website. From what I heard Chrysler is emptying some warehouses and Mancini had a bunch of that stuff for sale as they always have in the past for Chrysler. They have this pump on their site:http://ep.yimg.com/ca/I/chucker54_2084_9531548 CARTER - 14-16 psi 100 gph Get the fuel flow you need. These universal rotary vane electric fuel pumps from Carter operate using leaded and unleaded gasoline, gasohol, and fuel boosters. They have an internal pressure regulating valve, and feature free-flow fuel delivery. These pumps have no points to burn out, and no shaft seals to leak or deteriorate. Easy to install, these universal fuel pumps come with a complete installation package and instructions. $122.95 CARP4601HP
-
Well, here I am. !st. post for a newbie. Right off the bat, I apologize for any dumb questions that have probably been asked before. I have a 2001 I picked up a few months back from the original owner with 154,000 miles on it. I am told that it has had the lift pump replaced twice and the vp44 replaced once. The truck is all stock. It also had a dealer replaced trans at 127,000 miles as I have been told. I want to install an after market lift pump and stay as close to stock equipment as possible. After reading here and on the other forum I am thinking that the Raptor 100 in front of the stock fuel filter/fuel heater would be the way to go. I guess what I would like to know is about the relibility of this particular pump and or any pump that would allow me to keep the stock filter/heater. I will probably never hot rod this truck with any increase power mods. I would also like some suggestions as to a good quality (proven) fuel pressure gauge. Thank's for puttin up with a new guy, and thank's for your time and attention..........Hood Latch
-
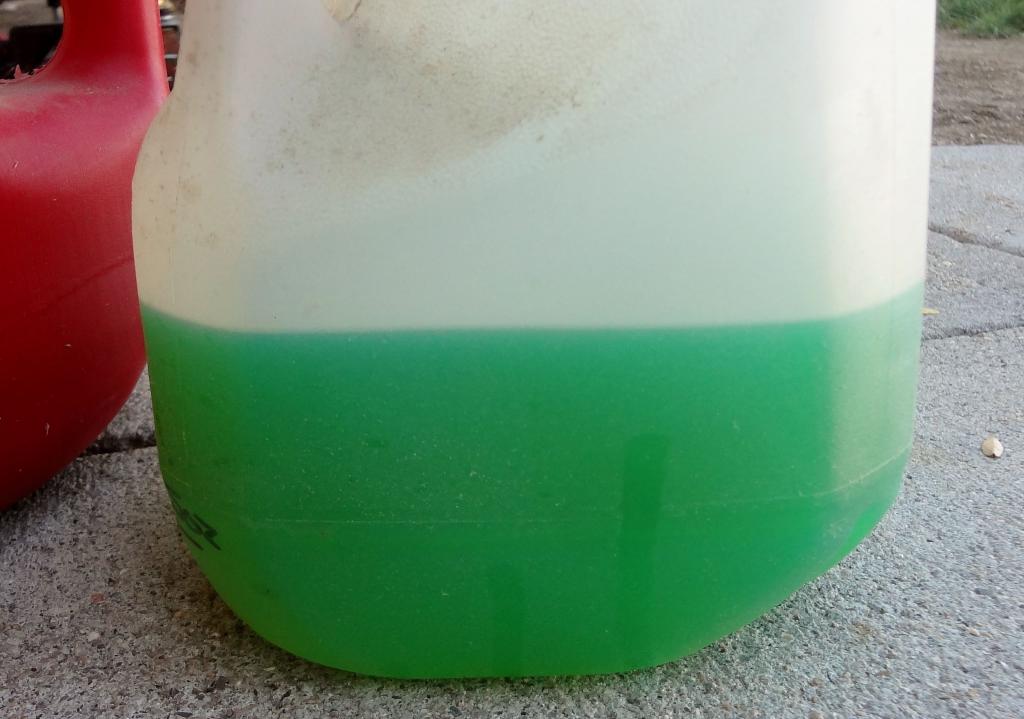
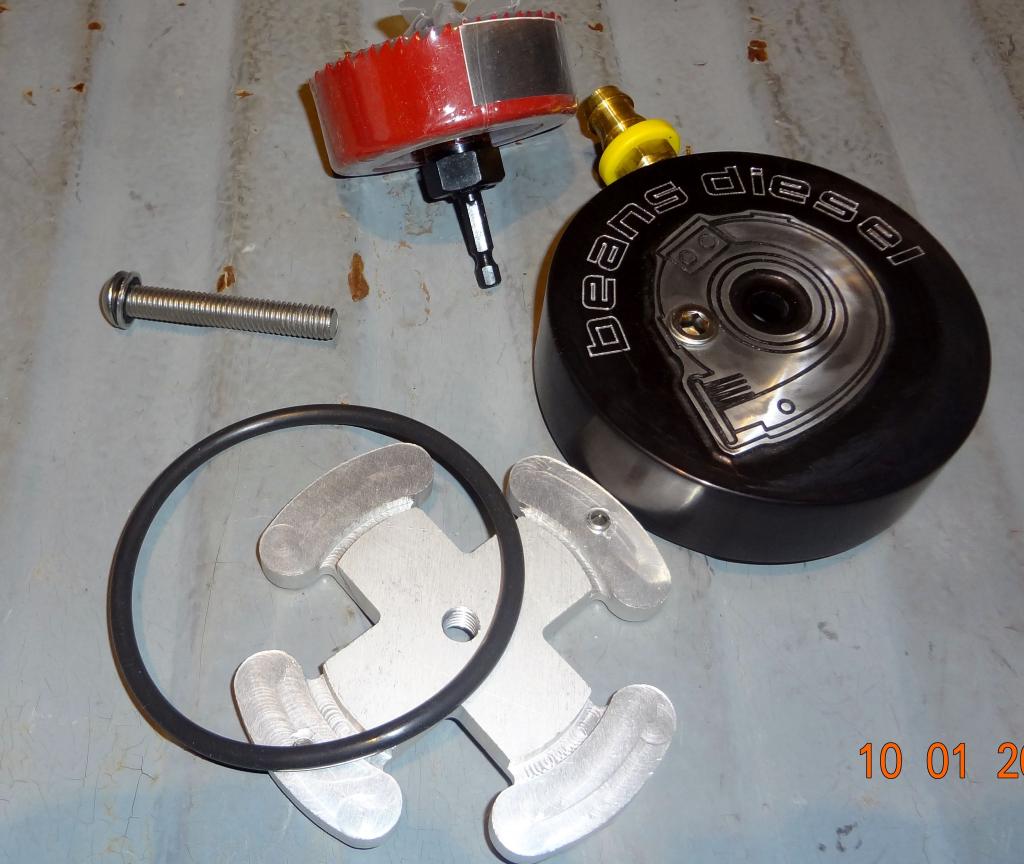
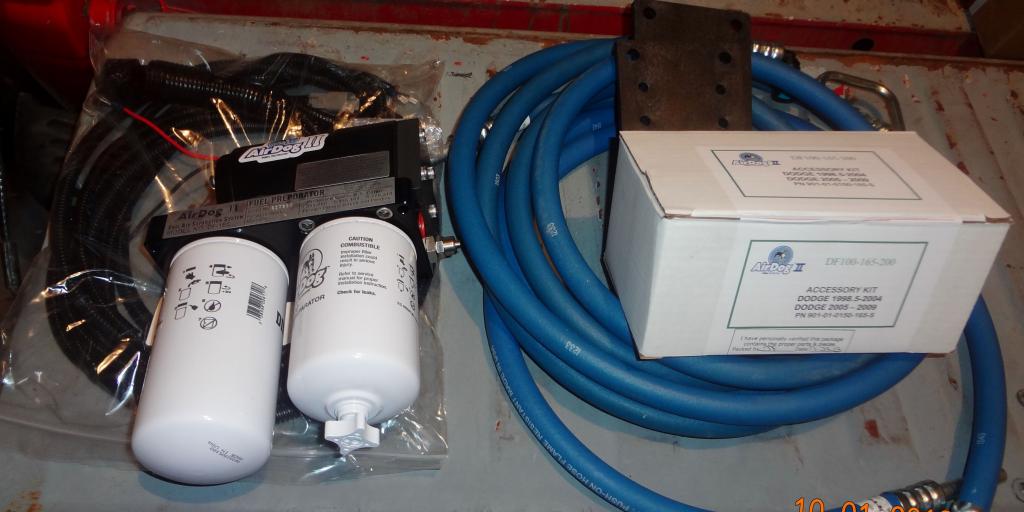
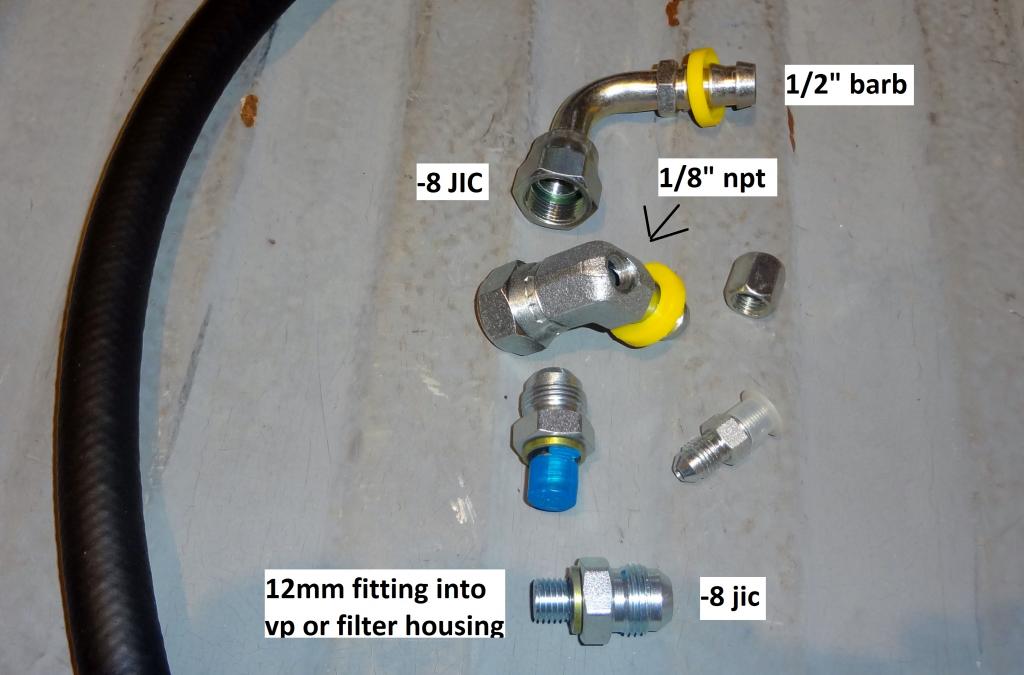
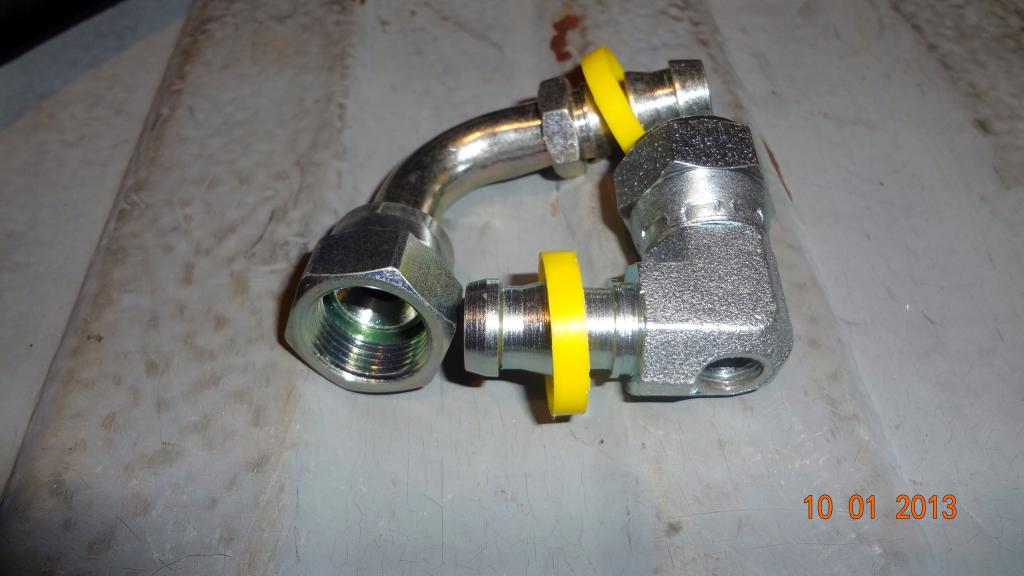
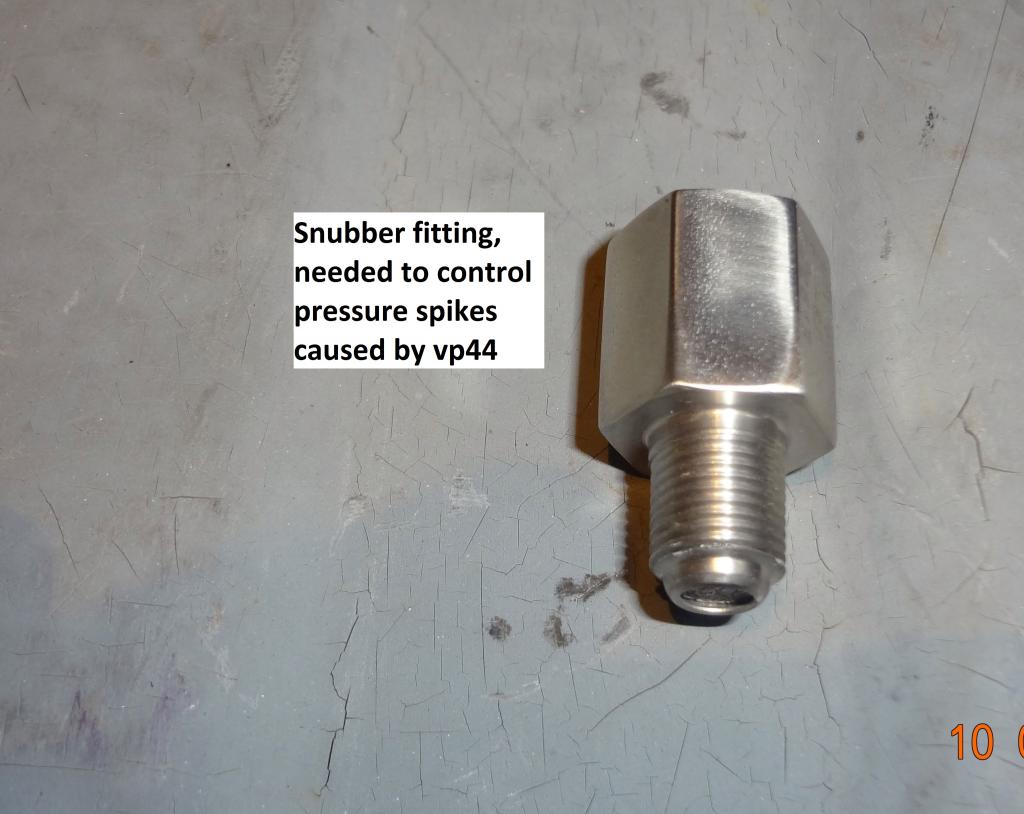
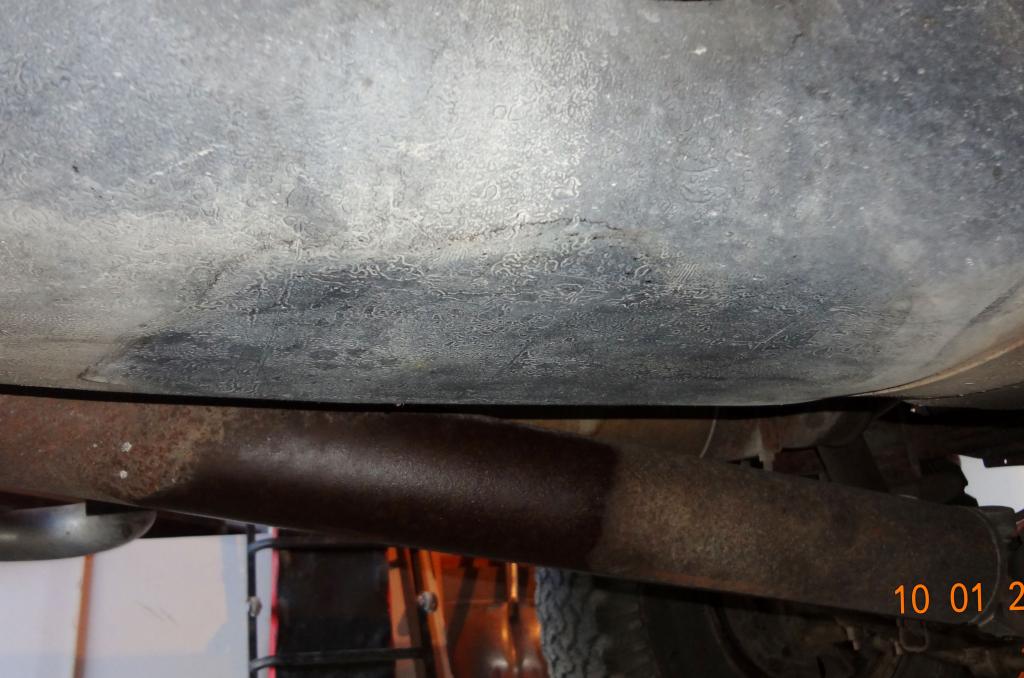
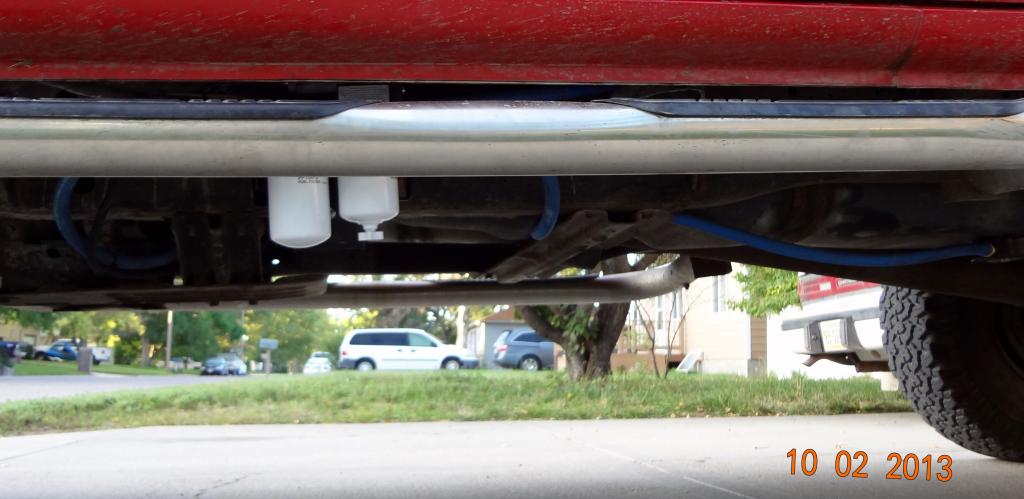
Ok, I did this 3 weeks ago so I am just finally getting around to doing my write up. I know people have concerns with the airdog/raptor issues, but hey, somebody has to see if they are fixed. I have no concerns about these pumps, as I have never had any problems getting warranty on customers raptors. Also, I have an electronic gauge as well as a quick release fitting for a mechanical gauge to check pressure whenever I need to.First things first here are the partsAirdog and hardwareHere is the sump kit by Bean's dieselFirst thing I did was drain the tank through the fuel filter housing drain into 5 gallon buckets and jumping out the lift pump wires to control the flow.Here is what your fuel looks like when you mix 2-stroke oil at 128/1Now time to put together the Airdog pump and fittings, I used some bituthene around the plates that mount to the frame and also between the actual pump and its mounting bracket to dampen any vibrations/noise.I ran all hoses and wiring, that ran up to the engine bay, through the frame rail to clean up and protect them. I also ran the fuel line into the stock filter housing to keep the extra filtration as well as the water separation. (I don't believe the fuel heater does much good)Next I installed the Vulcan big line kit, here are all the fittings and sizes to help clear up anythingThis is the fitting that will go into the vp44 and the bottom of the filter housing.These are the elbows that will hook into the previous fittings. The one with the 1/8 fitting should go on the vp44 fitting.Here is the glowshift maxtow gauge I got, its an analog as well as having the digital number readout. I am not to happy with the gauge as the needle looks like a windshield wiper when you are driving and have the throttle on anything off idle. I think the sensor is way to sensitive because with a mechanical gauge, the gauge only drops 1 psi at WOTHere is the fuel snubber that came with the fuel pressure gauge, this or a needle valve is a must to keep your pressure sensor safe from the hammering the vp44 does.Elbow with adapter and snubberNow onto the fuel sump. They say to drill it right below the stock fuel module, so I cleaned up the tank really well. After drilling the pilot hole with the provided hole saw, I let any fuel drain out that was still in the tank. After it stopped dripping, I finished drilling the hole and cleaned up all the shavings. After I drilled the hole I think drilling under the stock sender is not the best as it interferes with the installation of the sump.Sump all installedSump is roughly 1" tall and sits above the frame rail. Yes something could hit it and tear it off but I rarely go offroad so I won't be worried about it.And finally, its installed. This is my attempt to show how far everything hangs under the truck and the protection it has.Final thoughts, so far so good. As I said earlier, with the mechanical gauge, I only drop 1 psi at WOT with my setup and chip on highest setting. Don't believe there will be any gains in mileage, but I now know I have great fuel pressure (19-20psi) and great filtration.
- 11 replies
-
- 3
-
-
- airdog 165
- lift pump
- (and 1 more)
-
 I have been told by our shops head diesel guy that I can just install a Raptor 100 where the stock pump used to be and leave the retrofitted intank pump alone as it will simply draw thru it. I have to say that I am leery of this setup,I have a stock 99 3500 with 237,000 on it.He runs a 2000 CTD with 500+ HP so he's no dummy but I just want it right.I was hoping the pump was still in the stock location but it as not to be,aluminum junction block.I bought the truck dirt cheap and have only put 1500 or so miles on it,fuel pressure gauge will be installed in the next 2 weeks.So what to do,the truck will be driven rarely and will be lucky to get another 1500 on it by next spring,I intend to keep it for awhile and would prefer to do it right as it will tow a 31 foot travel trailer in the future at 9000 lbs or so,thanks for your input.
 -
 I like having information to make educated decisions, so I've been reading as many forum posts from as many different forums as I could find and I've come to the decision that I now have a headache. I've got a few questions that I'm not finding answers for, so it's my turn to ask...Is there a difference in reliability between lift pumps that are externally adjustable for pressure +/- (eg Raptor, AD2 system, FASS adjustable) and those that need to have springs replaced (eg. most other FASS, AD system)? I do like the idea of external adjustability to fine tune fuel pressure. But is the external screw only compressing a spring to increase/decrease pressure as opposed to swapping out for a firmer/lighter spring or is the fuel pressure managed in a different manner?I've seen absolutely no questions or posts discussing the FASS FA D08-95G adjustable standalone lift pump. This is the only fuel pump that seems to be advertised as having a boost compensation port.The idea of connecting the boost to the FP seems logical to control fuel feed based upon demand. Does anyone use this or have any info on reliability of this pump? Does it even work as advertised? Websites all tout that their pumps are "quieter than the competition." That really doesn't tell me much since I don't have any friends/neighbors with diesels to do a side by side comparison with. I guess most important is how loud are these pumps when the engine is idling? Can you still hear the pump running when standing outside the truck?Are there any negatives to NOT bypassing/removing the OEM filter housing even when installing an AD/AD2 or FASS Titanium/Platinum system? Does the fuel pressure still stay well above recommended levels or are people finding the need to upgrade to higher flow pumps?Lastly, with a lift pump that is externally adjustable, what negative effects would there be to using one that has a higher rated output on an engine that is still stock? Say, using a Raptor 150 dialed down for a stock engine with "room to grow." Would a person want to use the higher rated pump if they were to end up running through three filters with modest future gains in HP?I realize that one of the air/fuel separators is the most ideal way to go. Given my current needs and likelihood of only moderate engine improvements in the near future, the available options out there and if money were no object, I'd likely go with an AD2 100. However, my current economic situation is likely going to dictate that I spend between 4 and 500 as an initial investment, so an upgraded lift pump and big line kit first, followed by improving filtration later will be the likely, while slightly more expensive scenario.As far as my needs go; currently stock, 20' boat, in bed camper, sometimes both at the same time, mountain driving, don't like to drive in the slow truck lanes and would rather be passing than being passed when going up those long mountain passes. I don't tow regularly, and the heaviest loads will likely be a bed full of firewood and maybe an 8' trailer as well. Normally driven to/from work empty or with a little something just to smooth out the ride and a light foot on the skinny pedal.I hope all this makes sense and I hope it's not too much for one post. I bought the truck four months ago and it's my first diesel. Thanks in advance for any and all feedback. Craig(Mods, I don't know if this would be better cut up into several separate posts or just the way it is)
 -
I am about to purchase the Raptor 100. I was under the truck today just trying to see what i am getting into. It seems I have a pump mounted to the frame next to the gas tank, which i knew because I can here it come on (and its not the first time under the truck)....when i follow the fuel line up towards the filter it looks like there is another pump mounted on the block next to the filter. I followed the fuel line to this (pump?) and then out of it into the top of the fuel filter. I have only had this truck a couple months and I dont know the history. I am thinking that the original pump was block mounted? And that when someone replaced the pump they just left the old pump in line? When I install the new lift pump should I just take the new fuel lines straight into the connection at the top of the filter?Thanks for any help for the new guy.:)Jason
-
First off, let me say that this forum has been very helpful before, but I just can't seem to diagnose the issue this time. Hopefully someone has an idea on how to fix this.I installed my 4 gauge Autometer digital set(Boost, EGT, FP, and Trans temp) yesterday. Everything went in smoothly. Went to start truck up, wont start. Thought ok probably the fuel pressure, so cracked one of the lines, got fuel coming out, closed it. Tried it again. Wont start.:banghead: The FP gauge reads 0 while I crank, is that normal, or will it not register until I start the truck up? Any ideas??? Thanks ahead of time!!
-
 My truck has been dead for a few days now and I was referred to this site for better, more useful help, so here goes... I was in the middle of a coolant flush, heater on full blast, truck was idling for maybe 20 minutes, then suddenly sputtered and died. It cranks but will not fire up. Throws a P0234 code for "overboost", however this seems to be irrelevant, as I was driving it unusually hard the night before, to check for oil leaks since I had just changed oil/filter. Anyways, the issue seems to be narrowed down to lift or injector pump, or both. Heres what I've done so far: added 5 gallons to fuel tank, primed pump 8 times, loosened injector line on one of cylinders while cranking and got some fuel to come out. However, even after priming pump, fuel canister is near empty, pointing towards LP. The next issue is figuring out how much, if any, damage is done to VP since this truck has 200k with no service records and I've only owned it 3 weeks. I've been directed toward 2 bluechip articles regarding some testing procedures that I will get to. I was referred here for some extra help and advice without the "pissing matches" on who's right or wrong.Also, when I crank the truck for say... 5 seconds straight, and let the key go, the pump whines pretty loud under me until I pull the key off. Not sure what means, obviously, even though it's making noise, it can't be pumping fuel can it? My canister would be full, but only has maybe an inch of fuel in it. It's a little late to go out and test anything now, but please share any info you might have for me in the meantime. Thanks guys
 -
has anyone bought a delphi fuel lift pump and if so how did it work and does it have enought pressure ? Thanks