


Mopar1973Man
Owner
-
Joined
-
Last visited
Everything posted by Mopar1973Man
-
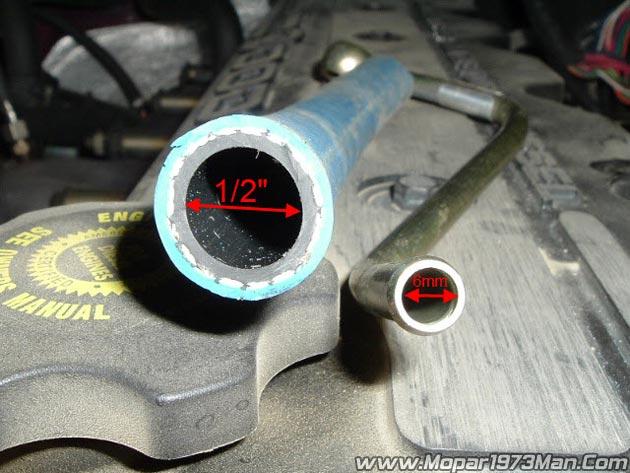
Typically they all supply 1/2 draw straw with the kit. I happen to have a 1/2" AirDog replacement straw that is steel.
-
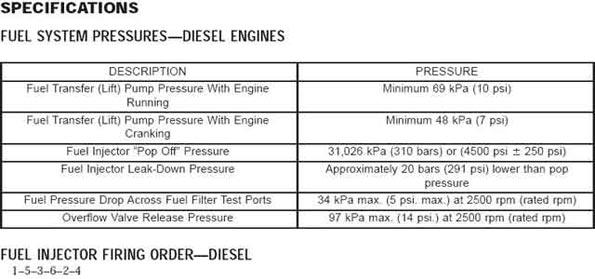
Don't you mean 293 to 327 bar? So 4,250 PSI equal to 293 bar and 4750 PSI is equal to 327 bar. At least from the Dodge FSM book.
-
Dave is right ask plenty of questions every if it sounds silly or stupid because that's have your going to learn about your truck.
-
Wiring issues. This is why I would ask for error codes. There might be P1694 or P1698 code which both are communication issues.
-
Yes, but typically the cost of about $120 for the flash and appointment with a dealer. My thing is if that SuperChips can't talk to the ECM I wonder if the dealer will too? Get my point.
-
Check all your OBDII pins. I've had a Smarty Touch behave the same way and found one of the SCI bus pin pushed out the back. You'll have to push the plug out of the metal tab on the dash and verify all the pins are locked in. https://smartyresource.com/forums/topic/1968-smarty-touch-communication-errors/
-
I love picking on you for that bolt in the intercooler... "Where does this go?" Clank!
-
Have them double check the balance on the tires.
-
I love seeing there are you guys out here willing to cut your teeth on the mechanic realm. Make sure you guys jump in the 911 Contact list you might be able to help out other members. Like my A/C work I typically charge $40 for A/C recharge (if the system is just low). Repairs can't go up depending on the extent of the repair. VP44 replacement on site I typically get $120. I've done them in the middle of a hay field in a rainstorm. Even bailed @IBMobile out when he broke down in Riggins, ID. The only thing DON'T let @JAG1 hang around while you do a VP44... Electrical jobs I typically edge up my price depending on the type of repair, modification or installation of an accessory. This is one of my strong points I'm not going to cheap out on that. Then with my Prevail Web Management, I'm doing server admin work or website building for a price. Depending on the task it can be simply $20 an hour or upwards of $60 an hour depending on how in-depth and working off hours. I even teach Linux OS. Back when I had "Cloud 10 Computers" I was getting $120 an hour for computer and network service. I closed this business down in 2008 when the economy tank locally. I switch to Mopar1973Man.Com.
-
Welcome to the website @Dirtworks ... I see you got your post going. The ones you might try... These are our Europian members maybe they would know. @wil440 @Ronniemx3 @AlpineRAM @Tiller
-
I agree. You have to start somewhere. For a basic part changer that not a bad place to start. I think the worse part is investing large amounts of time in the diagnostic realm. Better your tools, and experience the less time you invest. I win over heart locally with if I can't fix I don't charge. If I diagnose a vehicle and it's beyond my skill or experience then I typically will pass it up and not charge for the diagnostic work. The honesty wins. I end up with a return customer typically. If I doing a job I've got no experience in I'll outright tell the own straightforward I've never done this task and I expect to take more time than typical. Again the honesty brings them back. Acting like nothing phases you and you can handle anything make people uneasy. Try to allow yourself extra time for diagnostics, extra time to learn, extra time just in case you need special tools.
-
Ok. I jumped in and moved the thread over to the 24V to get him visibility. Now... I need to do the basics with I need you to check for error codes and what is your fuel pressure like (idle, cruise, and WOT on the highway).
-
I'm going to assume you have a Timbo's there is no voltage to set it about the angle. Lift pump is weak. Fuel system too restrictive. You should have only a 2 to 3 PSI drop not a 7 PSI drop that's too much. That's the limit of the Superchip vs the turbo without a boost elbow. The wastegate pop open and the boost stops. You've got issues with that SuperChips I would return to stock and then consider getting Quadzilla way better tuner. What's the code? Also no code will self erase for 40 warm-up cycles so in other word you have to start from below 140*F and rise above 160*F without tripping the code for 40 times. I promise the code is in the computer yet it's not gone.
-
Make sure its 1/2" fuel line...
-
I've got it as well. Mine keeps blow out and I've got to tuck it back into the bumper. Might cut mine off soon.
-
Yeah on Dodge trucks its open on pin 3. It terminates at the ECM though.
-
Nevermind... Need morning coffee yet...
-
U-joints you need to pull the shaft to truly inspect it most times. Once free of the vehicle you see the sloppy joint typically fast. Now on the vehicle might be a bit tougher but grab each piece of shaft between the joint and rotate against each other. See if the joint got bad bearing cups.
-
Fuel pressure? You need to have a gauge in the cab. I'm going to bet the fuel pressure is really low. You need to keep 14 to 20 PSI while at WOT going down the pavement. As for the loss of fuel prime that is because there could be air leak in the injectors, injector lines, crossover tube o-rings, return banjo at the back of the head. Suction line air leak. Fuel drain on the filter is leaking. Suction side leak are tough because they never drip on the ground. You'll need to put 1-2 PSI of air pressure the fuel tank and hunt for the leak in the system be like a moist spot.
-
I'm still running $60 an hour out the local economy is weak out here. I charge by my actual work hours if I can bet the labor book. If I'm over the book rate hours then I typically cap the hours to the book. It's a humble pay but its something.
-
30* on stock is a bit too far. About all your going to get 27* where it will hold better.
-
12 years mean time between failures isn't bad either. Most likely longer period of time for the AirDog between failures than on Fuel Boss. I don't think a belt will last that long for 250k miles and 12 years. My downtime was about 4 days. No worse than the down for other failures and ordering part like injectors or injection pump. So when I lost my VP44 after 243k miles it still was down 7 days waiting for parts and get it back on the road. Like injectors still got to wait for new injectors to get here still 3-4 day wait time. So down time to me is meaningless. It will happen.
-
Now seeing all the pins on the Members Map I would like to offer another great idea to everyone. It would be awesome to vote for a president of a region or state and then start making group meeting or get together's or wrench parties. Where states get together possibly in the summer where everyone meets up and get to know each other. Come on guys I know you'd love to get together share your knowledge with other members. Just in the small handful of people I met in person and the few hundred I talk to on the phone are all great people why not all work together and aid each other? https://mopar1973man.com/membermap/ The map is growing daily and the more member that get there locations posted the more we can figure out groups.
-
Ah... PCM is not seeing any communication from the ECM. Double check the two connectors to the cowl. The CCD bus is in one of them. Remember PCM is the primary computer and the ECM is the companion module. This will aid you in testing the APPS wiring.
-
Just talked to my buddy @Taz in McCall as of 10pm last night they didn't really see any rainfall at all. He said a few drops hit the windshield of his truck but mostly dry. He informed me 2 new fires started down in the Cambridge, ID area last night. I'm not sure of the state of those fires or did the local FD catch them before going wild. Then there is @Evan with 10 new fires in Mountain Home, ID area. Don't look like we gare going to get much slack till the rains really come on and snow flies.


