
IBMobile
Staff
-
Joined
-
Last visited
Everything posted by IBMobile
-
How about adding a pull chain switch?
-
More like rabbits. I have a couple like that in the main area but there is a master switch under an overhead wall cupboard that can be used also to operate them. 5th wheels have a higher ceiling/roof line because of those 2-3 steeps to go up to the bedroom.
-
Check these out. You might have to travel ; there are a lot of places in Riverside County. https://www.autopartswarehouse.com/?msclkid=88c2a9cab849130d29fcf7aba548e682&utm_source=bing&utm_medium=cpc&utm_campaign=[ADL] [Brand] Brand Terms (Exact)&utm_term=auto parts warehouse&utm_content=Auto Parts Warehouse&gclid=CP2U_6zVg-gCFaKUxQIdYX4Mbw&gclsrc=ds https://www.lkqpickyourpart.com/
-
When working with seat covers it some times helps to lay them out in the sun or inside a hot vehicle. They'll heat up and have a little stretch and give.
-
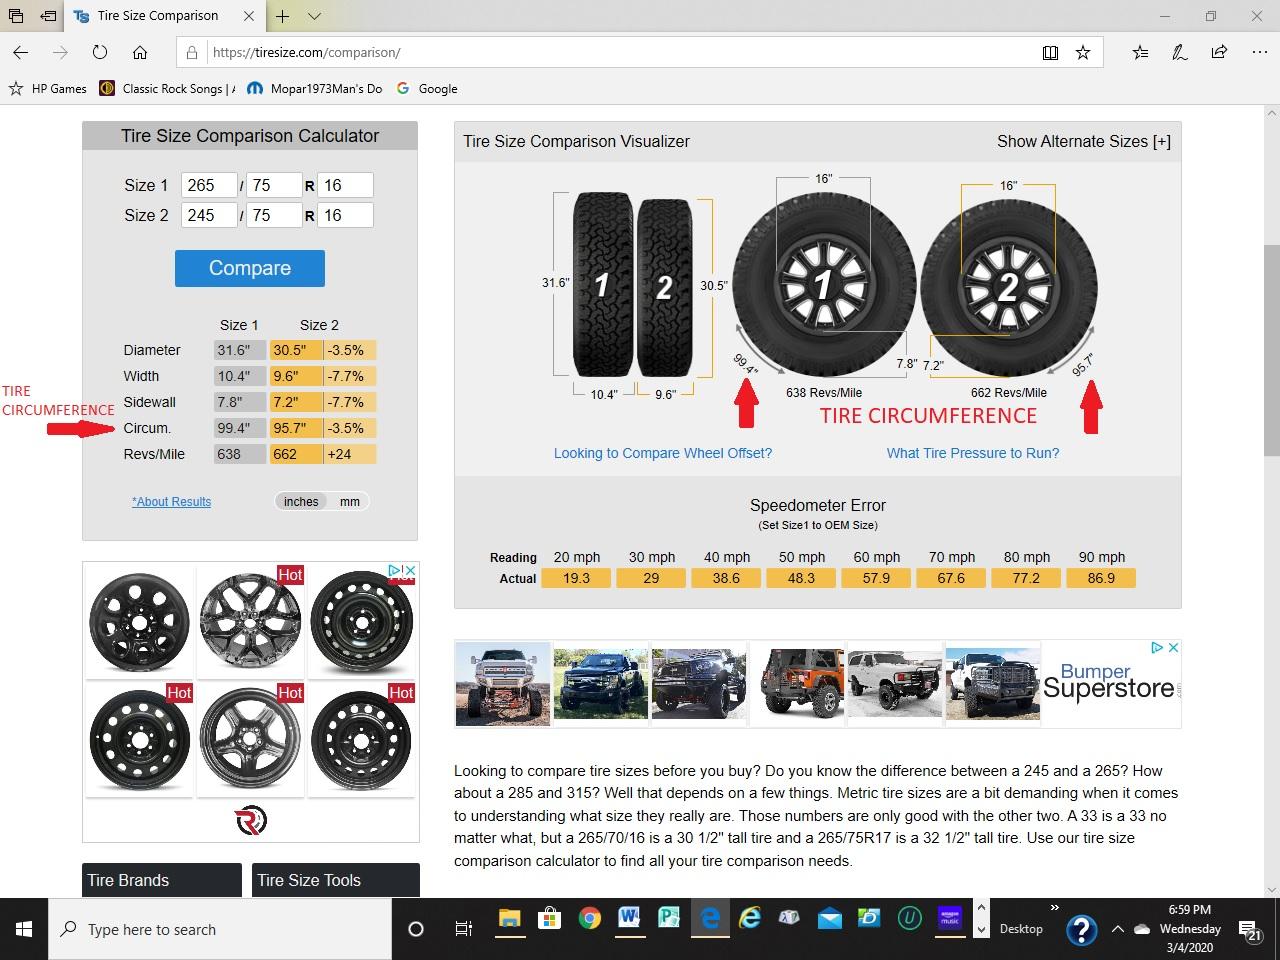
Or plug your tire size in and get other info too.
-
Here are a couple of sites; one for tire size comparison and another for gear ratio changes with tire size. https://www.discounttire.com/learn/tire-size-calculator https://tiresize.com/gear-ratio-calculator/
-
When I got my truck it was bone stock. The first thing I did was put gauges on it to see what I was dealing with. A draw straw is a tube installed in the fuel tank for fuel pick up so ths stock pick up is not used. The factory banjo fittings restrict fuel flow under high demand. The kit eliminates that restriction. There is a wide rang of thoughts here on which tuner to use. I have an Edge EZ I bought in 2005 and with the Bosch RV275 injectors gives me all the power I need to tow about 9,000 LB. Those 50HP are the next size up from the RV275 for power.
-
Who you calling a yayhoo?
-
No, the grid heaters both come on with the "wait to start" light" which is 180amps. After starting they cycle one on and one off every few seconds which is only 90amps at a time.
-
For what it's worth, RockAuto visited my profile on Thursday 2/27/2020 at 2:03 PM.
-
Good point. I have it something like that in the article I wrote up last night.
-
PCM Ground Splice Repair It's not hard and took very little time to do. NOTE: Do this after the other modifications have been done or you will lose the ECM, VP and grid heater grounds. You need: 2 10-12 gauge butt connectors 2 1/4 heat shrink tube 2" long Rosin core solder 140 watt solder gun (Weller) or small butane torch 1 roll of electrical tape Razer knife Wire cutters Wire striper Remove the air cleaner housing this will open up the whole area to work in. No need to disconnect the batteries, just unplug the gray connector at the ground wires of the right (AUX) battery. The other gray connector may have already been disconnected when the ground wires were relocated to the back of the timing cover if a W-T . Disconnect the 3 plugs at the PCM Cut and strip the 8 gauge wire then cut the connector off the 10 gauge wire and strip it back to fit the butt connector. This is the connection with the cove off. This is splice #S109 that the grounds for the ECM, PCM, VP44, grid heater relay and data link connector. Slide the heat shrink on to the wire were it won't be affected by the heat of soldering. Remove any plastic covering on the butt connector; insert the wires into the connector and solder. Let cool then cove with the heat shrink. At the PCM find the two 14 gauge black with tan stripe wires. They go up into the split wire cover about 10" that's where you'll find splice #S126 There are two 14 gauge black with tan strip wires coming down to the connector. One is the ground for the data link connector and the other is not used. Repeat the cut, strip and solder process as above. When done it should look like this. There are no warranties implied or expressed. Written by: J. Daniel Martin AKA IBMobile 2/29/2020 View full Cummins article
-
PCM Ground Splice Repair It's not hard and took very little time to do. NOTE: Do this after the other modifications have been done or you will lose the ECM, VP and grid heater grounds. You need: 2 10-12 gauge butt connectors 2 1/4 heat shrink tube 2" long Rosin core solder 140 watt solder gun (Weller) or small butane torch 1 roll of electrical tape Razer knife Wire cutters Wire striper Remove the air cleaner housing this will open up the whole area to work in. No need to disconnect the batteries, just unplug the gray connector at the ground wires of the right (AUX) battery. The other gray connector may have already been disconnected when the ground wires were relocated to the back of the timing cover if a W-T . Disconnect the 3 plugs at the PCM Cut and strip the 8 gauge wire then cut the connector off the 10 gauge wire and strip it back to fit the butt connector. This is the connection with the cove off. This is splice #S109 that the grounds for the ECM, PCM, VP44, grid heater relay and data link connector. Slide the heat shrink on to the wire were it won't be affected by the heat of soldering. Remove any plastic covering on the butt connector; insert the wires into the connector and solder. Let cool then cove with the heat shrink. At the PCM find the two 14 gauge black with tan stripe wires. They go up into the split wire cover about 10" that's where you'll find splice #S126 There are two 14 gauge black with tan strip wires coming down to the connector. One is the ground for the data link connector and the other is not used. Repeat the cut, strip and solder process as above. When done it should look like this. There are no warranties implied or expressed. Written by: J. Daniel Martin AKA IBMobile 2/29/2020
- 1 comment
- 4 reviews
-
-

-

- 6
-
-
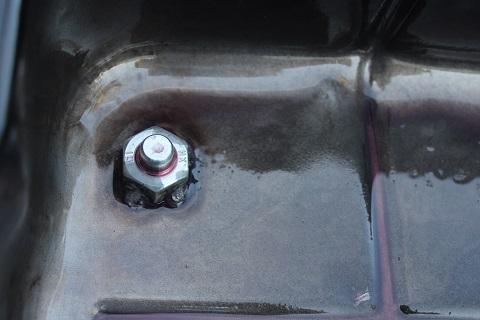
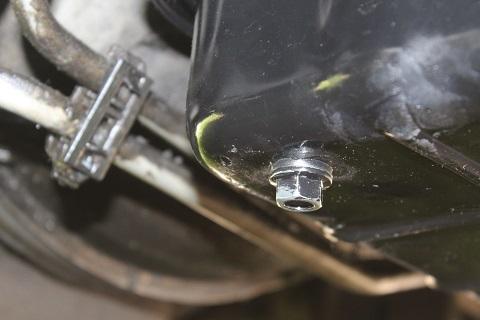
Adding a Transmission Drain Plug When you have the pan off you may want to install a drain plug in it. Parts needed: 1 M12 x 1.25 x 30mm drain plug 1 M12 x 1.25 nut 1 12mm ID plastic washer Paint (your choice type and color) Tools needed: Hammer Center punch Drill motor ½” drill bit Torque wrench 0-75 FT-LB or 0-300 IN-LB Socket to fit drain plug An automotive supply store like NAPA will have the M12 x 1.25 x 30mm drain plug, nut, and plastic washer. Using a strong (rare earth) magnet on the outside of the pan to hold the nut in place, you can find the area where the drain plug will clear the valve body and a large surface area for flat contact with the sealing washer. The left front corner of the pan has the most clearance. Center punch the spot you want to drill. Drill a 1/2" hole then place the bolt through the hole and thread the nut to it from inside the pan. This will center the nut over the hole. Tack weld the nut to the inside of the pan over the hole in three spots. The three weld spots are done so not to warp the pan and to allow fluid to be able to drain under the nut. After the pan cools clean the outside of the pan and paint to stop rusting. Install the drain plug with plastic washer and tighten no more than 20 FT-LB (240 IN-LB). You may want to have a dedicated 12 quart oil drain container for the ATF. If you have to make adjustments inside the transmission (e.g., replacing solenoids, adjusting line pressure) you can drain the ATF into the container and reuse the fluid if it is still good. Left front corner inside of pan Left front corner outside of pan There are no warranties implied or expressed Written by: J. Daniel Martin AKA IBMobile 2/29/2020 View full Cummins article
-
Adding a Transmission Drain Plug When you have the pan off you may want to install a drain plug in it. Parts needed: 1 M12 x 1.25 x 30mm drain plug 1 M12 x 1.25 nut 1 12mm ID plastic washer Paint (your choice type and color) Tools needed: Hammer Center punch Drill motor ½” drill bit Torque wrench 0-75 FT-LB or 0-300 IN-LB Socket to fit drain plug An automotive supply store like NAPA will have the M12 x 1.25 x 30mm drain plug, nut, and plastic washer. Using a strong (rare earth) magnet on the outside of the pan to hold the nut in place, you can find the area where the drain plug will clear the valve body and a large surface area for flat contact with the sealing washer. The left front corner of the pan has the most clearance. Center punch the spot you want to drill. Drill a 1/2" hole then place the bolt through the hole and thread the nut to it from inside the pan. This will center the nut over the hole. Tack weld the nut to the inside of the pan over the hole in three spots. The three weld spots are done so not to warp the pan and to allow fluid to be able to drain under the nut. After the pan cools clean the outside of the pan and paint to stop rusting. Install the drain plug with plastic washer and tighten no more than 20 FT-LB (240 IN-LB). You may want to have a dedicated 12 quart oil drain container for the ATF. If you have to make adjustments inside the transmission (e.g., replacing solenoids, adjusting line pressure) you can drain the ATF into the container and reuse the fluid if it is still good. Left front corner inside of pan Left front corner outside of pan There are no warranties implied or expressed Written by: J. Daniel Martin AKA IBMobile 2/29/2020
-
I tried "jam nut", "jam". and "nut" on my laptop and desk tower with no luck. We'll punt this one over to @Mopar1973Man for his thoughts.
-
That is the same as 13ft-lb. Snug plus, like a couple of ft-lbs, works sometimes but if you tighten the bolts any further there is the risk of tearing the gasket. The pan may be distorted, from a pervious install, where some of the bolts where over tightened and others weren't because they didn't use a torque wrench. If it still leaks after the "snug plus" Pull the pan off and inspect both mating surfaces; use a flat surface to check the pan for true.. When you have the pan off you may want to install a drain plug in it. Go to NAPA and get a M12 x 1.25 x 30mm drain plug, nut. and plastic washer. Use a strong rare earth magnet on the outside of the pan to hold the nut in place, and find the area where the drain plug will clear the valve body and a large surface area for flat contact with the sealing washer. Drill a hole 1/2" and tack weld the nut to the pan in three spots, this is done so not to warp the pan and to allow fluid to be able to drain under the nut. left front corner inside of pan left front corner outside of pan
-
Rock Auto: ACDelco 2wd upper $66, lower $68. https://www.rockauto.com/en/catalog/dodge,2001,ram+2500+pickup,5.9l+l6+diesel+turbocharged,1366602,suspension,ball+joint,10070Let's see, the OE pump has almost 500k on it; I think it's time for a new one.Not posi or locker but limited slip,You can use a volt-ohm-amp meter that will handle 20 amps in line between the battery and lift pump. Check with the manufacture for amp usage but I would be looking for less than 12 amps.When You open a blown relay you might see the part that is bad; the coil or the points. The amp draw test will show the health of the lift pump; a low amp draw is good.This is the only wrench a carpenter needs.