Mopar1973Man
Owner
-
Joined
-
Last visited
Everything posted by Mopar1973Man
-
There appears to problem with the gallon trip resetting when the ignition is cycled. Then I figured the MPG would of been released for the V2 98.5 to 02 Dodge profile.
-
Ask Diesel Auto Power being hes the owner of Quadzilla Power. @dieselautopower
-
Part of that problem I would say is injector builders looking for max flow and pop the injector lower to increase flow rates. Makes for dirty injectors.
-
He's only running a +2 spread. Should be a +3 spread for starting point. 16, 19, 22, 25, 26
-
Looks good. I guess you'll be considering sending the ECM to Auto Computer Specialist and have them fix that WTS light issues.
-
That worked out fairly good. Bit smoky not bad. I think it will help with the MPG tune.
-
Ok this is what I've done and found out. The low end bucking (ECM fight) you can reduce it quite a bit if you start 0 PSI at 100%. This is the new fuel curve I'm using and works fairly well. 100, 90, 85... (+1 till 12 PSI), 96 ,98, 100 (at 15 PSI) There is a reason for this I found that you want to cross your wiretap start at 100% then it much smoother.
-
@Quadzilla Power Curious when it will be released to the normal V2 side...
-
P0111 - Intake Air Temperature Sensor 1 Performance Theory of Operation The Intake Manifold Temperature (IMT) Sensor is located on the intake manifold on the Regular Cab. For the Cab and Chassis, it is a part of the Temperature/Pressure MAP Sensor. The IMT Sensor is used to measure the temperature of the air in the intake manifold. The Powertrain Control Module (PCM) supplies 5-Volts to the intake manifold temperature signal circuit. The PCM monitors the change in voltage caused by changes in the resistance of the sensor to determine the intake manifold temperature. The MIL lamp is illuminated immediately when the diagnostic runs and fails. During this time the customer may notice periods of white smoke as well as the fan running more often. The MIL lamp is turned off once the diagnostic runs and passes in four consecutive drive cycles. When Monitored and Set Conditions When Monitored: This diagnostic runs continuously when the following conditions are met: • With the ignition on. • With the Engine running. Set Conditions: • The Powertrain Control Module (PCM) has detected the Intake Air Temperature (IAT) Sensor reads differently than the Engine Coolant Temperature (ECT) Sensor with the ignition on and Engine off. With the ignition on and Engine running the PCM does not read a change in value from the Intake Air Temperature circuit over a calibrated amount of time. Default Actions: • The MIL is illuminated. Possible Causes AIR CLEANER BOX NOT SEALING PROPERLY TO THE AIR INLET TUBE DIRT OR DEBRIS IN CHARGE AIR COOLING SYSTEM TEMPERATURE/PRESSURE MAP SENSOR Always perform the Pre-Diagnostic Troubleshooting procedure before proceeding. (Refer to 28 - DTCBased Diagnostics/MODULE, Powertrain Control (PCM) - Standard Procedure). 1. OTHER DTCS 1. Ignition on, engine not running. 2. With the scan tool, read DTCs. Are DTC P0112 or P0113 present? Yes • Repair those DTCs first. • Perform the POWERTRAIN VERIFICATION TEST - 6.7L. (Refer to 28 - DTC-Based Diagnostics/MODULE, Powertrain Control (PCM) - Standard Procedure). No • Go To 2 2. CHECK THE CHARGE AIR COOLER AND SYSTEM FOR DIRT OR DEBRIS 1. Remove the hoses at the Charge Air Cooler and Turbo outlet and inspect the system for signs of excessive oil, dirt or debris. Does the Charge Air Cooling system show signs of excessive dirt or debris? Yes • Clean the Charge Air Cooling system in accordance with the service information. • Perform the POWERTRAIN VERIFICATION TEST - 6.7L. (Refer to 28 - DTC-Based Diagnostics/MODULE, Powertrain Control (PCM) - Standard Procedure). No • Go To 3 3. COMPARE THE INTAKE AIR TEMPERATURE CIRCUIT 1. After an eight hour cold soak, connect the scan tool and monitor intake air temperature, EGR orifice temperature, and engine coolant temperature. NOTE: Make sure ambient air temperature is above -6.7°C (20°F) when performing this test. NOTE: Make sure there is no external heat source, such as a block heater, operating during this test or within the eight hour cold soak. Does the Intake Air Temperature circuit read differently from the other sensors? Yes • Replace the Temperature/Pressure MAP Sensor in accordance with the service information. • Perform the POWERTRAIN VERIFICATION TEST - 6.7L. (Refer to 28 - DTC-Based Diagnostics/MODULE, Powertrain Control (PCM) - Standard Procedure). No • Perform the INTERMITTENT CONDITION diagnostic procedure. (Refer to 28 - DTC-Based Diagnostics/MODULE, Powertrain Control (PCM) - Standard Procedure).
-
P0108 - Manifold Absolute Pressure Sensor Circuit High Theory of Operation The Charge Air Cooler Temperature Sensor (CAC) and the Boost Pressure Sensor are combined in one sensor. This combination sensor is called the Temperature/Pressure MAP Sensor. It is located on the EGR Airflow Throttle Control Valve on the Regular Cab. For the Cab and Chassis, it is located on the Intake Manifold. The Cab and Chassis version also receive the Intake Manifold Temperature signal. The Regular Cab still has a separate Intake Manifold Temperature Sensor. The Boost Pressure Sensor is used to measure pressure in the intake manifold. The Powertrain Control Module (PCM) provides a 5-Volt supply and sensor ground for the Boost Pressure Sensor. The Boost Pressure Sensor provides a signal back to the PCM on the Boost Pressure Sensor Signal circuit. The PCM will detect a low signal voltage at operating conditions such as during an idle or a deceleration. The PCM will detect a high signal voltage during high engine load operating conditions. At key on, the readings for the Boost Pressure Sensor, Exhaust Gas Pressure Sensor, and Barometric Pressure Sensor are compared. This fault code occurs if the boost pressure reading is different from the others. During normal engine operation, the PCM estimates the Boost Pressure Sensor value using other fuel system related inputs. The PCM compares the actual Boost Pressure Sensor reading to this estimated value. If the two values are out of range for a calibrated period of time, an error is recorded. When Monitored and Set Conditions When Monitored: This diagnostic runs continuously when the following conditions are met: • With the ignition on. • Battery voltage greater than 10.4 Volts. Set Conditions: • The Powertrain Control Module (PCM) has detected the Boost Pressure Sensor Signal circuit is above a calibrated threshold. Default Actions: • The MIL is illuminated. Possible Causes 5-VOLT SUPPLY CIRCUIT SHORTED TO VOLTAGE BOOST PRESSURE SENSOR SIGNAL CIRCUIT SHORTED TO VOLTAGE BOOST PRESSURE SENSOR SIGNAL CIRCUIT SHORTED TO THE 5-VOLT SUPPLY CIRCUIT BOOST PRESSURE SENSOR RETURN CIRCUIT OPEN/HIGH RESISTANCE TEMPERATURE/PRESSURE MAP SENSOR POWERTRAIN CONTROL MODULE (PCM) Always perform the Pre-Diagnostic Troubleshooting procedure before proceeding. (Refer to 28 - DTCBased Diagnostics/MODULE, Powertrain Control (PCM) - Standard Procedure Diagnostic Test 1. ACTIVE DTC NOTE: If there are any 5-Volt supply DTCs present, repair those DTCs before proceeding. 1. Turn the ignition on. 2. With the scan tool, record all Freeze frame data. 3. With the scan tool, erase DTCs. 4. Turn the ignition off for 75 seconds. 5. Turn the ignition on. 6. With the scan tool, read DTCs. Did the DTC reset? Yes • Go To 2 No • Perform the INTERMITTENT CONDITION diagnostic procedure. (Refer to 28 - DTC-Based Diagnostics/MODULE, Powertrain Control (PCM) - Standard Procedure). 2. CHECK THE (K37) BOOST PRESSURE SENSOR SIGNAL CIRCUIT FOR A SHORT TO VOLTAGE 1. Turn the ignition off. 2. Disconnect the Temperature/Pressure MAP (T/P MAP) Sensor harness connector. 3. Turn the ignition on. 4. With a voltmeter, measure the voltage of the (K37) Boost Pressure Sensor Signal circuit at the Temperature/Pressure MAP Sensor harness connector. Is the voltage reading near battery voltage? Yes • Repair the (K37) Boost Pressure Sensor Signal circuit for a short to voltage. • Perform the POWERTRAIN VERIFICATION TEST - 6.7L. (Refer to 28 - DTC-Based Diagnostics/MODULE, Powertrain Control (PCM) - Standard Procedure). No • Go To 3 3. CHECK FOR THE (K37) BOOST PRESSURE SENSOR SIGNAL CIRCUIT SHORTED TO THE (F857) 5-VOLT SUPPLY CIRCUIT 1. Turn the ignition off. 2. Disconnect the PCM C1 harness connector. 3. Measure the resistance between the (K37) Boost Pressure Sensor Signal circuit and (F857) 5-Volt Supply circuit at the Temperature/Pressure MAP Sensor harness connector. Is the resistance below 10k Ohms? Yes • Repair the short between the (K37) Boost Pressure Sensor Signal circuit and (F857) 5-Volt Supply circuit. • Perform the POWERTRAIN VERIFICATION TEST - 6.7L. (Refer to 28 - DTC-Based Diagnostics/MODULE, Powertrain Control (PCM) - Standard Procedure). No • Go To 4 4. CHECK THE (K916) BOOST PRESSURE SENSOR RETURN CIRCUIT FOR AN OPEN/HIGH RESISTANCE 1. Measure the resistance of the (K916) Boost Pressure Sensor Return circuit between the Temperature/Pressure MAP Sensor and the PCM C1 harness connectors. Is the resistance below 5.0 Ohms? Yes • Go To 5 No • Repair the (K916) Boost Pressure Sensor Return circuit for an open or high resistance. • Perform the POWERTRAIN VERIFICATION TEST - 6.7L. (Refer to 28 - DTC-Based Diagnostics/MODULE, Powertrain Control (PCM) - Standard Procedure). 5. CHECK THE TEMPERATURE/PRESSURE MAP SENSOR 1. Reconnect the Temperature/Pressure MAP Sensor harness connector. 2. Reconnect the PCM C1 harness connector. 3. Turn the ignition on. 4. With the scan tool, erase DTCs. 5. Turn the ignition off and disconnect the T/P MAP Sensor harness connector. 6. Turn the ignition on. 7. With the scan tool, read DTCs. Did the DTC P0107 set? Yes • Replace the Temperature/Pressure MAP Sensor in accordance with the Service Information.(Refer to 14 - Fuel System/Fuel Injection/SENSOR, TMAP-Intake Manifold/Removal) • Perform the POWERTRAIN VERIFICATION TEST - 6.7L. (Refer to 28 - DTC-Based Diagnostics/MODULE, Powertrain Control (PCM) - Standard Procedure). No • Go To 6 6. POWERTRAIN CONTROL MODULE 1. Disconnect all PCM harness connectors. 2. Disconnect all related in-line harness connections (if equipped). 3. Disconnect the related component harness connectors. 4. Inspect harness connectors, component connectors, and all male and female terminals for the following conditions: • Proper connector installation. • Damaged connector locks. • Corrosion. • Other signs of water intrusion. • Weather seal damage (if equipped). • Bent terminals. • Overheating due to a poor connection (terminal may be discolored due to excessive current draw). • Terminals that have been pushed back into the connector cavity. • Perform a terminal drag test on each connector terminal to verify proper terminal tension. Repair any conditions that are found. 5. Reconnect all PCM harness connectors. Be certain that all harness connectors are fully seated and the connector locks are fully engaged. 6. Reconnect all in-line harness connectors (if equipped). Be certain that all connectors are fully seated and the connector locks are fully engaged. 7. Reconnect all related component harness connectors. Be certain that all connectors are fully seated and the connector locks are fully engaged. 8. With the scan tool, erase DTCs. 9. Using the recorded Freeze Frame and Environmental Data, along with the When Monitored and Set Conditions above, operate the vehicle in the conditions that set the DTC. 10. With the scan tool, read PCM DTCs. Did the DTC return? Yes • Replace the Powertrain Control Module (PCM) in accordance with the Service Information. (Refer to 08 - Electrical/8E - Electronic Control Modules/MODULE, Powertrain Control/Removal) . • Perform the PCM VERIFICATION TEST. (Refer to 28 - DTC-Based Diagnostics/MODULE, Powertrain Control (PCM) - Standard Procedure). No • Test complete. • Perform the PCM VERIFICATION TEST. (Refer to 28 - DTC-Based Diagnostics/MODULE, Powertrain Control (PCM) - Standard Procedure).
-
P0107 - Manifold Absolute Pressure Sensor Circuit Theory of Operation The Charge Air Cooler Temperature Sensor (CAC) and the Boost Pressure Sensor are combined in one sensor. This combination sensor is called the Temperature/Pressure MAP Sensor. It is located on the EGR Airflow Throttle Control Valve on the Regular Cab. For the Cab and Chassis, it is located on the Intake Manifold. The Cab and Chassis version also receives the Intake Manifold Temperature signal. The Regular Cab still has a separate Intake Manifold Temperature Sensor. The Boost Pressure Sensor is used to measure pressure in the intake manifold. The Powertrain Control Module (PCM) provides a 5-Volt supply and sensor ground for the Boost Pressure Sensor. The Boost Pressure Sensor provides a signal back to the PCM on the Boost Pressure Sensor Signal circuit. The PCM will detect a low signal voltage at operating conditions such as during an idle or a deceleration. The PCM will detect a high signal voltage during high engine load operating conditions. At key on, the readings for the Boost Pressure Sensor, Exhaust Gas Pressure Sensor, and Barometric Pressure Sensor are compared. This fault code occurs if the boost pressure reading is different from the others. During normal engine operation, the PCM estimates the Boost Pressure Sensor value using other fuel system related inputs. The PCM compares the actual Boost Pressure Sensor reading to this estimated value. If the two values are out of range for a calibrated period of time, an error is recorded. When Monitored and Set Conditions When Monitored: This diagnostic runs continuously when the following conditions are met: • With the ignition on. • Battery voltage greater than 10.4 Volts. Set Conditions: • The Powertrain Control Module (PCM) has detected the Boost Pressure Sensor Signal circuit is below a calibrated threshold. Default Actions: • The MIL is illuminated. Possible Causes 5-VOLT SUPPLY CIRCUIT OPEN/HIGH RESISTANCE BOOST PRESSURE SENSOR SIGNAL CIRCUIT SHORTED TO THE BOOST PRESSURE SENSOR RETURN CIRCUIT BOOST PRESSURE SENSOR SIGNAL CIRCUIT SHORTED TO GROUND BOOST PRESSURE SENSOR SIGNAL CIRCUIT OPEN/HIGH RESISTANCE TEMPERATURE/PRESSURE MAP SENSOR POWERTRAIN CONTROL MODULE (PCM) Always perform the Pre-Diagnostic Troubleshooting procedure before proceeding. (Refer to 28 - DTCBased Diagnostics/MODULE, Powertrain Control (PCM) - Standard Procedure). Diagnostic Test 1. ACTIVE DTC NOTE: If there are any 5-Volt supply DTCs present, repair those DTCs before proceeding. 1. Turn the ignition on. 2. With the scan tool, record all Freeze frame data. 3. With the scan tool, erase DTCs. 4. Turn the ignition off for 75 seconds. 5. Turn the ignition on. 6. With the scan tool, read DTCs. Did the DTC reset? Yes • Go To 2 No • Perform to the INTERMITTENT CONDITION diagnostic procedure. (Refer to 28 - DTC-Based Diagnostics/MODULE, Powertrain Control (PCM) - Standard Procedure). 2. CHECK THE (F857) 5-VOLT SUPPLY CIRCUIT FOR AN OPEN/HIGH RESISTANCE 1. Ignition on. 2. Disconnect the Temperature/Pressure MAP (T/P MAP) Sensor harness connector. 3. With a voltmeter, measure the voltage of the (F857) 5-Volt Supply circuit at the T/P MAP Sensor harness connector. Is the voltage reading between 4.9 and 5.1 volts? Yes • Go To 3 No • Repair the (F857) 5-Volt Supply circuit for an open or high resistance. • Perform the POWERTRAIN VERIFICATION TEST - 6.7L. (Refer to 28 - DTC-Based Diagnostics/MODULE, Powertrain Control (PCM) - Standard Procedure). 3. CHECK THE BOOST PRESSURE SENSOR 1. While monitoring the scan tool, connect a jumper between the (F857) 5-Volt Supply circuit and the (K37) Boost Pressure Sensor Signal circuit at the T/P MAP Sensor harness connector. Did the P0108 DTC set? Yes • Replace the Temperature/Pressure MAP Sensor in accordance with the Service Information.(Refer to 14 - Fuel System/Fuel Injection/SENSOR, TMAP-Intake Manifold/Removal) • Perform the POWERTRAIN VERIFICATION TEST - 6.7L. (Refer to 28 - DTC-Based Diagnostics/MODULE, Powertrain Control (PCM) - Standard Procedure). No • Go To 4 4. CHECK FOR THE (K37) BOOST PRESSURE SENSOR SIGNAL CIRCUIT SHORTED TO THE (K916) BOOST PRESSURE SENSOR RETURN CIRCUIT 1. Turn the ignition off. 2. Disconnect the PCM C1 harness connector. 3. Measure the resistance between the (K37) Boost Pressure Sensor Signal circuit and (K916) Sensor Ground circuit at the T/P MAP Sensor harness connector. Is the resistance below 10k Ohms? Yes • Repair the short between the (K37) Boost Pressure Sensor Signal circuit and (K916) Sensor Ground circuit. • Perform the POWERTRAIN VERIFICATION TEST - 6.7L. (Refer to 28 - DTC-Based Diagnostics/MODULE, Powertrain Control (PCM) - Standard Procedure). No • Go To 5 5. CHECK THE (K37) BOOST PRESSURE SENSOR SIGNAL CIRCUIT FOR A SHORT TO GROUND 1. Measure the resistance between ground and the (K37) Boost Pressure Sensor Signal circuit. Is the resistance below 10k Ohms? Yes • Repair the (K37) Boost Pressure Sensor Signal circuit for a short to ground. • Perform the POWERTRAIN VERIFICATION TEST - 6.7L. (Refer to 28 - DTC-Based Diagnostics/MODULE, Powertrain Control (PCM) - Standard Procedure). No • Go To 6 6. CHECK THE (K37) BOOST PRESSURE SENSOR SIGNAL CIRCUIT FOR AN OPEN/HIGH RESISTANCE 1. Measure the resistance of the (K37) Boost Pressure Sensor Signal circuit between the T/P MAP Sensor and the PCM C1 harness connectors. Is the resistance below 5.0 Ohms? Yes • Go To 7. No • Repair the (K37) Boost Pressure Sensor Signal circuit for an open or high resistance. • Perform the POWERTRAIN VERIFICATION TEST - 6.7L. (Refer to 28 - DTC-Based Diagnostics/MODULE, Powertrain Control (PCM) - Standard Procedure). 7. POWERTRAIN CONTROL MODULE 1. Disconnect all PCM harness connectors. 2. Disconnect all related in-line harness connections (if equipped). 3. Disconnect the related component harness connectors. 4. Inspect harness connectors, component connectors, and all male and female terminals for the following conditions: • Proper connector installation. • Damaged connector locks. • Corrosion. • Other signs of water intrusion. • Weather seal damage (if equipped). • Bent terminals. • Overheating due to a poor connection (terminal may be discolored due to excessive current draw). • Terminals that have been pushed back into the connector cavity. • Perform a terminal drag test on each connector terminal to verify proper terminal tension. Repair any conditions that are found. 5. Reconnect all PCM harness connectors. Be certain that all harness connectors are fully seated and the connector locks are fully engaged. 6. Reconnect all in-line harness connectors (if equipped). Be certain that all connectors are fully seated and the connector locks are fully engaged. 7. Reconnect all related component harness connectors. Be certain that all connectors are fully seated and the connector locks are fully engaged. 8. With the scan tool, erase DTCs. 9. Using the recorded Freeze Frame and Environmental Data, along with the When Monitored and Set Conditions above, operate the vehicle in the conditions that set the DTC. 10. With the scan tool, read PCM DTCs. Did the DTC return? Yes • Replace the Powertrain Control Module (PCM) in accordance with the Service Information. (Refer to 08 - Electrical/8E - Electronic Control Modules/MODULE, Powertrain Control/Removal) . • Perform the PCM VERIFICATION TEST. (Refer to 28 - DTC-Based Diagnostics/MODULE, Powertrain Control (PCM) - Standard Procedure). No • Test complete. • Perform the PCM VERIFICATION TEST. (Refer to 28 - DTC-Based Diagnostics/MODULE, Powertrain Control (PCM) - Standard Procedure).
-
I thought the MPG was fixed and ready for the public. Still don't see it for the V2 stuff yet.
-
I was think to change the 0 psi position to 100%.
-
If so you better buy the timing set and get use to doing timing adjustments of the p-pump. That is something I'm glad I never have to do.
-
Yeah it does. Not as bad as the previous but still there. You'll get the up and pulses around 1,200 RPM range. Launching way better. Where it stands out is cruising 30 MPH through Council or Ontario and it starts it mild bucking gotta step up to 35 MPH or drop a gear and do 25 MPH.
-
Make sure you select the right vehicle. V2 98.5 to 2002 Dodge.
-
Ok. Update of the firmware is done. I'll report back after today.
-
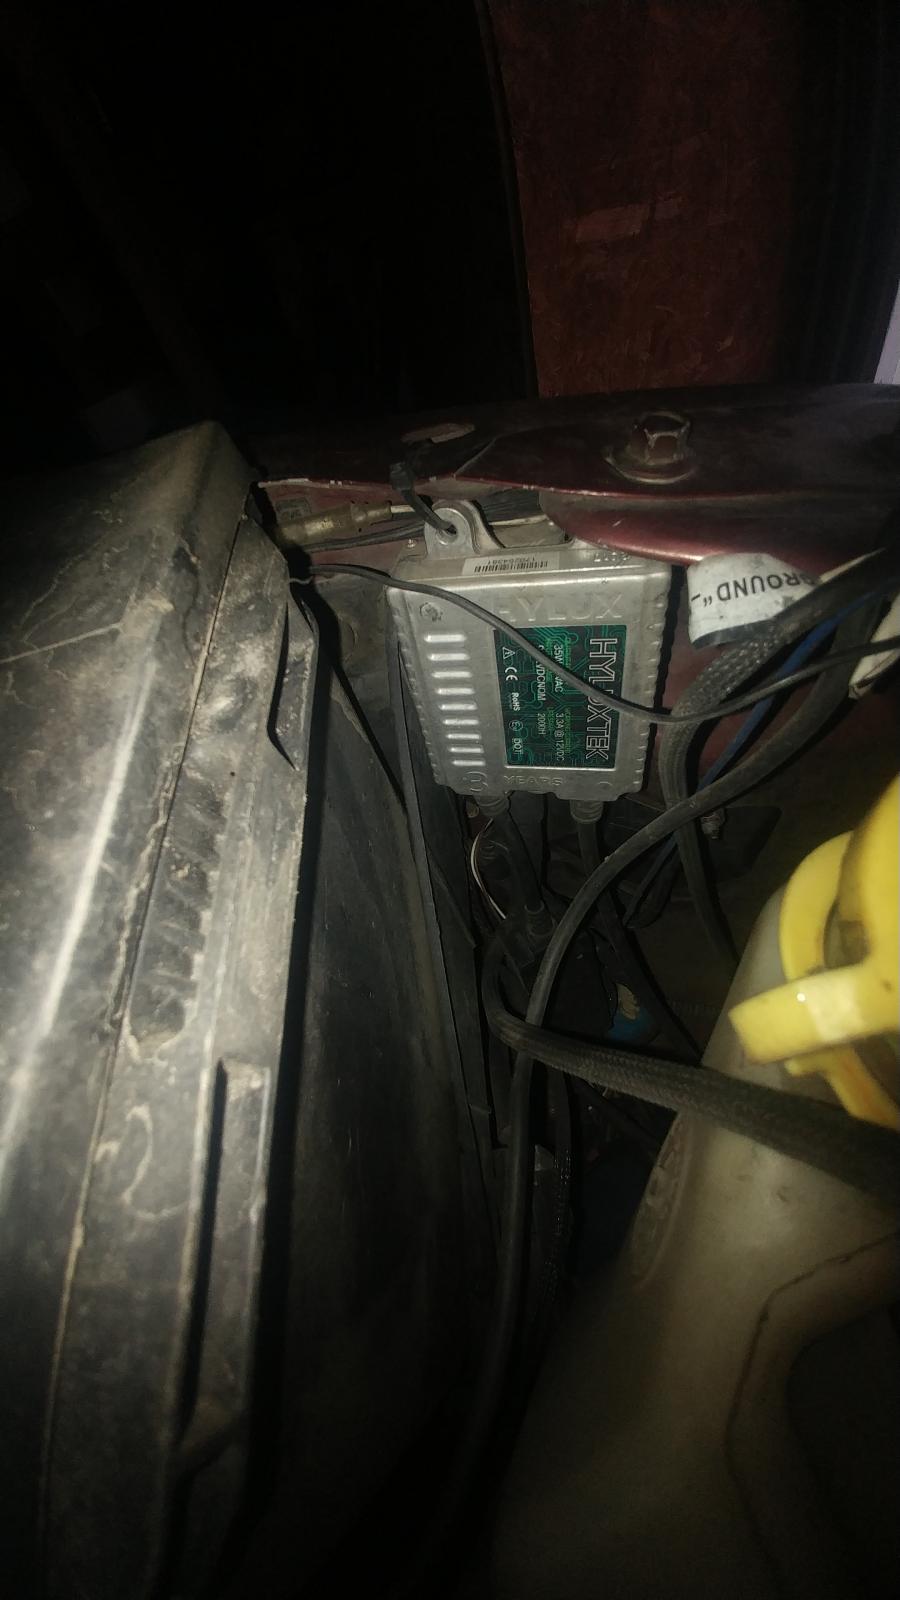
So you back to buying quality headlights housings. I know it sucked big time to spend the $1,000 of front lighting. I'm Highly impressed with the amount of light I cast in the dead of winter and can see up to 1 mile out. Morimoto D2S HID Headlights PIAA 530 LED Driving Lights Switchback marker lights Worth every penny...
-
Problem... Cargo lights are a switched ground (pink/black) with a constant +12V (pink) Brake lights are switched +12V (white/tan)... With constant ground (lt green/black) If the LEDs have common ground then you stuck with what you got. My idea is I'm going to use the factory lighting but switch then all out for LED bulbs. I've been doing the looking at the bulbs and prices.
-
Make sure you change your turn signal bulbs before installing. It will piss you off to have to pull it again because you want to change blown blub or change to switchback LED bulbs like I did.
-
IN 32 years of driving I've NEVER had an explosive tire failure... Don't get me wrong I've had flat tires where pick up a nail and slowly leak down. I'm very aware of what is going on around me and my vehicle and trailers. Most of my tires failures have sidewall rock cuts I've had most of them are unrepairable. Never have I shredded a tire with a violent explosive failure going down the pavement. I've ran everything from China Bomb on the truck to China Bombs on the trailer and still always worn them out.
-
Might read up...A correction, that is a 7 x 0.010 @ 320 bar tune. Version 1.1.0 is a safe tune yet. I've not released my crazy timing tune yet... Coming soon.You'll enjoy those headlights I promise! Ummm... Just zip tie to the fender.